既然 Next.js 內建後端環境,除了處理 Pre-Rendering 和 Server Components 外,還有其他功能可以善用 server 來處理。
今天分享兩個 App Router 中的兩個功能 - Route Handler 與 Server Action。
Route Handler 等同 Pages Router 中的 API Router,顧名思義,我們可以將路由定義成 API endpoint,來處理 HTTP request 和 response。
要如何創建 route handler 呢?
我們只需要在 /app 中的資料夾,建一個 route.ts/js 即可,路由定義的模式跟 page.tsx 相同,也可以使用巢狀、動態路由。
舉例來說,app/api/products/route.ts 即會對應 /api/products 這支 API;app/new_api/profile/route.ts 即會對應 /new_api/profile 這支 API。
但一個資料夾中不能同時有route.ts 和 page.tsx。不然就會吃不到 Page,並跳出 Conflicting route and page 的報錯。
Route handler 支援 GET、POST、PUT、PATCH、DELETE、HEAD、OPTIONS 七種 HTTP methods,假如使用這七種以外的 methods,Next 會 return 405 Method Not Allowed。
要使用哪個 method,就以該 method 當作 export function 的名稱。比方說:
/* app/api/products/route.ts */
export function GET() {
…
}


export function POST(){
…
}
API request 和 response,可以使用 Fetch API 的 Request 和 Response 物件:
/* app/api/hello/route.ts */
export function GET() {
  return Response.json({ message: 'Hello World!' });
}
這時候打 http://localhost:3000/api/hello 這支 API ( GET ),就可以得到
{
  "message": "Hello World!"
}
除了可使用 Fetch API 原生的 Request 和 Response 物件外,Next 也有擴充兩者,開發一個 methods 更多的物件 - NextRequest 和 NextResponse,可以操作 cookies 等等。
想了解的讀者可以參考超連結官方文件,這邊就不細介紹。
除了可以寫 API route 以外,App Router 也以 React Actions 為基礎,推出了一個能不另外寫 API,直接在 client-side 觸發 server 執行 functions 的方法 - Server Actions。
在開始前介紹 Server Actions 前,想先提醒大家兩件事:
- Server Actions 目前還處於實驗階段,不建議在 production stage 使用
- Turbopack 目前不支援 server action
- Server Actions 目前評價兩極,對部分人來說不是一個「優化」的機制,也存在一些資安疑慮,後天會跟大家分享
完賽後補充:Server Actions 已於 Next.js 14 版本進入 stable 版,詳細資訊可參考官方貼文
通常會綁定表單 <form> 使用 ,可以在表單提交後觸發 server 執行某些事項,像是對資料庫 CRUD。
舉個例子:
假如 /user 頁,包含一個註冊表單,和下方一個顯示所有用戶列表的表格。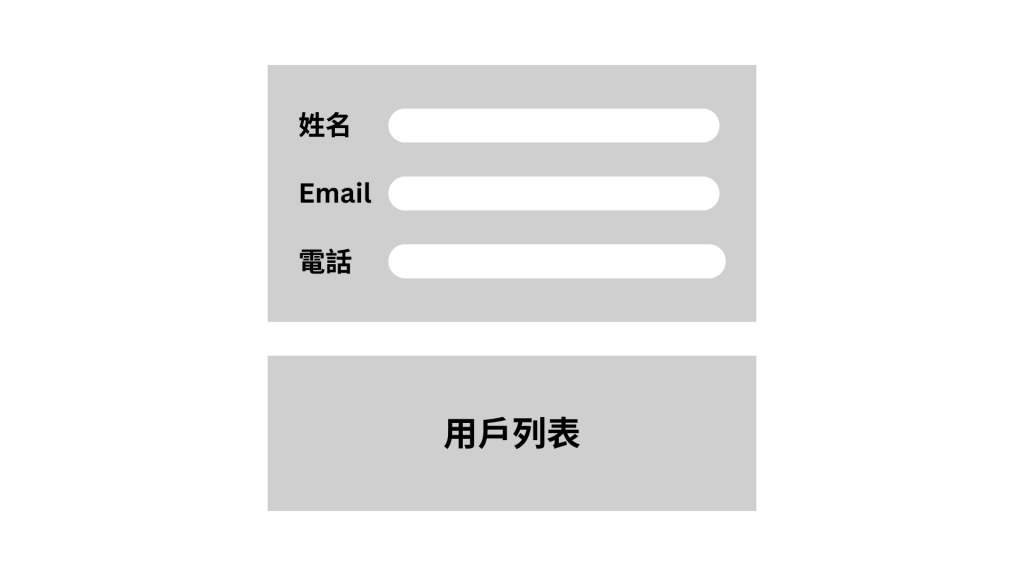
我希望送出註冊表單後,新的用戶會出現在下方表格裡。常見的作法我可能需要寫兩支 API:
但透過 Server Actions,我們可以不開發這兩支 API,直接在 Server Actions 中定義 CRUD 的邏輯,讓用戶提交表單後,會觸發這個 action。
聽起來可能有點抽象,我們直接實作一個 Server Action 來處理上述表單需求:
next.config.js 的設定中啟用 Server Actions:/** @type {import('next').NextConfig} */
const nextConfig = {
experimental: {
serverActions: true,
},
};
module.exports = nextConfig;
app/users/page.tsx 中定義 Server Action saveData()。定義方法很簡單,我在 function 第一行加入 ‘use server’ 即可。const saveData = () => {
'use server';
…
};
假如要讀表單的資料,saveData()可以帶一個FormData資料格式的參數,透過這個參數來取得表單內容。接著就可以在 saveData() 中加入與資料庫互動的邏輯 ( 以 Firebase Cloud Firestore 為例 ):
const saveData = async (formData: FormData) => {
'use server';
// 透過 input name 取得個別 input 的值
const input: UserData = {
name: formData.get('name') as string,
email: formData.get('email') as string,
age: Number(formData.get('age')),
};
// 將使用者輸入的內容存入 Firestore
await addDoc(collection(db, 'users'), input);
};
<form> 加入 action prop,來讓表單提交後觸發 saveData()
/* app/users/page.tsx */
export default async function Page(){
    ...

    return(
        <form action={saveData}>
        ...
        </form>
    )
}
完成後,我們來看使用者提交表單後,會發生什麼事: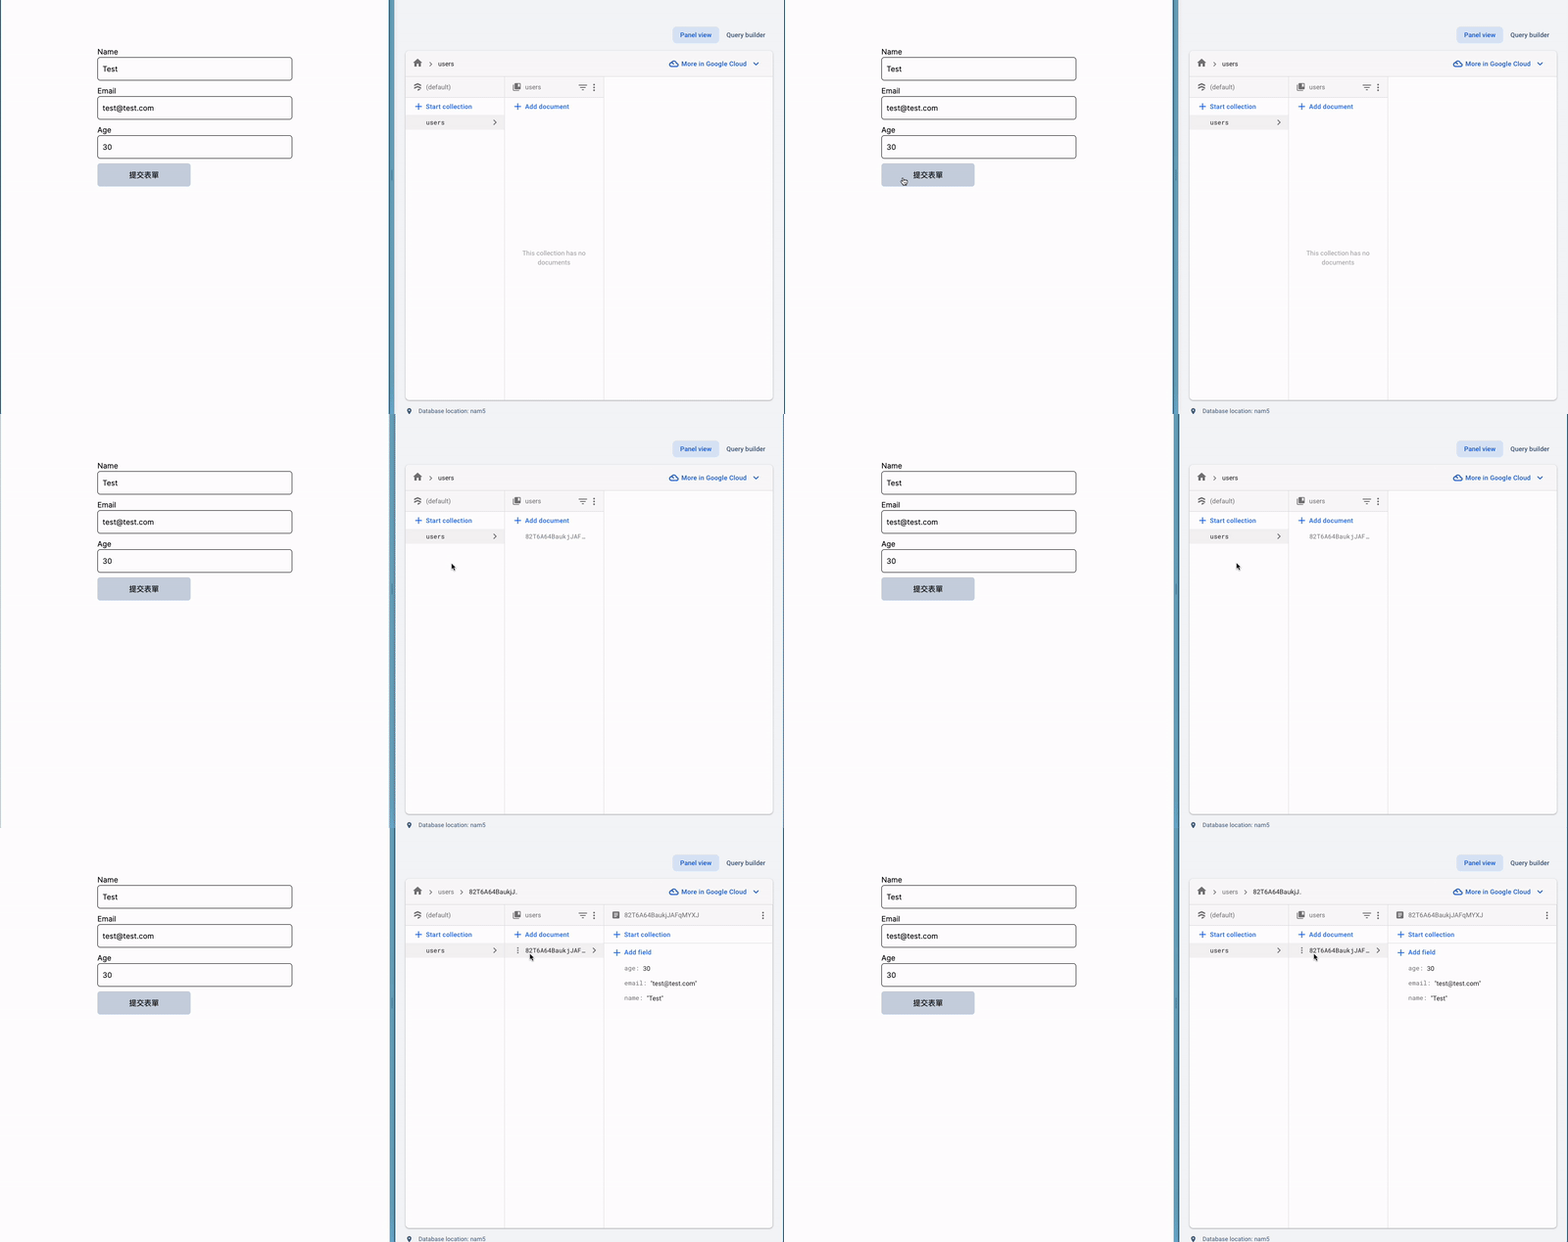
資料有成功被寫入,但使用者列表沒有出現最新的資料,該怎麼讓資料寫入後畫面更新呢?
要讓畫面更新,我們就可以使用 revalidatePath() 來告訴 Next 要重新 fetch 這個 route segment 的資料並重新渲染:
  const saveData = async (formData: FormData) => {
    'use server';
    // 透過 input name 取得個別 input 的值
    const input: UserData = {
      name: formData.get('name') as string,
      email: formData.get('email') as string,
      age: Number(formData.get('age')),
    };
    // 將使用者輸入的內容存入 Firestore
    await addDoc(collection(db, 'users'), input);
    // 告訴 Next 重新 fetch data 和渲染 /users 的內容
    revalidatePath('/users');
  };
我們重新提交表單一次,資料庫更新後,畫面也的確自動更新了!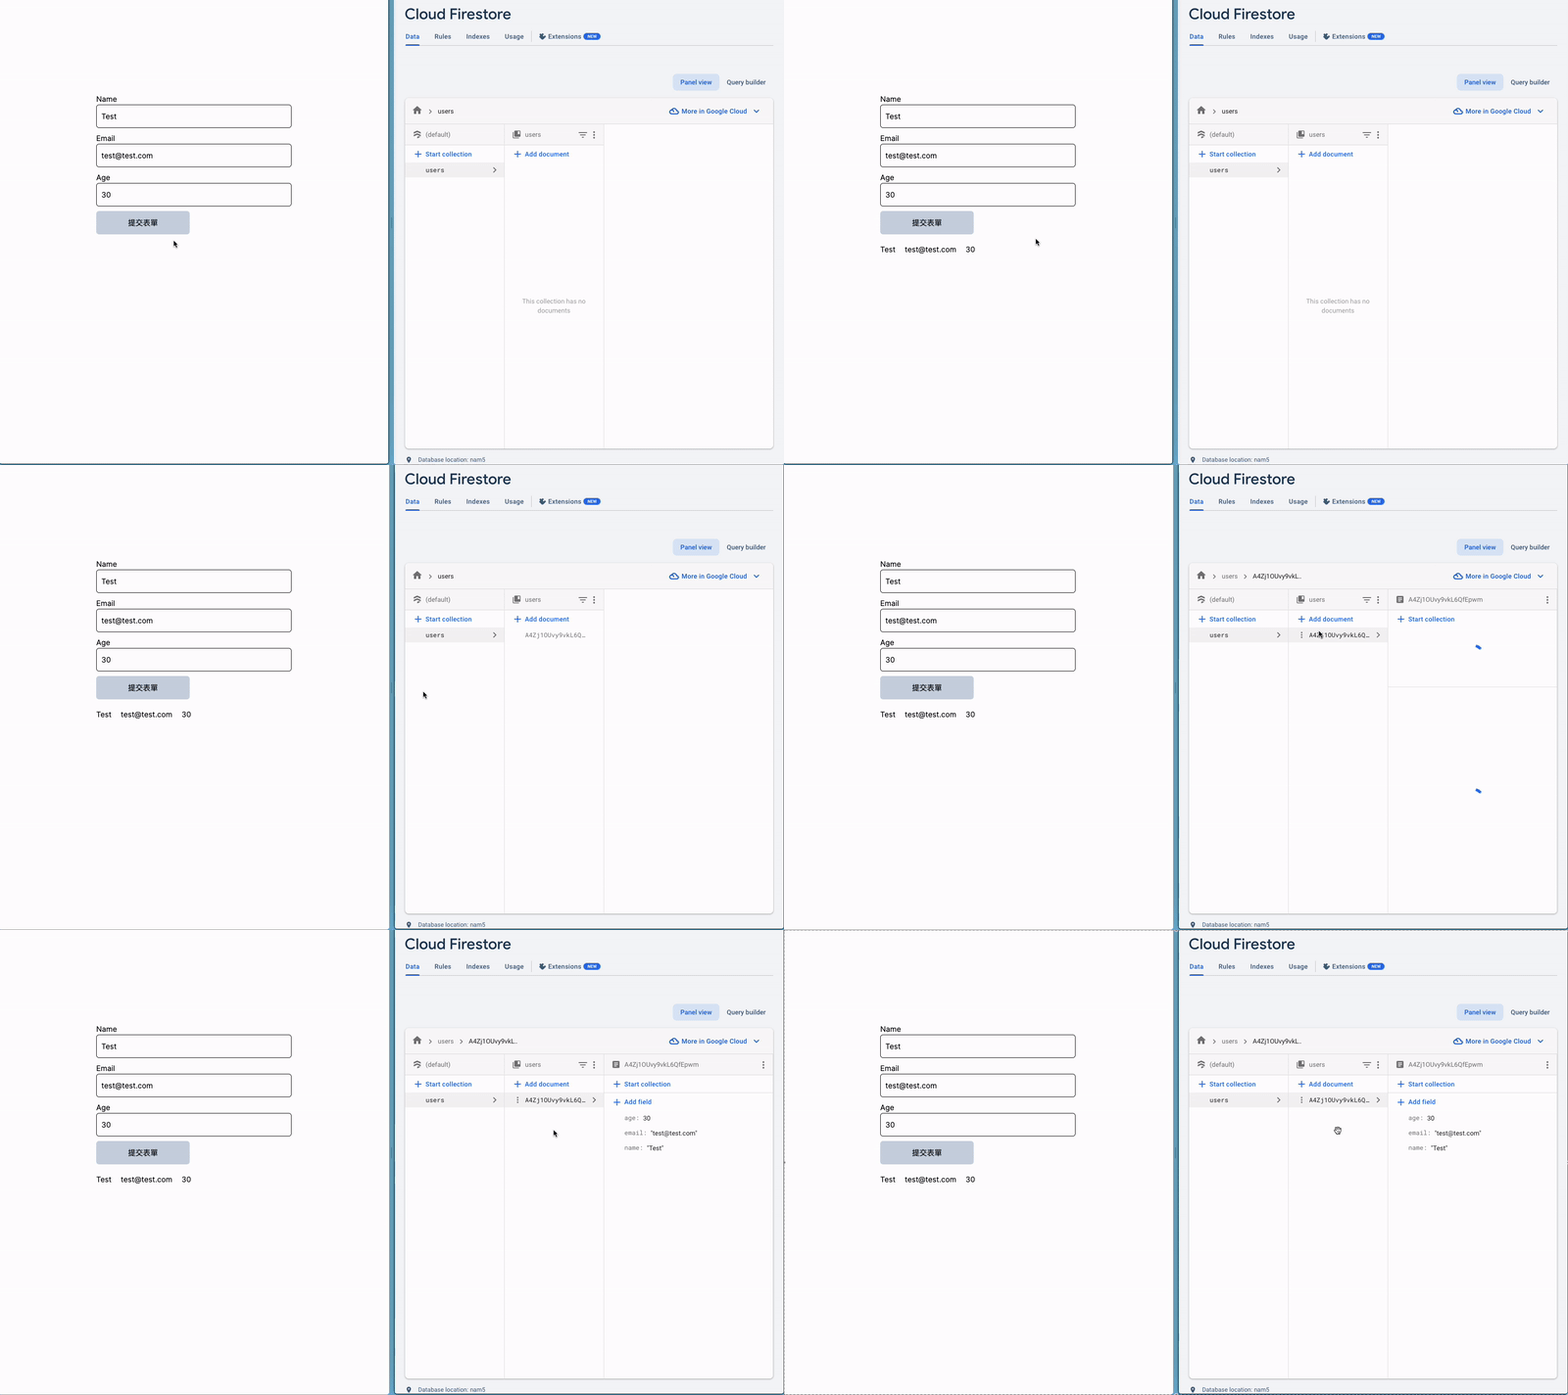
有時候會希望 form 提交時能觸發一些 client-only 的功能,比方透過 ref.current.reset 清空 input。
這時候就會需要在 Client Components 呼叫 Server Actions,該怎麼做呢?
'use server';
/* app/utils/actions.ts */

export const saveData = async (formData: FormData) => {
    ...
};
可以在專門存放 Server Actions 的檔案最上方標記
'use server',告訴 Next 這份檔案都是 Server Actions,就不用在 functions 中個別標記'use server'。不過一旦在檔案最上方標記'use server',這份檔案就只能 export async functions。
/* app/users/Form.tsx */
'use client';

import { saveData } from '../utils/actions';

export default function Form() {
...
  return (
    <>
      <form
        action={saveData}
      >
        ...
      </form>
    </>
  );
}
ref.current.reset():/* app/users/Form.tsx */
'use client';
import { useRef } from 'react';
import { saveData } from '../utils/action';
export default function Form() {
const ref = useRef<HTMLFormElement>(null);
// 新增 function
const onSubmit = async (formData: FormData) => {
ref.current?.reset();
await saveData(formData);
};
return (
<>
<form
ref={ref}
action={onSubmit}
>
...
</form>
</>
);
}
完成後,當我們提交表單,輸入框會先清空,資料也能正確寫入資料庫,底下使用者清單也可以正常更新。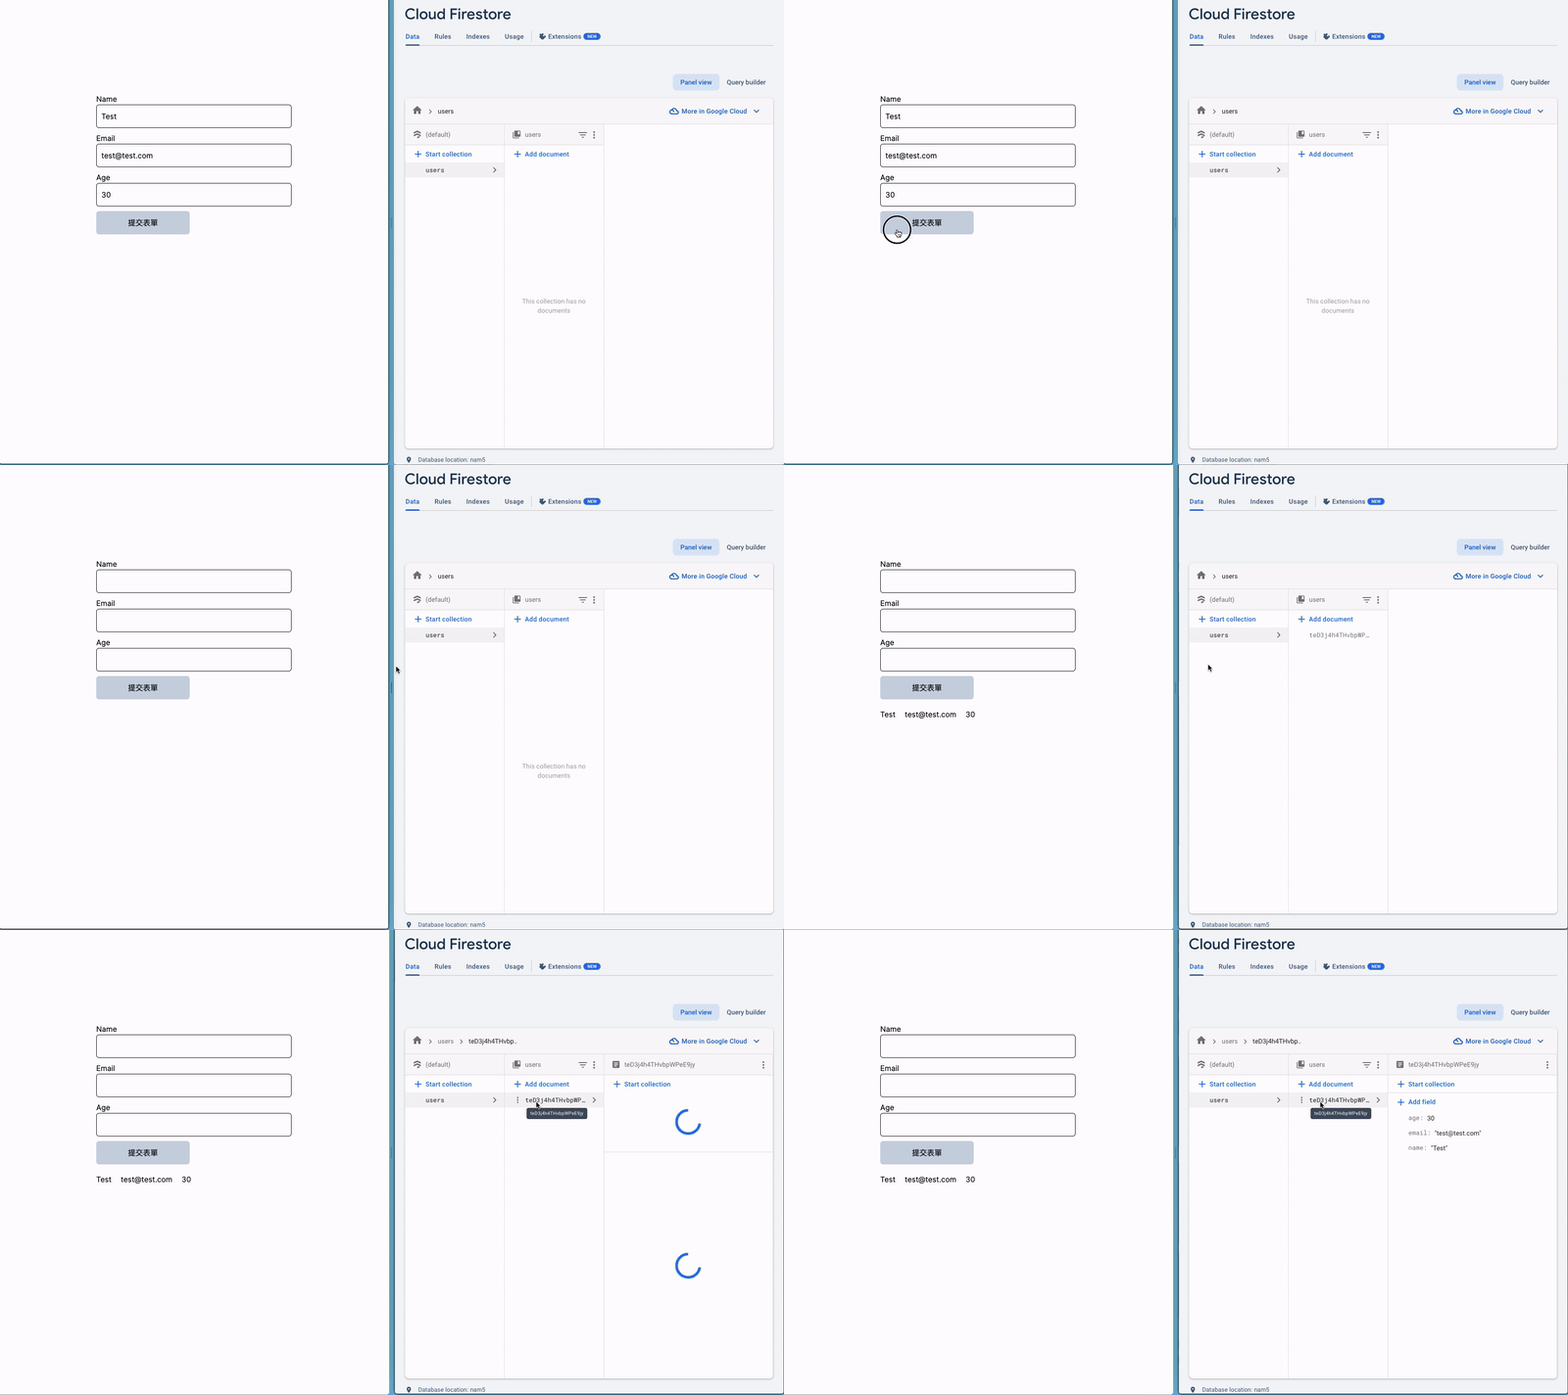
小提醒:假如要在 Client Components 中加入 Server Components,記得要用傳 props 的方式 ( 可以參考 Day 12 的文章)
透過 props 傳 Server Actions
假如要在 Client Components 使用,也可以在 Server Components 中定義 Server Actions,再透過 props 傳到 Client Components:
'use client'

export default function ClientComponent({ serverAction }) {
  return (
    <form action={serverAction}>
      <input type="text" name="name" />
      <button type="submit">Update Item</button>
    </form>
  )
}
import React from 'react'
import ClientComponent from './ClientComponent'

export default function ServerComponent() {
  const saveData = () => {
    'use server';
    ...
  };

  return (
    <>
    <ClientComponent serverAction={saveData} />
    </>
  )
}
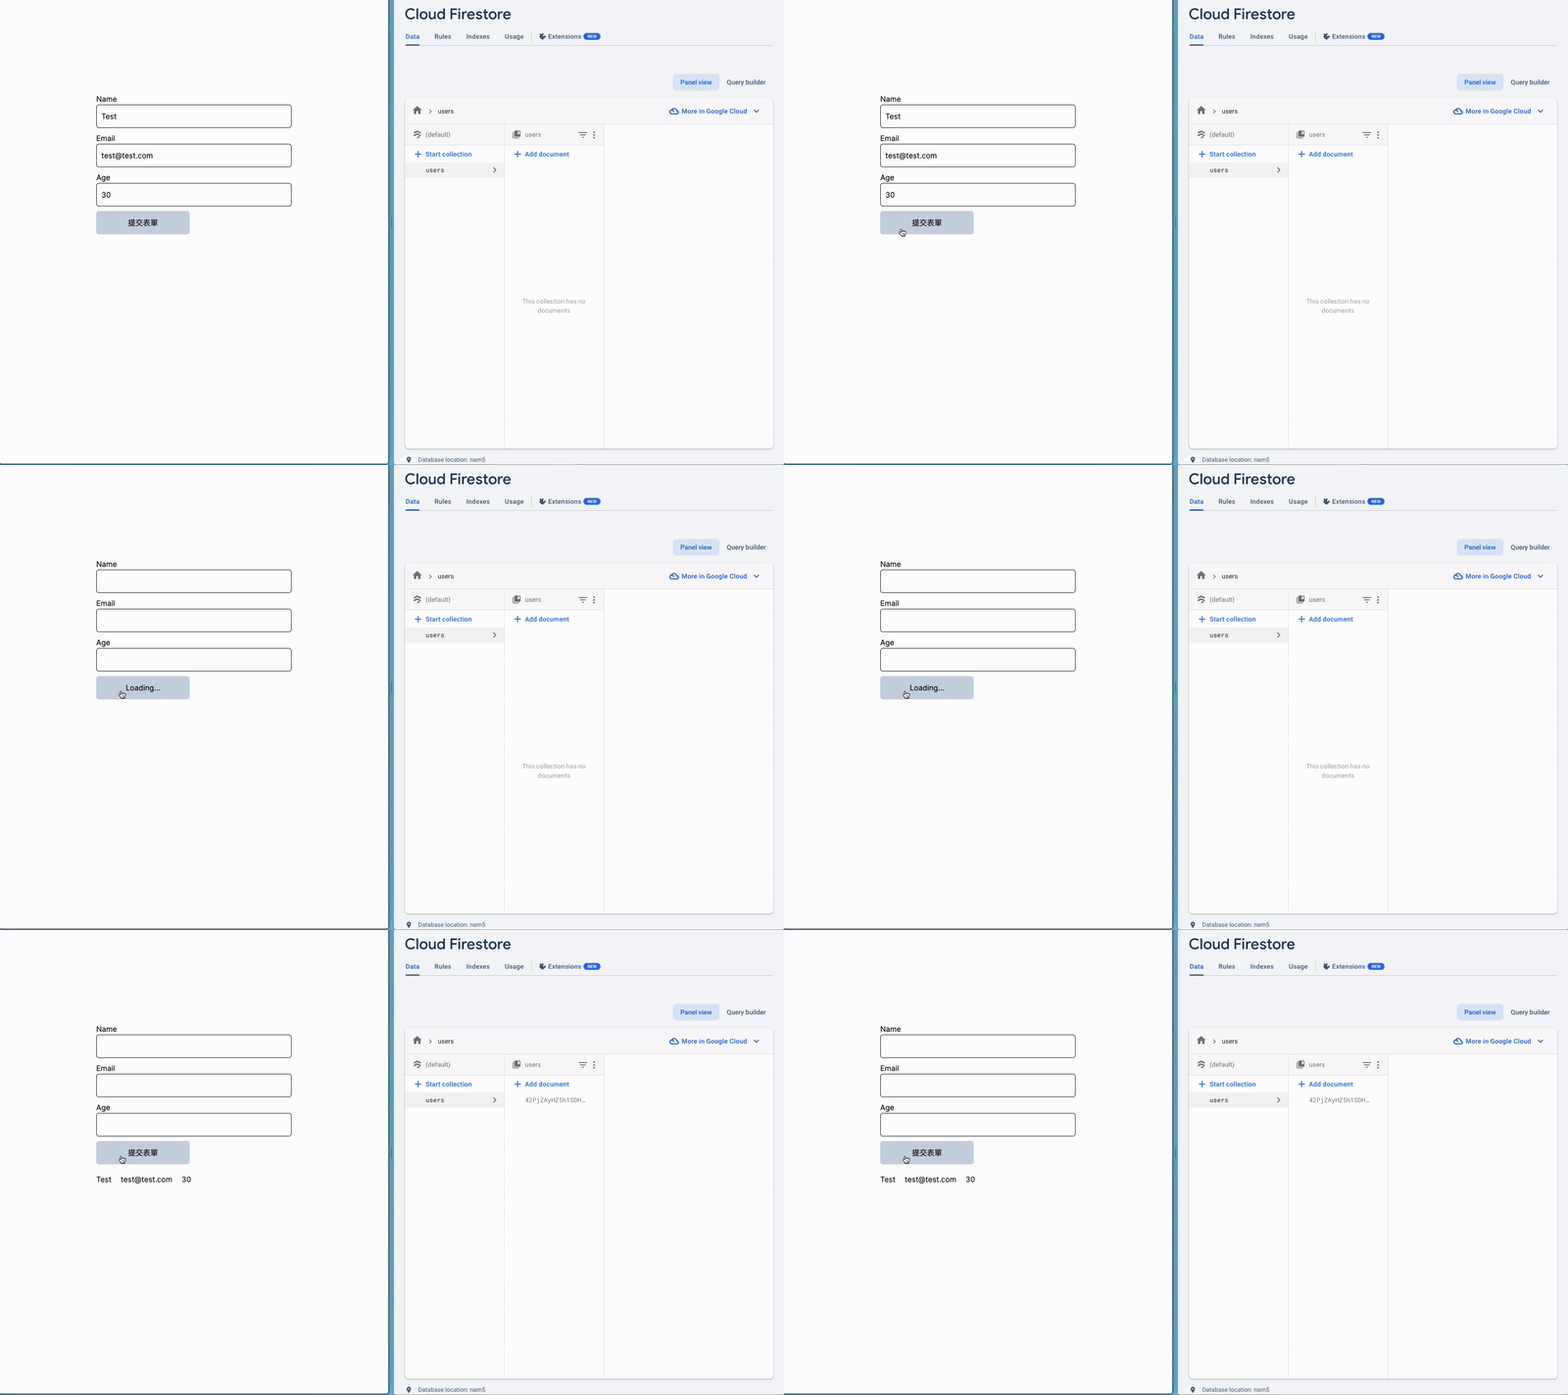
從上面的 demo 影片可以發現,按下「提交表單」到使用者清單更新,會有一段等待時間。假如想強化 UX,可以搭配 useFormStatus() 在這段期間加入 loading 特效。
我們可以透過 useFormStatus 其中一個 value pending,來判斷表單提交是否還在處理中。
比方說,我可以讓表單 pending 時按鈕的文字顯示「loading...」:
/* app/users/Button.tsx */
'use client';
import { experimental_useFormStatus as useFormStatus } from 'react-dom';

export default function Button() {
  const { pending } = useFormStatus();

  return (
    <button
      type='submit'
    >
      {pending ? 'Loading...' : '提交表單'}
    </button>
  );
}
小提醒:目前 useFormStatus 只能在 Client Components 中使用
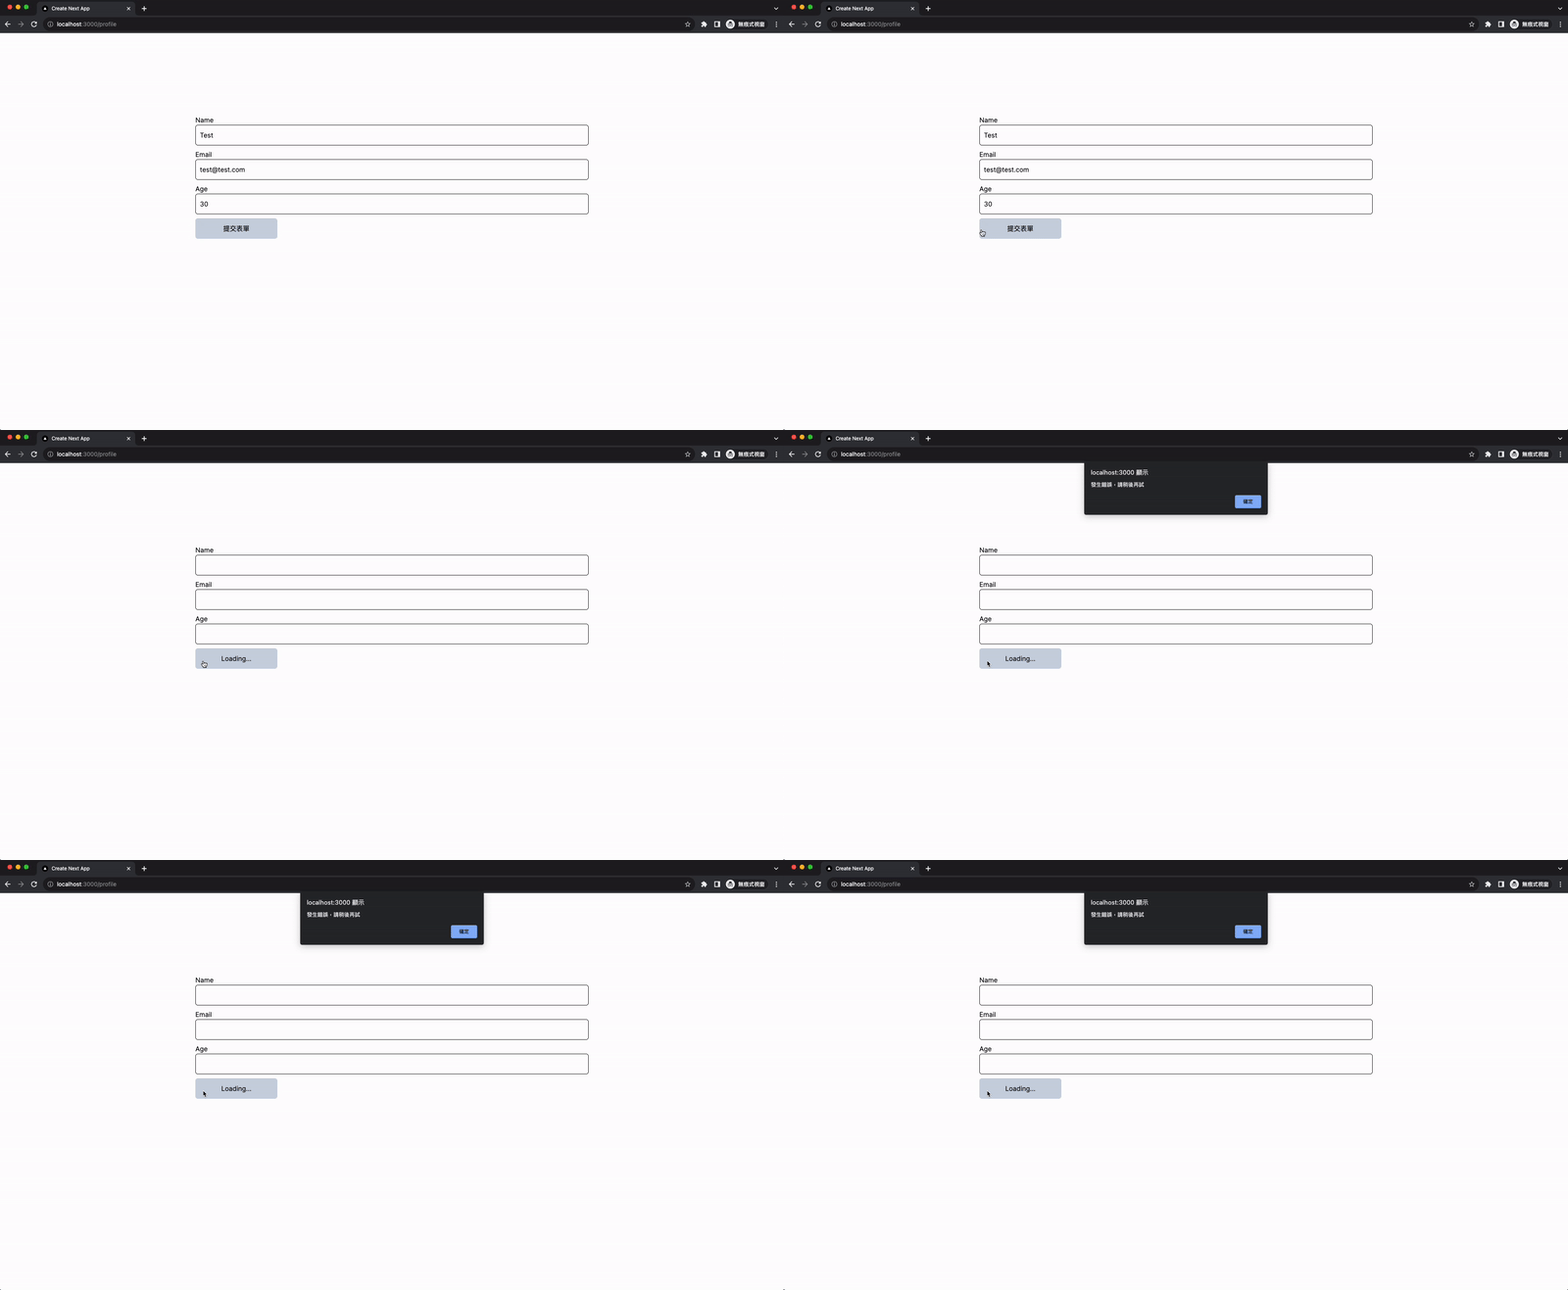
假如使用 API,可以透過 status code 或 response messages,讓 client 知道發生什麼錯誤。假如使用 Server Actions,當 actions 發生問題有辦法讓 client 知道嗎?
我們可以在 Server Actions 中加入 try...catch...邏輯,在 actions 執行成功或失敗時 return 一個 serializable 的物件 (ex: 一段文字):
/* app/utils/actions.ts */
export const saveData = async (formData: FormData) => {
  'use server';

  const input: UserData = {
    name: formData.get('name') as string,
    email: formData.get('email') as string,
    age: Number(formData.get('age')),
  };
  // 回傳一個{status: ...} 的物件告訴 client 執行結果
  try {
    await addDoc(collection(db, 'users'), input);
    revalidatePath('/users');
    return { status: 'success' };
  } catch (error) {
    return { status: 'error' };
  }
};
我們在 Form 中就可以依照回傳的 status,做後續處理:
/* app/users/Form.tsx */

'use client';
import { useRef } from 'react';
import { saveData } from '../utils/action';

export default function Form({ children }: { children: React.ReactNode }) {
  const ref = useRef<HTMLFormElement>(null);

  const onSubmit = async (formData: FormData) => {
    ref.current?.reset();
    // 透過 response.status 判斷是否發生錯誤
    const response = await saveData(formData);
    response.status === 'error' && alert('發生錯誤,請稍後再試');
  };

  return (
    <>
      <form ref={ref} action={onSubmit}>
      ...
      </form>
    </>
  );
}
小提醒:目前 error state 也只能在 Client Components 中使用
Server Actions 也可以設置、讀取、刪除 cookies:
'use server'

import { cookies } from 'next/headers'

export async function create() {
  const cart = await createCart()
  cookies().set('cartId', cart.id)
}

export async function read() {
  const auth = cookies().get('authorization')?.value
  // ...
}

export async function delete() {
  cookies().delete('name')
  // ...
}
至於 server-side 表單 input 的驗證,基本可以使用 input 的 type 和 required 屬性。假如要比較進階的驗證,可以使用像是 Zod 等 library;當 Server Actions 處理完資料,除了 revalidate 外,也可以用 redirect 轉址到其他 URL,怕篇幅太長,就不多做介紹。有興趣的讀者可以參考官方文件:
今天主要跟大家分享 Route Handler 和 Server Actions 的基本使用方式。但眼尖的讀者可能發現,Server Actions 的範例都是在表單提後觸發。
有辦法在一個表單中透過多個按鈕觸發多個 Server Actions 嗎?或甚至在表單以外使用 Server Actions 嗎?這部分就留到明天分享囉!
至於想了解 Server Actions 原理的讀者,我後天會和大家分享,再請稍加等候。
謝謝大家耐心的閱讀,我們明天見!

完賽後補充:Server Actions 已於 Next.js 14 版本進入 stable 版,詳細資訊可參考官方貼文
官方貼文連結是 404
已修正,感謝提醒!