
昨天介紹了metric aggregation與bucket aggregation
不過在介紹Pipeline aggregation之前還有一些東西需要補充
在使用aggregation時,我們可以
GET /index-name/_search
{
  "query": {
    ...
  },
  "aggs": {
		...
  }
}
GET /index_name/_search
{
  "aggs": {
    "first-aggregation-name": {
      "terms": {
        "field": "my-field"
      }
    },
    "second-aggregation-name": {
      "avg": {
        "field": "my-other-field"
      }
    }
  }
}
GET /orders/_search
{
  "size": 0,
  "aggs": {
    "ouside_agg_name": {
      "terms": {
        "field": "status"
      },
      "aggs": { // 在上面分組完後,內部再進行一次聚合
        "nested_agg_name": {
          "avg": {
            "field": "total_amount"
          }
        }
      }
    }
  }
}
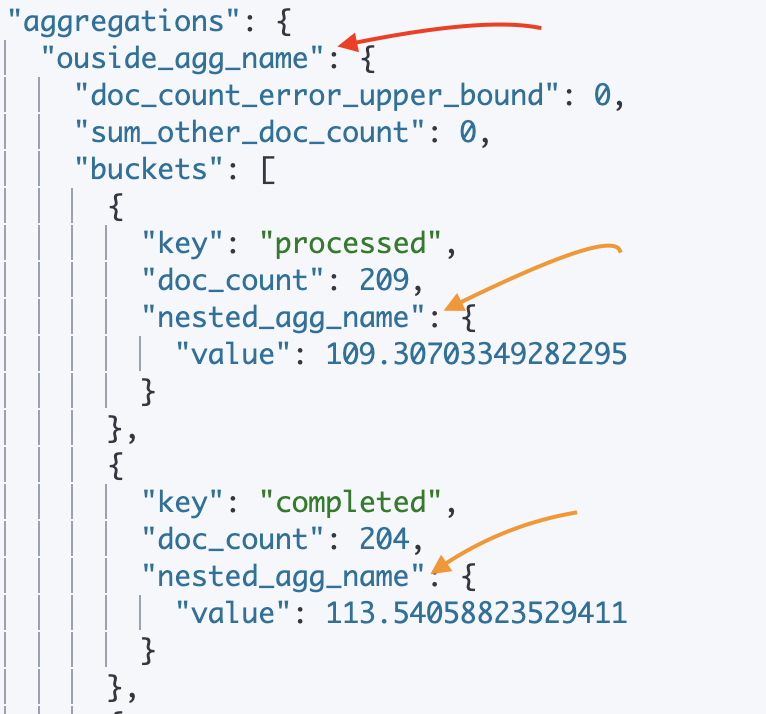
可以看到紅箭頭會先把資料分成不同bucket,每個bucket內部再進行metric aggregation
GET /inde_name/_search?size=0
{
  "runtime_mappings": {
    "message.length": {
      "type": "long",
      "script": ""
    }
  },
  "aggs": {
    "message_length": {
      "histogram": {
        "field": ""
      }
    }
  }
}
GET /index_name/_search?size=0
{
  "aggs": {
    "resellers": {
      "nested": {
        "path": "obj" // nested_field_name
      },
      "aggs": {
        "min_price": {
          "min": {
            "field": "obj.price" // 用.來找到sub_field
          }
        }
      }
    }
  }
}
GET /index_name/_search
{
  "aggs": {
    "NAME": {
      "terms": {
        "field": ""
      },
      "missing": {
        "field": ""
      }
    }
  }
}
總結一下這些技巧在實際操作可能流程如下
接下來我們就進到最後的pipeline aggregation
Pipeline aggregation:
AGG_SEPARATOR       =  `>` ;
METRIC_SEPARATOR    =  `.` ;
AGG_NAME            =  <the name of the aggregation> ;
METRIC              =  <the name of the metric (in case of multi-value metrics aggregation)> ;
MULTIBUCKET_KEY     =  `[<KEY_NAME>]`
PATH                =  <AGG_NAME><MULTIBUCKET_KEY>? (<AGG_SEPARATOR>, <AGG_NAME> )* ( <METRIC_SEPARATOR>, <METRIC> ) ;
實際寫起來可能是像下面這樣
multi_bucket["foo"]>single_bucket>multi_metric.avg
"buckets_path": "agg_name"
那我們來介紹幾個不同的bucket aggregation~
Avg bucket aggregation:
接著我們來稍微示範一下使用的方法
PUT /test_pipeline_aggregation
{
  "mappings": {
    "properties": {
      "date": {
        "type": "date",
        "format": "yyyy-MM-dd"
      },
      "show_counts": { //當日網站曝光數
        "type": "integer"
      },
      "click_counts": { //當日網站點擊數
        "type": "integer"
      },
      "spend_time": {   //當日使用者平均停留在網站的秒數
        "type": "integer"
      }
    }
  }
}
PUT /_bulk
{"index": {"_index": "test_pipeline_aggregation"}}
{"date": "2023-01-01", "show_counts": 25, "click_counts": 3, "spend_time": 11}
{"index": {"_index": "test_pipeline_aggregation"}}
{"date": "2023-01-15", "show_counts": 42, "click_counts": 3, "spend_time": 10}
{"index": {"_index": "test_pipeline_aggregation"}}
{"date": "2023-02-01", "show_counts": 82, "click_counts": 0, "spend_time": 13}
{"index": {"_index": "test_pipeline_aggregation"}}
{"date": "2023-02-15", "show_counts": 89, "click_counts": 4, "spend_time": 15}
{"index": {"_index": "test_pipeline_aggregation"}}
{"date": "2023-03-01", "show_counts": 109, "click_counts": 2, "spend_time": 9}
{"index": {"_index": "test_pipeline_aggregation"}}
{"date": "2023-03-15", "show_counts": 121, "click_counts": 4, "spend_time": 15}
{"index": {"_index": "test_pipeline_aggregation"}}
{"date": "2023-04-01", "show_counts": 138, "click_counts": 6, "spend_time": 15}
{"index": {"_index": "test_pipeline_aggregation"}}
{"date": "2023-04-15", "show_counts": 141, "click_counts": 4, "spend_time": 16}
{"index": {"_index": "test_pipeline_aggregation"}}
{"date": "2023-05-01", "show_counts": 151, "click_counts": 3, "spend_time": 21}
{"index": {"_index": "test_pipeline_aggregation"}}
{"date": "2023-05-15", "show_counts": 201, "click_counts": 5, "spend_time": 19}
{"index": {"_index": "test_pipeline_aggregation"}}
{"date": "2023-06-01", "show_counts": 292, "click_counts": 7, "spend_time": 18}
{"index": {"_index": "test_pipeline_aggregation"}}
{"date": "2023-06-15", "show_counts": 320, "click_counts": 8, "spend_time": 21}
{"index": {"_index": "test_pipeline_aggregation"}}
{"date": "2023-07-01", "show_counts": 439, "click_counts": 9, "spend_time": 25}
{"index": {"_index": "test_pipeline_aggregation"}}
{"date": "2023-07-15", "show_counts": 401, "click_counts": 6, "spend_time": 22}
{"index": {"_index": "test_pipeline_aggregation"}}
{"date": "2023-08-01", "show_counts": 385, "click_counts": 3, "spend_time": 18}
{"index": {"_index": "test_pipeline_aggregation"}}
{"date": "2023-08-15", "show_counts": 408, "click_counts": 6, "spend_time": 23}
{"index": {"_index": "test_pipeline_aggregation"}}
{"date": "2023-09-01", "show_counts": 457, "click_counts": 8, "spend_time": 23}
{"index": {"_index": "test_pipeline_aggregation"}}
{"date": "2023-10-01", "show_counts": 605, "click_counts": 11, "spend_time": 31}
{"index": {"_index": "test_pipeline_aggregation"}}
{"date": "2023-11-01", "show_counts": 517, "click_counts": 15, "spend_time": 49}
{"index": {"_index": "test_pipeline_aggregation"}}
{"date": "2023-12-01", "show_counts": 463, "click_counts": 8, "spend_time": 60}
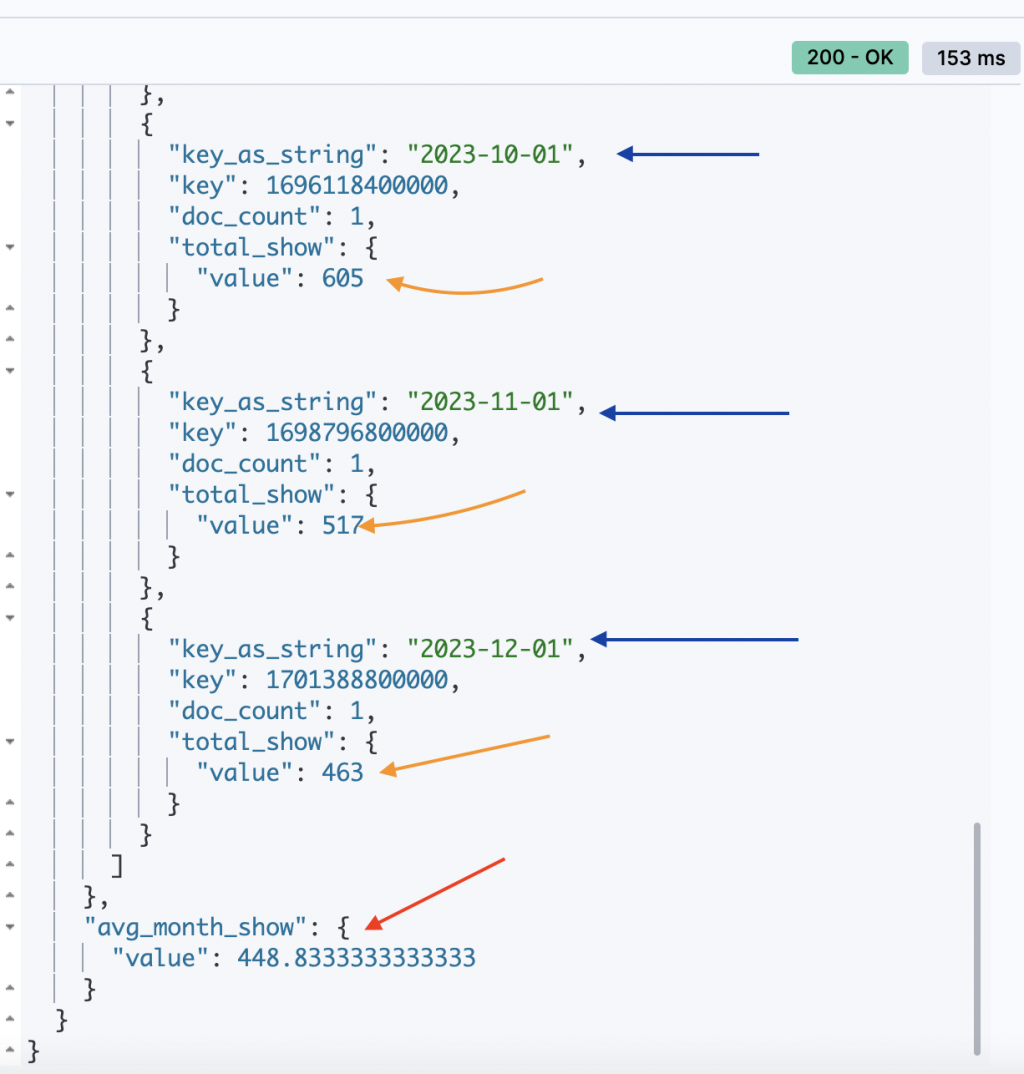
GET /test_pipeline_aggregation/_search
{
  "size": 0,
  "aggs": {
    "show_per_month": {
      "date_histogram": {
        "field": "date",
        "calendar_interval": "month"
      },
      "aggs": {
        "total_show": {
          "sum": {
            "field": "show_counts"
          }
        }
      }
    },
    "avg_month_show": {
      "avg_bucket": {
        "buckets_path": "show_per_month>total_show"
      }
    }
  }
}
Derivative aggregation:
在下面的範例中,我們先計算一階導數,看一下點擊次數每月的變化
GET /test_pipeline_aggregation/_search
{
  "size": 0,
  "aggs": {
    "show_per_month": {
      "date_histogram": {
        "field": "date",
        "calendar_interval": "month"
      },
      "aggs": {
        "total_click": {
          "sum": {
            "field": "click_counts"
          }
        },
        "click_deriv": {
          "derivative": {
            "buckets_path": "total_click"
          }
        }
      }
    }
  }
}
結果如下:
  "aggregations": {
    "show_per_month": {
      "buckets": [
        {
          "key_as_string": "2023-01-01",
          "key": 1672531200000,
          "doc_count": 2,
          "total_click": {
            "value": 6
          }
        },
        {
          "key_as_string": "2023-02-01",
          "key": 1675209600000,
          "doc_count": 2,
          "total_click": {
            "value": 4
          },
          "click_deriv": {
            "value": -2
          }
        },
        {
          "key_as_string": "2023-03-01",
          "key": 1677628800000,
          "doc_count": 2,
          "total_click": {
            "value": 6
          },
          "click_deriv": {
            "value": 2
          }
Cumulative sum aggregation:
GET /test_pipeline_aggregation/_search
{
  "size": 0,
  "aggs": {
    "show_per_month": {
      "date_histogram": {
        "field": "date",
        "calendar_interval": "month"
      },
      "aggs": {
        "total_users_used": {
          "sum": {
            "field": "spend_time"
          }
        },
        "spend_time_cumulative_sum": {
          "cumulative_sum": {
            "buckets_path": "total_users_used"
          }
        }
      }
    }
  }
}
結果如下:
  "aggregations": {
    "show_per_month": {
      "buckets": [
        {
          "key_as_string": "2023-01-01",
          "key": 1672531200000,
          "doc_count": 2,
          "total_users_used": {
            "value": 21
          },
          "spend_time_cumulative_sum": {
            "value": 21
          }
        },
        {
          "key_as_string": "2023-02-01",
          "key": 1675209600000,
          "doc_count": 2,
          "total_users_used": {
            "value": 28
          },
          "spend_time_cumulative_sum": {
            "value": 49
          }
        },
        {
          "key_as_string": "2023-03-01",
          "key": 1677628800000,
          "doc_count": 2,
          "total_users_used": {
            "value": 24
          },
          "spend_time_cumulative_sum": {
            "value": 73
          }
設計簡單的運算,我們可以不一定需要使用pipeline aggreation
我們可以使用bucket跟metric的組合
但是當牽扯更複雜的運算,或是需要產出中間值來生成結果
使用pipeline aggregation能更幫助我們做到更多的事情~
明天就是search部分的最後一天,後天開始就會進到更進階一點的內容上~
參考資料
aggregation:
https://www.elastic.co/guide/en/elasticsearch/reference/current/search-aggregations.html
pipeline aggregation:
https://www.elastic.co/guide/en/elasticsearch/reference/current/search-aggregations-pipeline.html
https://blog.csdn.net/UbuntuTouch/article/details/103539437

 iThome鐵人賽