今天來談談 Pulumi 的 Resource。在 Pulumi 中,常用的有兩種 Resource,分別為 Custom Resource 與 Component Resource。
Custom Resource 其實在前面的文章中已經用的很熟悉了,VPC、Subnet 等由 Provider 提供的 Resource 皆是 Custom Resource。下面列了官方的 Source Code,可以從中看到 VPC 其實就是繼承自 CustomResource。Custom Resource 通常都代表了一個雲端的資源,當 Custom Resource 的參數有任何修改時,通常也代表著需要更新雲端相關資源的狀態。
/**
 * Resource Type definition for AWS::EC2::VPC
 */
export class Vpc extends pulumi.CustomResource {
...
}
Component Resource 則為一個邏輯上容器的概念,可以將多個 Resource 組合成一個 Component Resource。在建立 Resource 時,第一個參數永遠都是 name,Component Resource 也不例外。這個名稱就可以讓我們將多個 Resource 放置於一個有意義名稱的容器中。
在 [Day 06] 善用程式語言優勢撰寫 Pulumi IaC 文中就已經看到,我們善用程式語言的特性,使用函式、類別來建立資源。並不一定需要用到 Component Resource。那為何還需要有 Component Resource 呢?
這是因為如果將建立資源包裝成函式或類別,這樣的組合也只能在程式碼中看到。對 Pulumi 引擎來說,他並不清楚到底這些資源之間的關係為何。當我們使用 pulumi stack 指令查看所有資源時,也看不出他們之間的邏輯關係。
但如果我們使用 Component Resource 來包裝相關的資源,Pulumi 引擎就能認得這些資源之間的隸屬關係,也會多一個 Component Resource 的名稱在 pulumi stack 指令的輸出中。
例如我們可以將 Subnet、RouteTable、RouteTableAssociate 放進一個稱為 PrivateSubnet 的 Component Resource 中。就可以看到如下的關係。
Component Resource - PrivateSubnet
├─ CustomResource - aws.ec2.Subnet
├─ CustomResource - aws.ec2.RouteTable
└─ CustomResource - aws.ec2.RoutaTableAssociate
建立 Component Resource 的方法很簡單,只要將類別繼承自 Component Resource 即可。
class MyComponentResource extends pulumi.ComponentResource {
    constructor (name: string, args: Record<string, pulumi.Input>, opts: pulumi.ComponentResourceOptions) {

    }
}
在 MyComponentResource 中,我們可以自行設計建構子的參數,但建議與其他 Resource 的慣例一樣,使用 name, args, opts。
其中 name 代表著這個 Component Resource 的名稱,args 為建立這個 component 會用到的參數,而 opts 可放置其他選項,這個參數通常型別為 ComponentResourceOptions。
建構子中,第一行我們需要呼叫父類別的建構子,並且傳送 4 個參數,分別為 type、name、args、opts。
這四個參數只有 type 不是由建構子提供,需要我們手動填寫一個唯一的名稱做為 ComponentResource 的型別。例如我們可以使用我們的 package 名稱、檔案名稱、Component Resource 名稱來取這個唯一的 type name。例如這個 MyComponentResource 是放在 myPulumiInfra 專案中的 myVpc.ts 檔案內的 MyComponent,就可將 type 取名為:myPulumiInfra:myVpc:MyComponent。這個 type name 只要確保跟別人不同不會衝突即可。
class MyComponentResource extends pulumi.ComponentResource {
    constructor (name: string, args: Record<string, pulumi.Input>, opts: pulumi.ComponentResourceOptions) {
        super('myPulumiInfra:myVpc:MyComponent', name, args, opts)
    }
}
接著唯一要做的就是將其餘需要建立的資源都放在建構子中即可。要注意的是,我們必須將目前的物件傳遞給我們要建立的資源,這樣 pulumi 引擎才會知道資源之間的關係。
例如以下例子即是建立一個 VPC,並在第三個參數中使用 parent 將 MyComponentResource 的 instance 傳遞給 Vpc。
class MyComponentResource extends pulumi.ComponentResource {
    constructor (name: string, args: Record<string, pulumi.Input>, opts: pulumi.ComponentResourceOptions) {
        super('myPulumiInfra:myVpc:MyComponent', name, args, opts)
        const myVpc = new aws.ec2.Vpc(`${name}-vpc`, {
          cidrBlock: "10.120.0.0/16"
        }, { parent: this });
    }
}
最後我們使用 [Day 06] 善用程式語言優勢撰寫 Pulumi IaC 文中的 PrivateSubnet 類別做為範例。原本的 PrivateSubnet 是一個單純的類別,並沒有辦法讓 Pulumi 知道這是一個邏輯的容器。我們可以重構這個類別,讓他變成 Component Resource。
class PrivateSubnet extends pulumi.ComponentResource {
}
    constructor(name: string, args: CreatePrivateSubnetArgs, opts: pulumi.ComponentResourceOptions = {}) {
        ...
    }
    constructor(name: string, args: CreatePrivateSubnetArgs, opts: pulumi.ComponentResourceOptions) {
        super("aws-vpc-ts:privateSubnet:PrivateSubnet", name, args, opts);
        ...
    }
...
    const subnet = new aws.ec2.Subnet(`${name}-${args.az}`, {...}, { parent: this });

    const rt = new aws.ec2.RouteTable(`${name}-${args.az}-rt`, {...}, { parent: this });

    new aws.ec2.RouteTableAssociation(`${name}-${args.az}-rt-association`, {...}, { parent: this });
...
最後使用 pulumi up,就可以看到 Component Resource 所建立的階層:
     Type                                       Name                                                 Status
 +   pulumi:pulumi:Stack                        aws-vpc-ts-dev                                       created (2s)
 +   ├─ aws-vpc-ts:privateSubnet:PrivateSubnet  my-private-subnet-ap-northeast-1c                    created (1s)
 +   │  ├─ aws:ec2:RouteTable                   my-private-subnet-ap-northeast-1c-rt                 created (0.86s)
 +   │  ├─ aws:ec2:Subnet                       my-private-subnet-ap-northeast-1c                    created (2s)
 +   │  ├─ aws:ec2:RouteTableAssociation        my-private-subnet-ap-northeast-1c-rt-association     created (1s)
 +   │  └─ aws:ec2:Route                        my-private-subnet-ap-northeast-1c-nat-gateway-route  created (1s)
 +   ├─ aws-vpc-ts:privateSubnet:PrivateSubnet  my-private-subnet-ap-northeast-1a                    created (1s)
 +   │  ├─ aws:ec2:Subnet                       my-private-subnet-ap-northeast-1a                    created (1s)
 +   │  ├─ aws:ec2:RouteTable                   my-private-subnet-ap-northeast-1a-rt                 created (2s)
 +   │  ├─ aws:ec2:RouteTableAssociation        my-private-subnet-ap-northeast-1a-rt-association     created (1s)
 +   │  └─ aws:ec2:Route                        my-private-subnet-ap-northeast-1a-nat-gateway-route  created (1s)
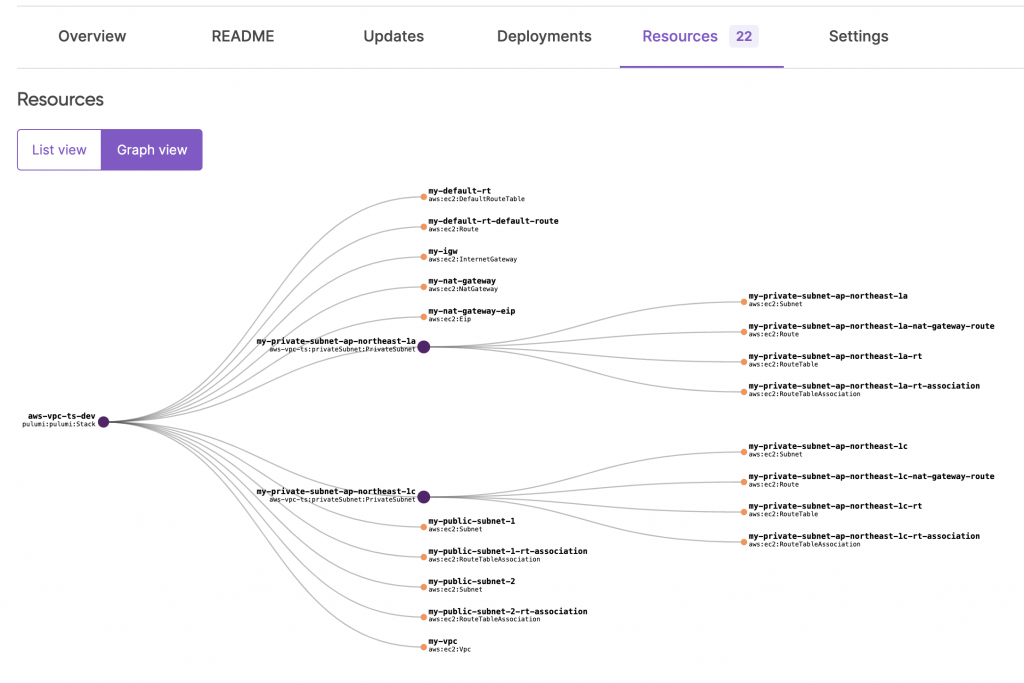
也可以在 Pulumi Cloud 中的 Resource tab 中的 Graph view 看到階層式的關係。
完整的範例可以參考 GitHub Repository
