昨天我們將 Dockerfile 撰寫大概有個樣子了,今天就馬上來根據 Dockerfile 來建立自己的 image 吧!(就是一個瘋狂除錯的步驟🥹)
接著立馬試試能否成功建立自己的 image
docker build -t my-ruby:1.0 .
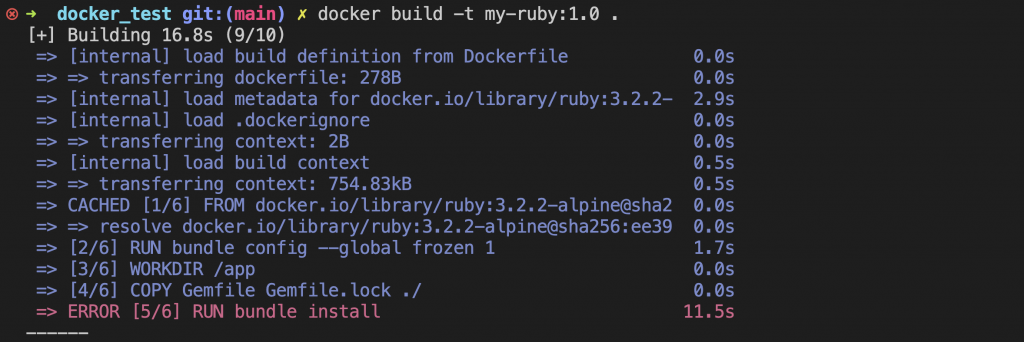
如圖示可以看到在 bundle install 時失敗了!錯誤訊息還不只一兩個😅
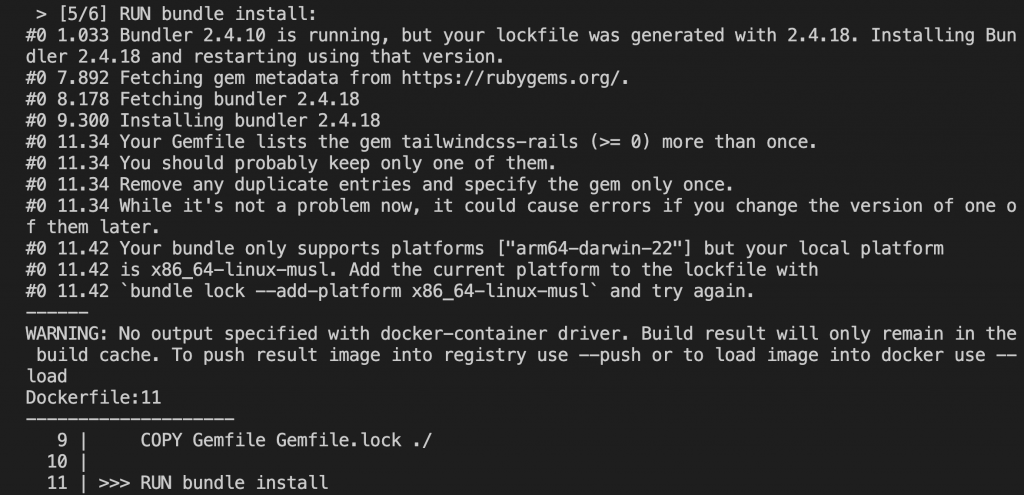
Bundler 2.4.10 is running, but your lockfile was generated with 2.4.18. Installing Bundler 2.4.18 and restarting using that version.
看起來是 Bundler 版本不一致所導致的。我的 Gemfile.lock 文件是使用 Bundler 2.4.18 生成的,但是容器中安裝的 Bundler 版本是 2.4.10,所以常理來說我應該只要在 Dockerfile 裡裝正確版本的 Bundler 就可以所以我多加一行安裝 2.4.18 的 bundler ,在 RUN bundle config 之前
LABEL maintainer="Krystal <krystal@5xcampus.com>"

RUN gem install bundler:2.4.18

RUN bundle config --global frozen 1
Your Gemfile lists the gem tailwindcss-rails (>= 0) more than once.
這個就好懂了,好像是在說我的 Gemfile 裡有不只一個 tailwindcss-rails
實際去看 Gemfile 真的發現第 8 跟 28 行分別都有一個
gem 'tailwindcss-rails'
我就直接把第八行我不小心多加的 gem 'tailwindcss-rails' 給刪掉
Your bundle only supports platforms ["arm64-darwin-22"] but your local platform is x86_64-linux-musl. Add the current platform to the lockfile with
bundle lock --add-platform x86_64-linux-musland try again.
我猜測這是因為我電腦是 M1 的關係才會出現 platform 不一致的問題,但是他也把解決方法寫上去了,在終端機打 bundle lock --add-platform x86_64-linux-musl 指令,並重新 bundle install 就可以更新 Gemfile.lock
上面三個錯誤都解決了,我就來重新 build 一次吧!
docker build -t my-ruby:1.0 .
一樣在 bundle install 中錯誤了,以下是我翻找 log 發現可能的錯誤
Gem::Ext::BuildError: ERROR: Failed to build gem native extension.
看起來像是我有相依的套件沒有安裝導致的錯誤,但因為找了一陣子覺得有點撞牆,所以我就先上網問谷歌大神有關 dockerfile rails run,找到的 第一篇文章 ,看起來跟我麼需求很像,因為一直都是相依套件出問題,所以我決定將
RUN gem install bundler:2.4.18

RUN bundle config --global frozen 1
移除,改成如文章中的
RUN apk add \
    build-base \
    postgresql-dev
看起來 build-base 跟 postgresql-dev 像是安裝 基本的編譯工具 以及 支援 PostgreSQL 資料庫的開發文件。
(其實文章內文還有安裝 nodejs 跟 tzdata,但因為我使用的是 Rails 7 ,在 Rails 7 中並不包括 Node.js ; 另外 tzdata 我純粹因為不知道他是什麼所以我就先移除,避免安裝不必要的套件)
這時 Dockerfile 變成如下,再重新 build 一次
FROM ruby:3.2.2-alpine

LABEL maintainer="Krystal <krystal@5xcampus.com>"

RUN apk add \
    build-base \
    postgresql-dev

WORKDIR /app

COPY Gemfile Gemfile.lock ./

RUN bundle install

COPY . .

EXPOSE 3000

CMD ["rails", "server", "-b", "0.0.0.0"]
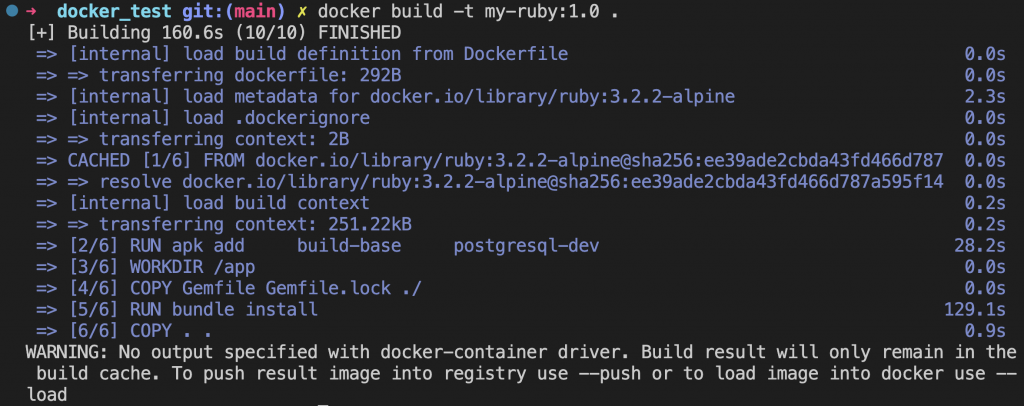
看起來終於有點像是 build 成功了,但卻收到如下的警告訊息
WARNING: No output specified with docker-container driver. Build result will only remain in the build cache. To push result image into registry use --push or to load image into docker use --load
大概是建議我們在 build image 時,沒有指定輸出結果,所以只會保留在緩存中,建議如果要
docker build -t my-ruby:1.0 . --push
docker build -t my-ruby:1.0 . --load
那因為我這邊目標史事希望現在本地建立成功,所以我就選擇 docker build -t my-ruby:1.0 . --load 再重新 Build 一次。
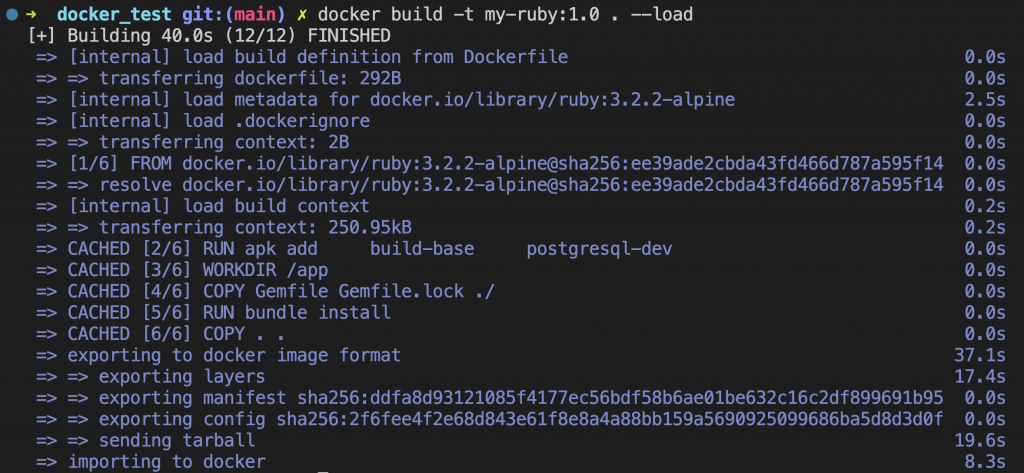
終於沒有任何錯誤跟警告了🎉🎉🎉
docker images 指令docker images

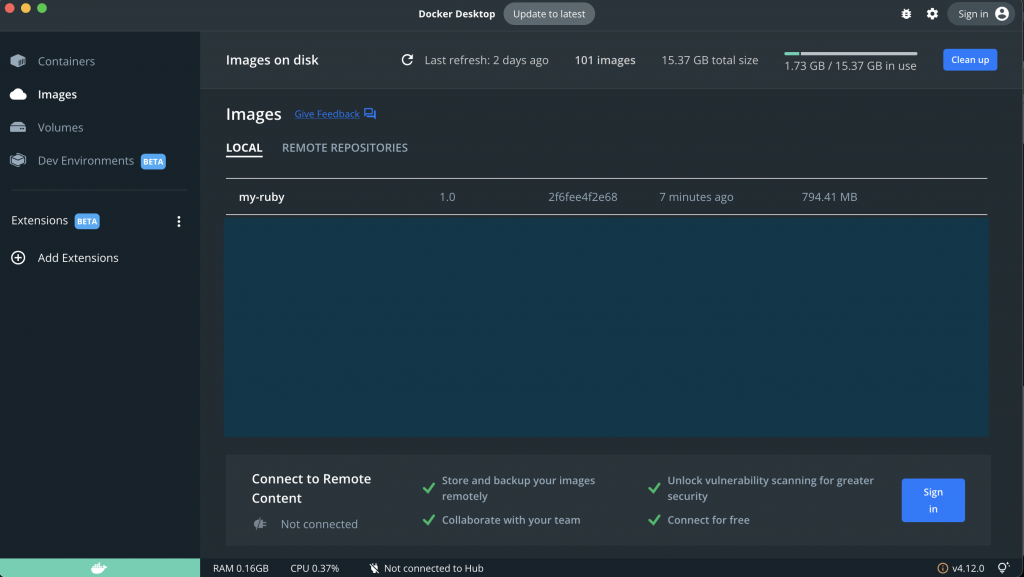
兩者都可以看到我們成功建立的 my-ruby:1.0,可以說明我們成功根據自己撰寫的 Dockerfile 製作出屬於這個 rails 專案獨一無二的一顆 image,當然建立完後,我們明天就要實際使用這顆 image 來製作成 container ,看能否成功運轉我的 rails 專案,若能成功運轉,只要其他人擁有這顆 image 就可以確保他做出來的 container ,會跟我的一樣,因為我們都是用同一個烤模烤出來的雞蛋糕。