iT邦幫忙

0

利用AWS內的S3及Lambda上傳圖片及辨識文字

  • 分享至 

  • xImage
  •  

目錄

  • 系統架構
  • 功能說明
  • 操作圖&流程說明
  • 參考資料

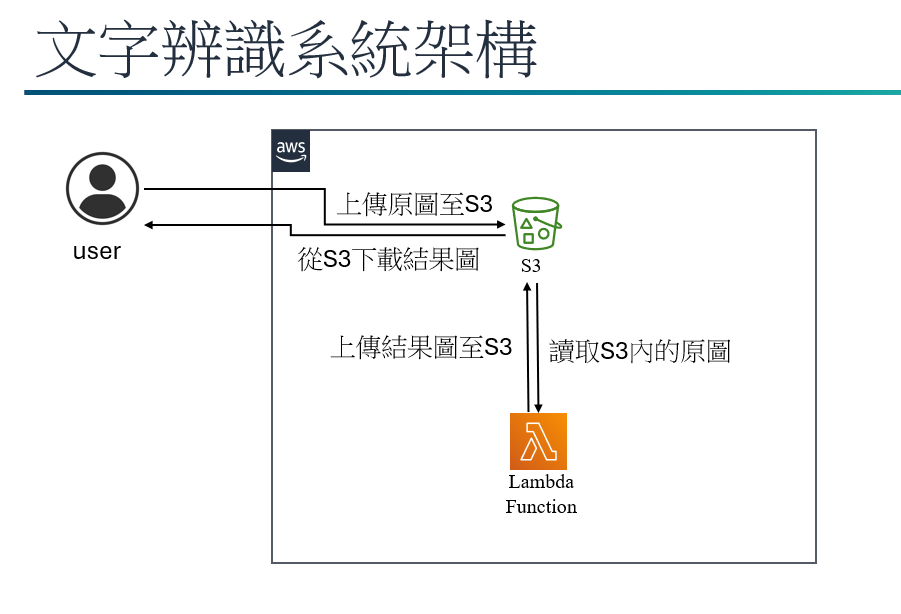
系統架構

https://ithelp.ithome.com.tw/upload/images/20240430/201668640AnmyG1hcd.png


功能說明

  1. 上傳圖片至S3
  2. 辨識圖片內的文字,並框出辨識到的文字

操作圖&流程說明

  1. 創建S3儲存桶
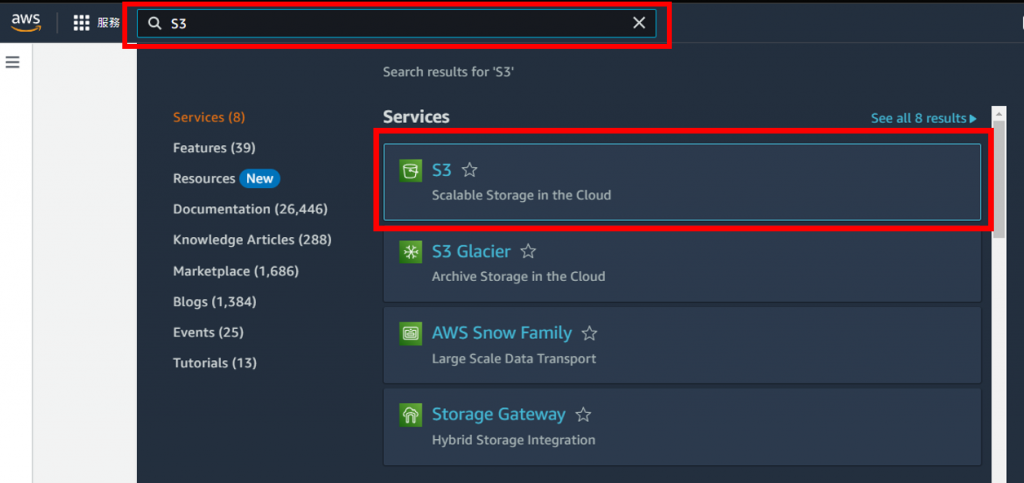
  • 在搜尋欄輸入S3,前往該頁面
    https://ithelp.ithome.com.tw/upload/images/20240430/20166864OUVmUAD2TE.png

  • 點擊建立儲存貯體
    https://ithelp.ithome.com.tw/upload/images/20240430/20166864dm4XEtsGM7.png

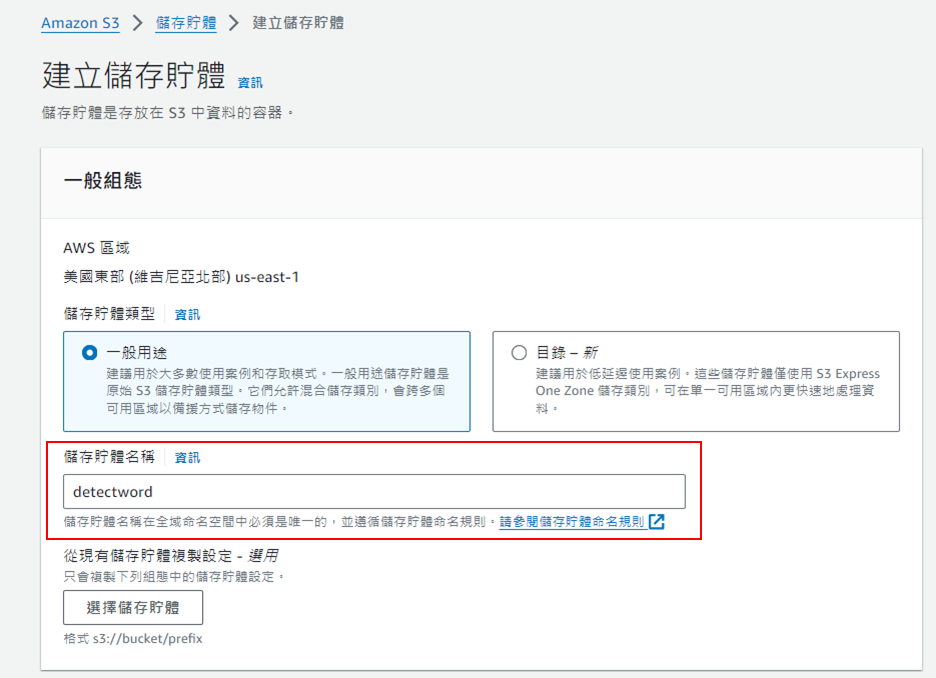
  • 命名儲存貯體
    https://ithelp.ithome.com.tw/upload/images/20240430/201668640imC5rJglI.png

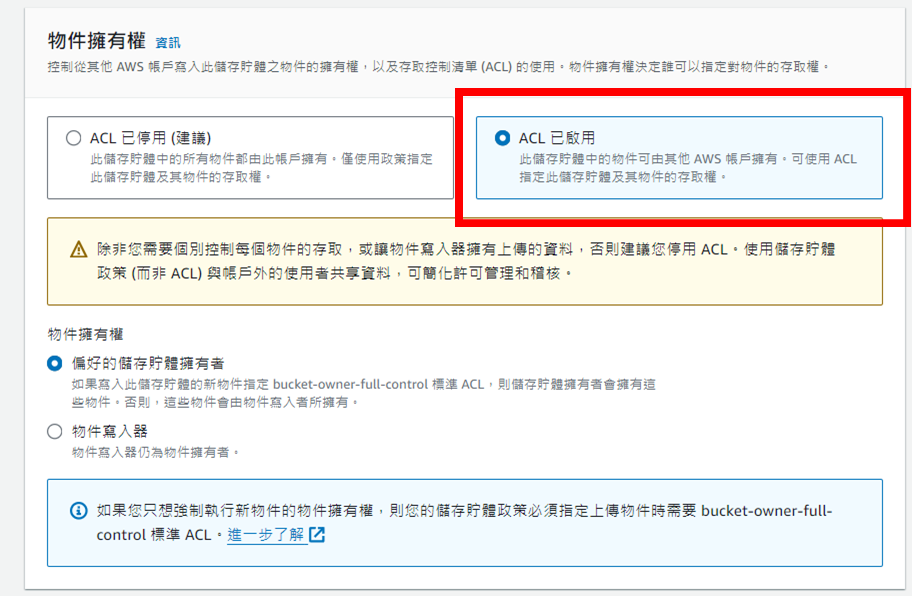
  • 啟用ACL
    https://ithelp.ithome.com.tw/upload/images/20240430/20166864Lu6X7O5LxZ.png

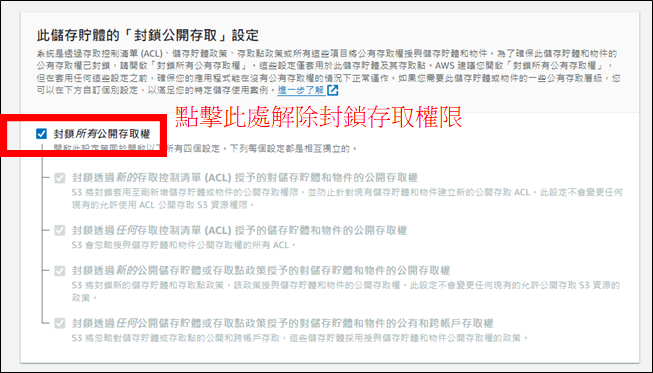
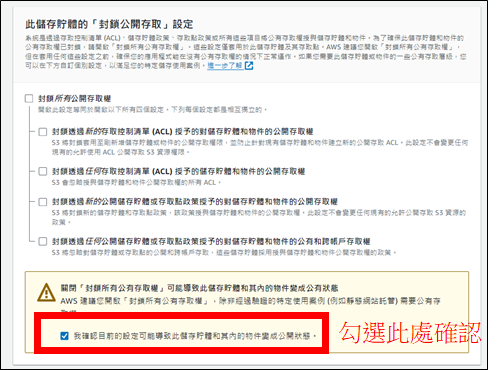
  • 解除存取權限的封鎖
    https://ithelp.ithome.com.tw/upload/images/20240430/20166864MvYHWhnzFa.png
    https://ithelp.ithome.com.tw/upload/images/20240430/20166864RWeqEqOlNT.png

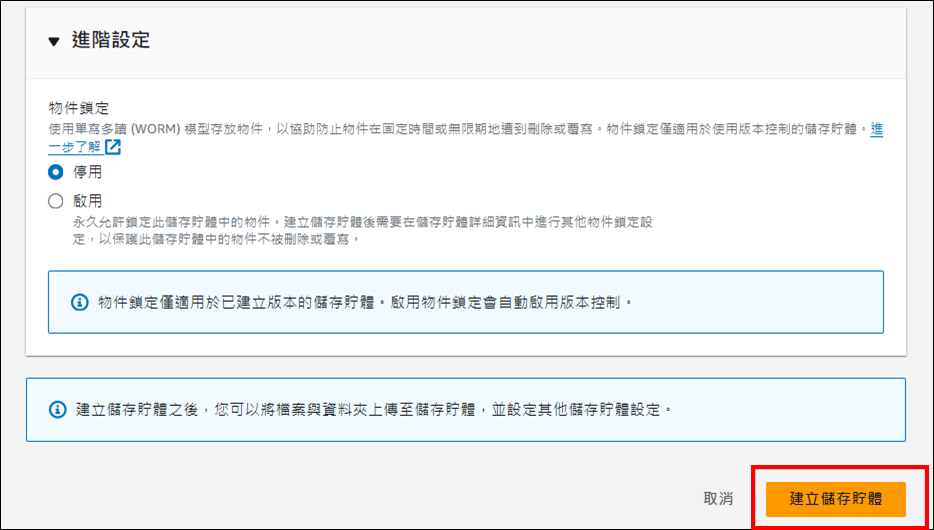
  • 接著點擊"建立儲存貯體",便可看到剛剛創建的儲存貯體
    https://ithelp.ithome.com.tw/upload/images/20240430/20166864Sc97K2LLLK.png
    https://ithelp.ithome.com.tw/upload/images/20240430/20166864VhVBImA8Bp.png

  1. 上傳圖片至剛創建的儲存貯體內
  • 進入儲存貯體內
    https://ithelp.ithome.com.tw/upload/images/20240430/20166864baEYCODfW9.png

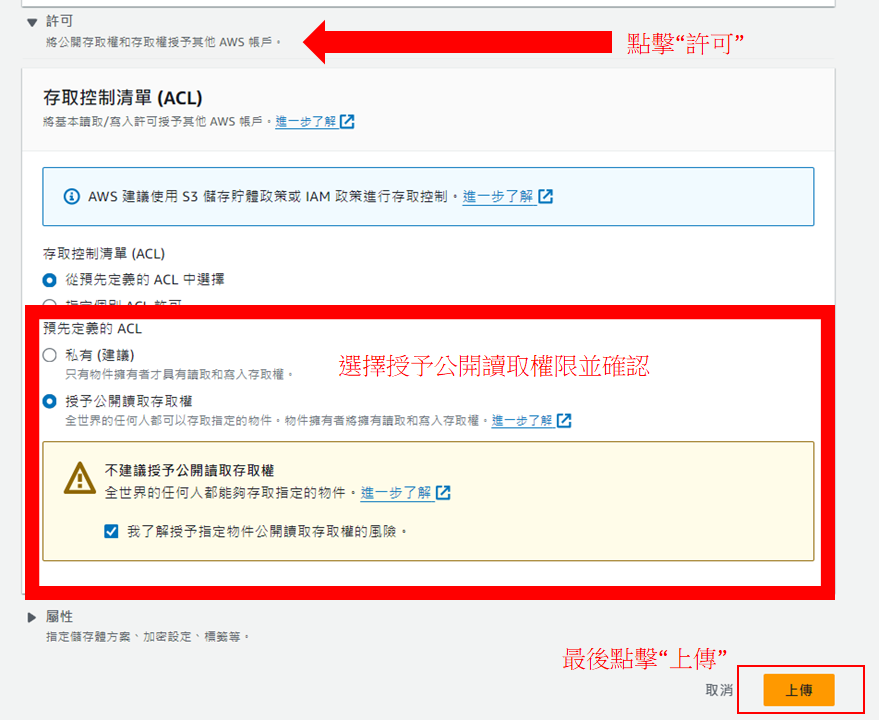
  • 點擊上傳,選擇圖片並修改許可權後上傳,成功後即可看到儲存貯體內存在剛上傳的圖片
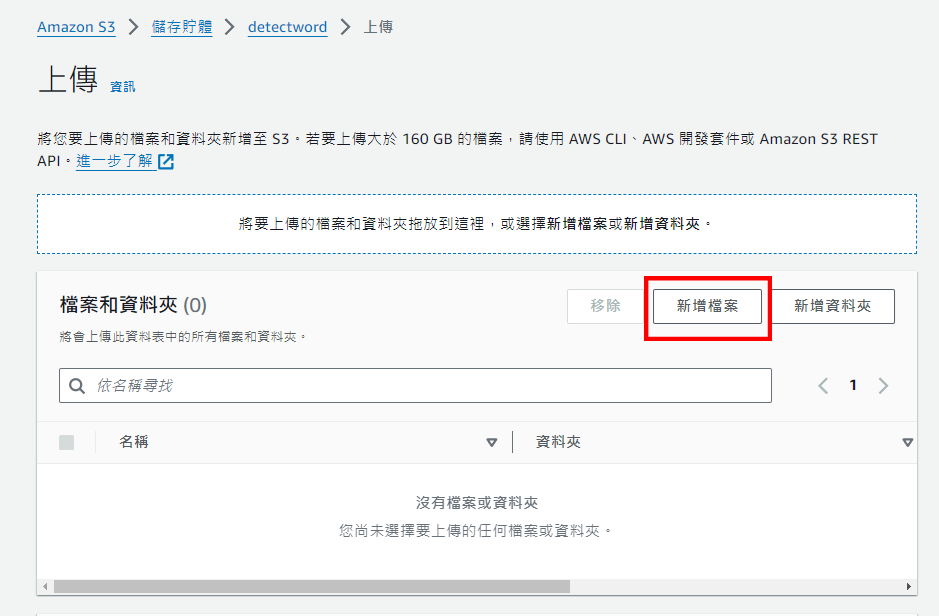
    https://ithelp.ithome.com.tw/upload/images/20240430/20166864VAevU369M3.png
    https://ithelp.ithome.com.tw/upload/images/20240430/201668641cPLZoXnz4.png
    https://ithelp.ithome.com.tw/upload/images/20240430/2016686451Pe3ReNSv.png
    https://ithelp.ithome.com.tw/upload/images/20240430/20166864FGZWKEbsFX.png
    https://ithelp.ithome.com.tw/upload/images/20240430/20166864u2YHhenSj6.jpg

  1. 用同樣的步驟上傳opencv函式庫(為了之後Lambda能使用opencv)
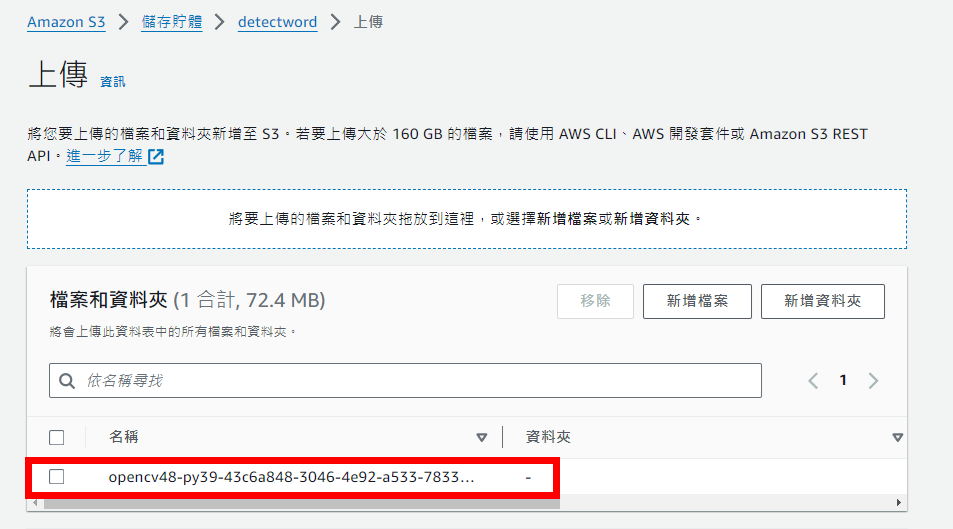
    https://ithelp.ithome.com.tw/upload/images/20240430/20166864bb2kLniylF.png
    https://ithelp.ithome.com.tw/upload/images/20240430/20166864zy7HTyI7K6.png

  2. 建立Lambda

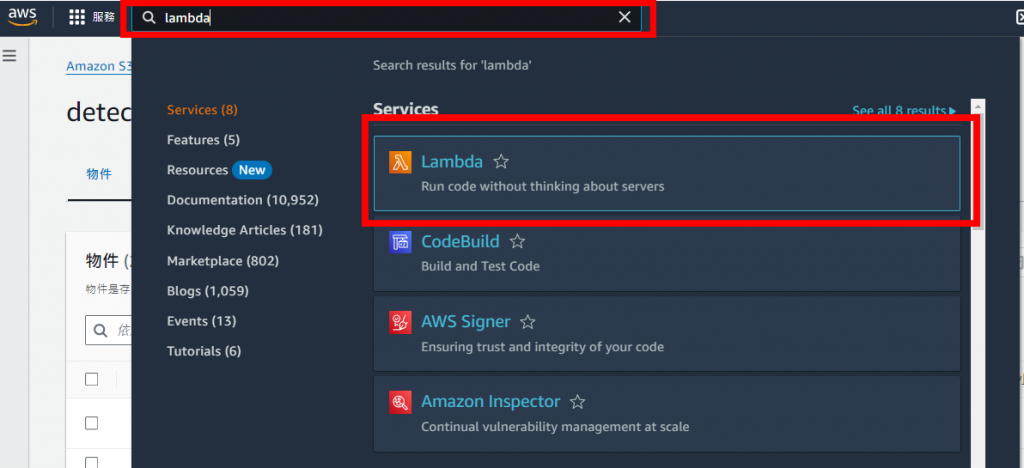
  • 在搜尋欄裡輸入Lambda,前往該頁面
    https://ithelp.ithome.com.tw/upload/images/20240430/20166864rqCBVLKvoB.png

  • 點擊建立函式
    https://ithelp.ithome.com.tw/upload/images/20240430/20166864gRq6ptQFrM.png

  • 命名此函式,並修改要使用的程式語言(對應到opencv的版本)
    https://ithelp.ithome.com.tw/upload/images/20240430/20166864SgQ1W6oasx.png

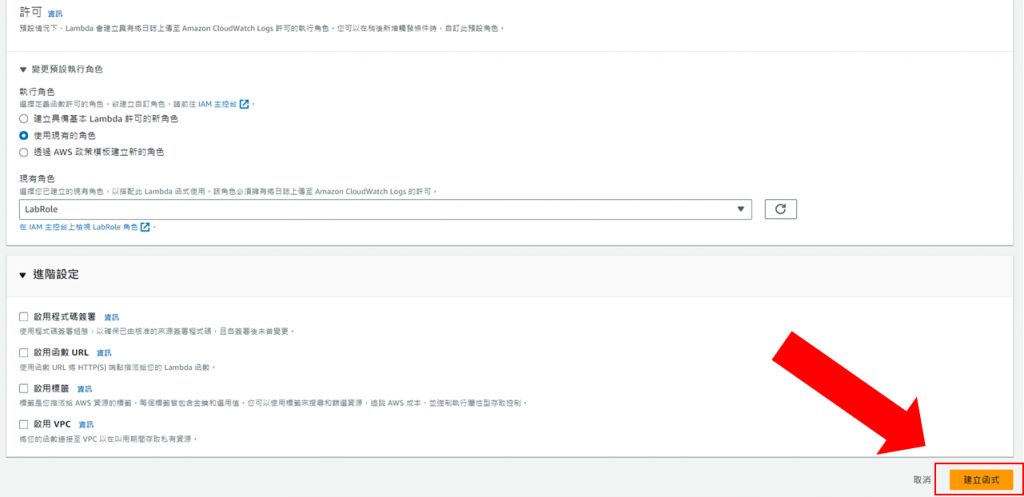
  • 修改執行角色為LabRole
    https://ithelp.ithome.com.tw/upload/images/20240430/20166864CFzxvoDBsZ.png

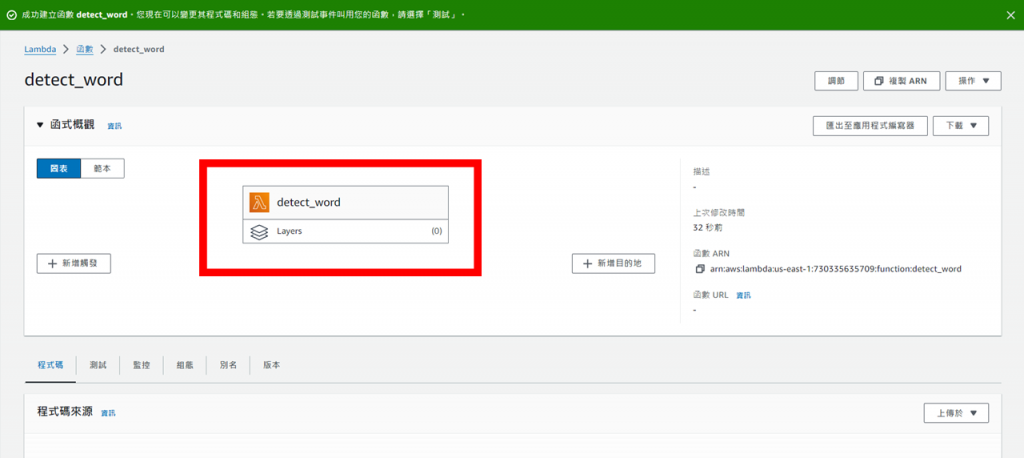
  • 完成上述步驟後點擊建立函式,成功後便可看到剛建立的函式
    https://ithelp.ithome.com.tw/upload/images/20240430/201668645jI7yJaAo1.png
    https://ithelp.ithome.com.tw/upload/images/20240430/20166864FMJfmLKC7K.png

  1. 在Lambda上實現辨識文字並框選的功能
  • 將程式碼貼到紅色框框標式的區域內,並按"Deploy"
import json
import base64
import boto3
from datetime import datetime
import numpy as np
import cv2
import os
import time


def lambda_handler(event, context):
    s3 = boto3.client('s3')
    
    #bucket_name要改為自己儲存貯體的名稱
    #file_name則是要從儲存貯體拿來辨識的圖片名稱
    bucket_name = 'detectword'
    file_name = "origin.png"
    
   
    img_data = s3.get_object(Bucket=bucket_name, Key=file_name)
    image_data = img_data['Body'].read()
    
    
    nparr = np.frombuffer(image_data, np.uint8)
    image = cv2.imdecode(nparr, cv2.IMREAD_COLOR)


    print('Bucket name: {}'.format(bucket_name))
    print('Upload file name: {}'.format(file_name))
    #get current unix time
    created = int(datetime.now().timestamp())
    #OCR
    client=boto3.client('rekognition')
    response=client.detect_text(Image={'S3Object':{'Bucket':bucket_name,'Name':file_name}})
    print(json.dumps(response))


    # 获取文本区域的信息
    text_detections = response["TextDetections"]

    # 绘制矩形
    for detection in text_detections:
        # 检查是否检测到了文本
        if "Geometry" in detection and "BoundingBox" in detection["Geometry"]:
            box = detection["Geometry"]["BoundingBox"]
            x = int(box["Left"] * image.shape[1])
            y = int(box["Top"] * image.shape[0])
            w = int(box["Width"] * image.shape[1])
            h = int(box["Height"] * image.shape[0])
            cv2.rectangle(image, (x, y), (x+w, y+h), (0, 255, 0), 2)
    
    cv2.imwrite('/tmp/image.jpg', image)
    
    s3.upload_file('/tmp/image.jpg', bucket_name, f"result.png")
    
    return {
        'statusCode': 200,
        'body': json.dumps('Hello from Lambda!')
    }
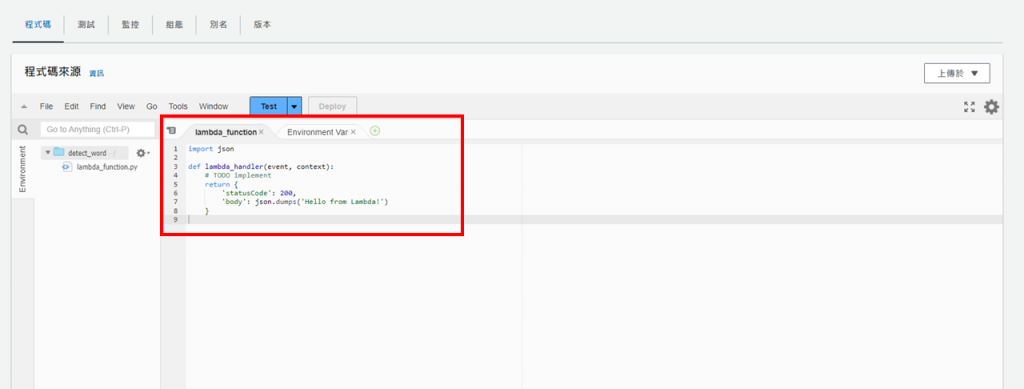
https://ithelp.ithome.com.tw/upload/images/20240430/20166864YmdK1y02BT.png
https://ithelp.ithome.com.tw/upload/images/20240430/20166864pouEr5Yreb.png

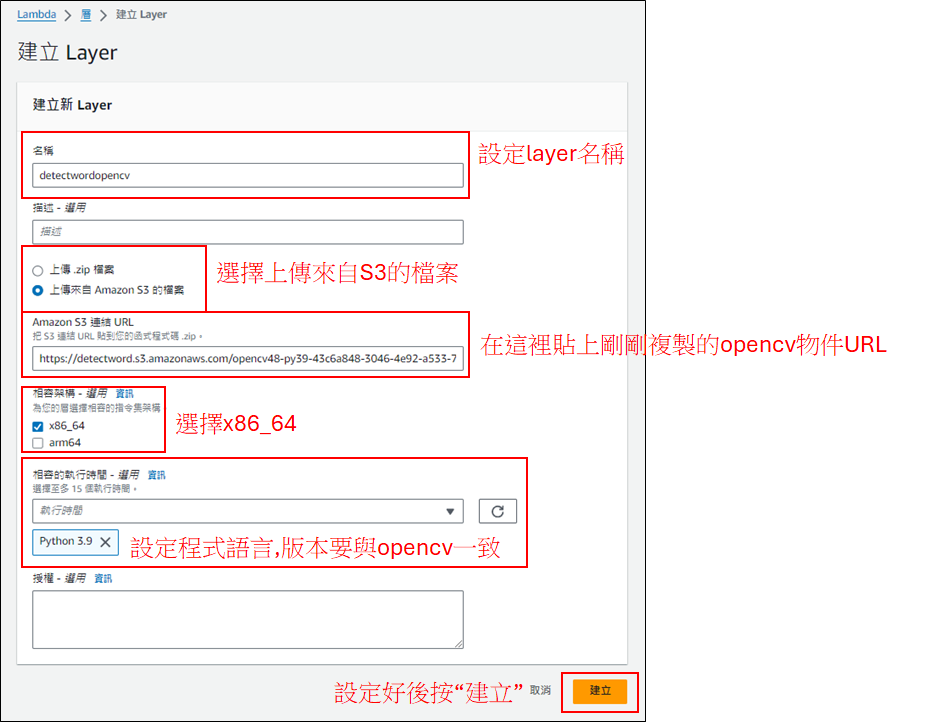
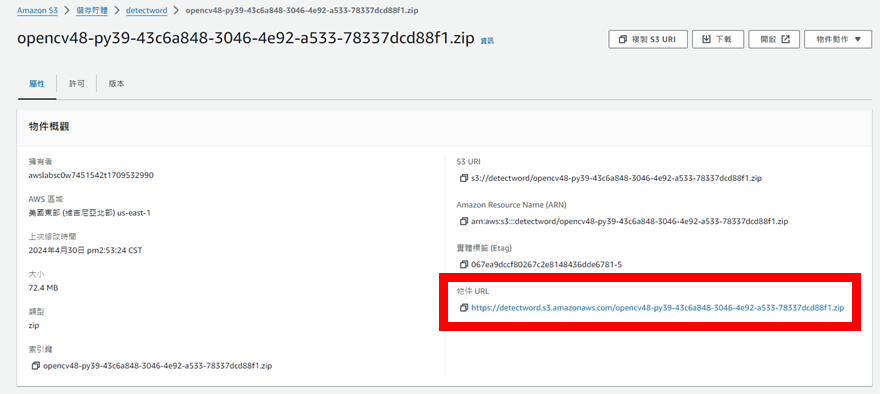
  • 接著,先回到S3創建的儲存貯體內複製opencv的物件URL,在下一步會用到
    https://ithelp.ithome.com.tw/upload/images/20240430/2016686461kMoy9kvH.png
    https://ithelp.ithome.com.tw/upload/images/20240430/201668642JoiNiV4kA.png

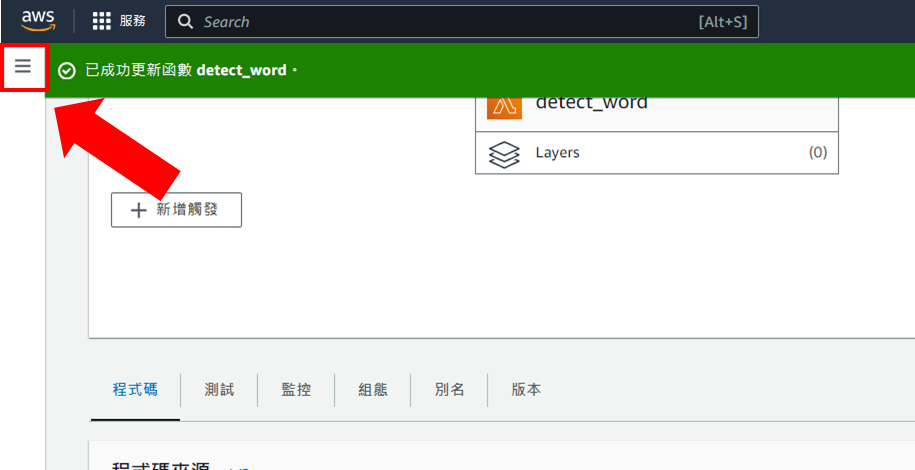
  • 完成後回到Lambda,點擊左上角的這個圖標
    https://ithelp.ithome.com.tw/upload/images/20240430/201668642lMwQWbqt3.png

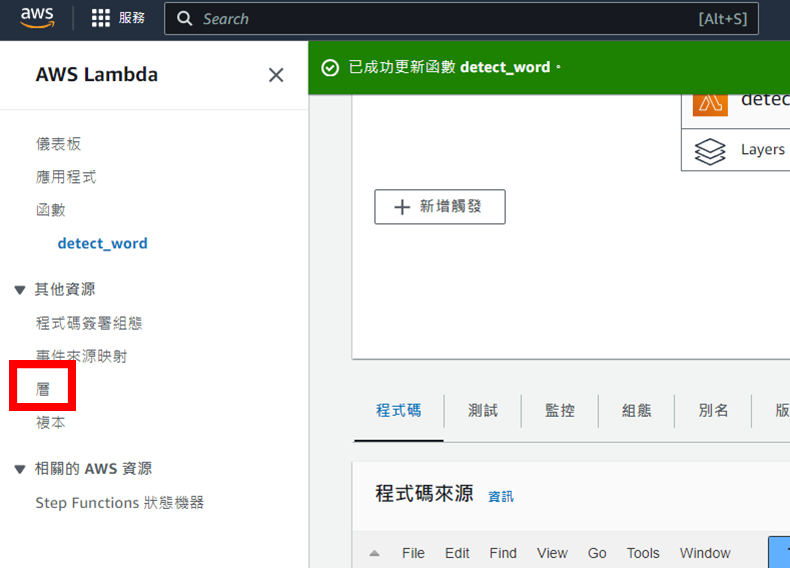
  • 點擊"層",並開始建立Layer
    https://ithelp.ithome.com.tw/upload/images/20240430/20166864nQdG6Im2RO.png
    https://ithelp.ithome.com.tw/upload/images/20240430/20166864M3UELZzOKn.png
    https://ithelp.ithome.com.tw/upload/images/20240430/201668640ihob3JIaa.png

  • 建立成功後回到Lambda的程式設計頁面
    https://ithelp.ithome.com.tw/upload/images/20240430/20166864M0ErLXuYJk.png

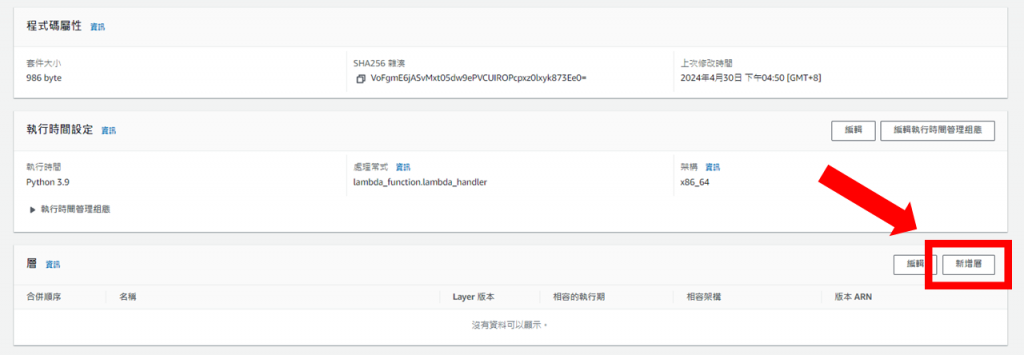
  • 將頁面滑到最下面,開始將剛剛創立的Layer新增到此函式
    https://ithelp.ithome.com.tw/upload/images/20240430/20166864IN0iK9DUOl.png

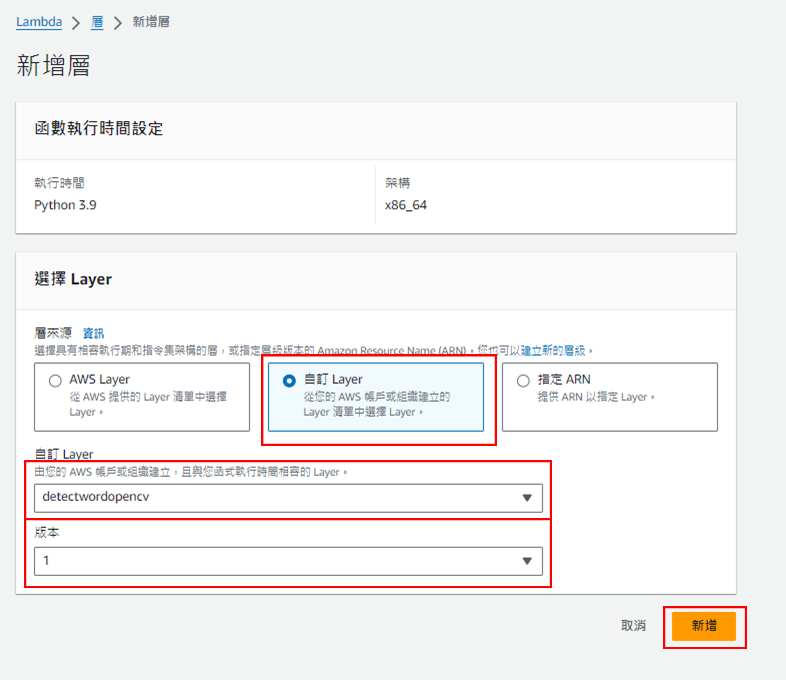
  • 點擊"自訂Layer",並選擇剛剛建立的Layer和版本,接著點擊"新增"
    https://ithelp.ithome.com.tw/upload/images/20240430/201668645h9kv9ZijN.png

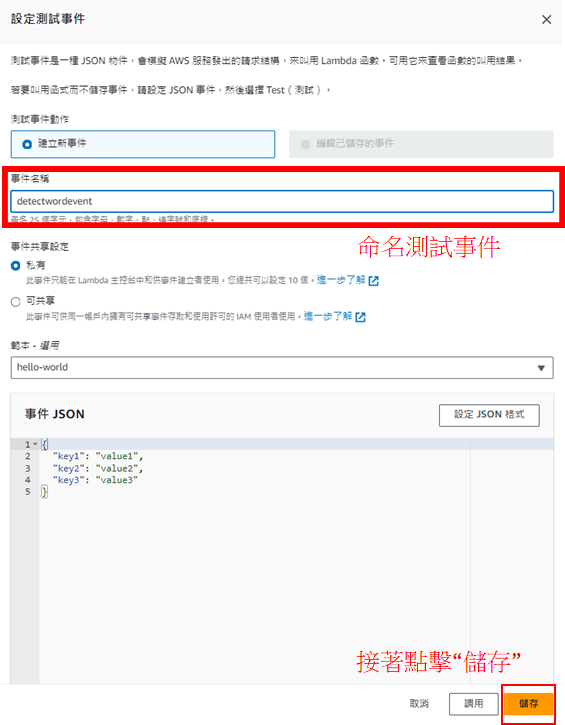
  • 完成後會回到程式設計頁面,接著點擊"TEST"建立測試用事件
    https://ithelp.ithome.com.tw/upload/images/20240430/20166864Cnv01vIfUA.png
    https://ithelp.ithome.com.tw/upload/images/20240430/20166864PfpDsop5KP.png

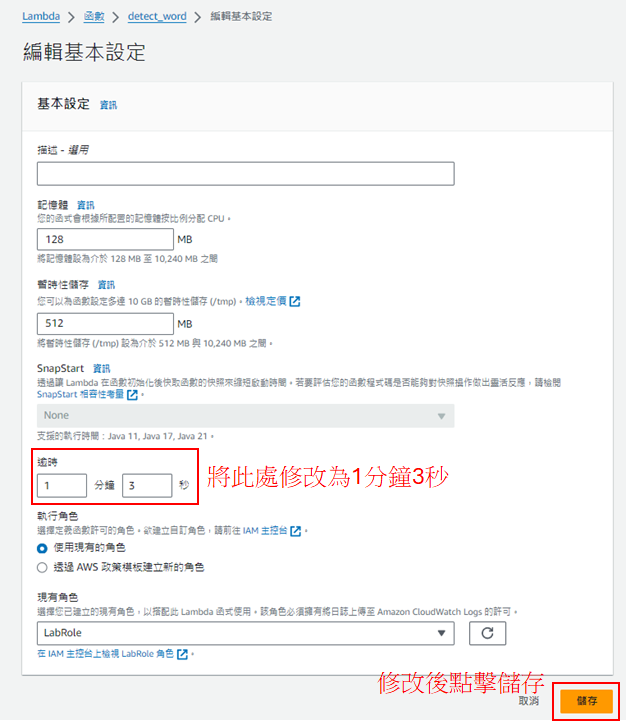
  • 接著,為了預防程式運作時長過久而報錯,要先修改程式運作時間
    https://ithelp.ithome.com.tw/upload/images/20240430/20166864OGW0YeegFc.png
    https://ithelp.ithome.com.tw/upload/images/20240430/20166864P5trUYkWJD.png
    https://ithelp.ithome.com.tw/upload/images/20240430/20166864G24j6JctoH.png

  • 完成後回到"程式碼",點擊"TEST",若成功運作則會回傳'Hello from Lambda!',否則會出現error
    https://ithelp.ithome.com.tw/upload/images/20240430/20166864xqSHVMYY7E.png
    https://ithelp.ithome.com.tw/upload/images/20240430/201668646SzJSxgjAG.png

  1. 下載辨識後的結果圖
  • 若成功運作的話,回到S3的儲存貯體內會看到處理後的圖(result.png)
    https://ithelp.ithome.com.tw/upload/images/20240430/20166864FyaismbFR9.png

  • 點進去後要先到"許可"編輯物件的讀取權,修改好後儲存變更(若沒修改則無法下載結果圖)
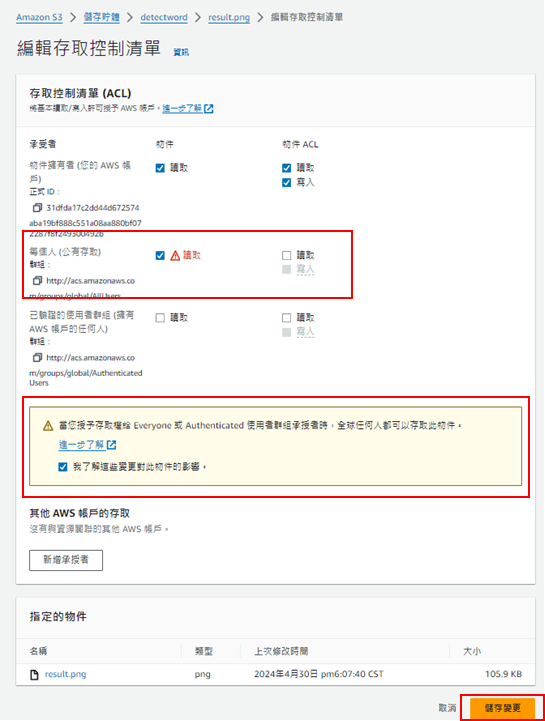
    https://ithelp.ithome.com.tw/upload/images/20240430/20166864SQ3c3b7vQj.png
    https://ithelp.ithome.com.tw/upload/images/20240430/20166864mW7LPCuWu5.png

  • 接著點擊"物件URL",便能下載結果圖
    https://ithelp.ithome.com.tw/upload/images/20240430/20166864XijQmOyv7h.png
    https://ithelp.ithome.com.tw/upload/images/20240430/20166864Vtf6iprk9A.jpg


參考資料

文字辨識: https://aws.amazon.com/tw/rekognition/
Lambda: https://docs.aws.amazon.com/zh_tw/lambda/latest/dg/lambda-python.html
框出文字: https://blog.csdn.net/weixin_38145317/article/details/89497616


圖片
  直播研討會
圖片
{{ item.channelVendor }} {{ item.webinarstarted }} |
{{ formatDate(item.duration) }}
直播中

尚未有邦友留言

立即登入留言