在現代雲端運算環境中,快速的部署和管理應用程式至關重要。目前公司所有的服務都運行在 GKE 上,當中分別有 Dev, Stage, Beta, Production 等四個環境多個GKE Cluster,為了保持各環境的一至性、複用性,因此導入了 Terraform 實現基礎架構即程式碼 (IAC) 的利器,再搭配 CICD Pipeline,可以大大提升 SRE 團隊的工作效率。 本篇文章將帶領您深入了解如何使用 Terraform 來自動化 GKE 的部署,從而提高效率、減少錯誤,並實現可重複的基礎架構管理。
雖然可以為 GKE 集群使用內置的 GCP 配置流程(UI、SDK/CLI),但 Terraform 提供了幾個好處:
同時創建兩個Node Pool,如下表
| Node name | Machine type | Number | Provisioning Model | affinity | 每節點的 Pod 數上限 |
|---|---|---|---|---|---|
| cpu | n1-standard-4 | 2~3 | on-demand | role=cpu | 64 |
| t4-spot | n1-standard-4+nvidia-t4x2 | 0 | spot | role=t4-spot | 預設110 |
有幾個部分需要注意:
# provider.tf

terraform {
  required_providers {
    google = {
      source  = "hashicorp/google"
      version = "5.40.0"
    }
  }
# 將tfstat狀態文件保存到GCS
  backend "gcs" {
    bucket = "tfstat狀態文件保存到GCS的BUCKET NAME"
    prefix = "gke/ithome-202409-demo-2"
  }
}
provider "google" {
  project = "ithome-202409-demo-2"
}
# cluster.tf

locals {
  master_authorized_networks = flatten(
    [
      [
        # Control plane authorized networks CIDR
        {
          cidr_block   = "10.120.0.0/20"
          display_name = "ithome-202409-demo-us-central1-subnet"
        },
        {
          cidr_block   = "10.120.64.0/20"
          display_name = "ithome-202409-demo-2-us-central1-subnet"
        },
      ]
    ]
  )
}
module "gke" {
  source                     = "terraform-google-modules/kubernetes-engine/google//modules/private-cluster"
  project_id                 = var.project_id
  name                       = "${var.cluster_name_suffix}-cluster"
  service_account_name       = "${var.cluster_name_suffix}-cluster"
  region                     = var.region
  zones                      = var.zones
  network                    = var.network
  network_project_id         = var.network_project_id
  subnetwork                 = var.subnetwork
  ip_range_pods              = var.ip_range_pods
  ip_range_services          = var.ip_range_services
  http_load_balancing        = true #開啟Http Load Balancing
  network_policy             = false
  horizontal_pod_autoscaling = true
  filestore_csi_driver       = true #Filestore CSI 驅動程式
  gcs_fuse_csi_driver        = true #Cloud Storage FUSE CSI 驅動程式
  datapath_provider          = "ADVANCED_DATAPATH" //enables Dataplane-V2 feature.
  enable_private_endpoint    = true
  enable_private_nodes       = true
  deletion_protection        = false
  master_ipv4_cidr_block     = var.master_ipv4_cidr_block
  master_authorized_networks = local.master_authorized_networks
  gateway_api_channel        = "CHANNEL_STANDARD" #開啟 Gateway API
  remove_default_node_pool = true
  cluster_resource_labels = {
    createdby = "terraform"
  }
}
module "gke_auth" {
  source = "terraform-google-modules/kubernetes-engine/google//modules/auth"
  project_id   = var.project_id
  location     = module.gke.location
  cluster_name = module.gke.name
}
# variables.tf

module "gke" {
  node_pools = [
    var.node_pool_t4-spot.config,
    var.node_pool_cpu.config,
  ]

  node_pools_labels = {
    "${var.node_pool_cpu.config.name}"      = var.node_pool_cpu.kubernetes_label
    "${var.node_pool_t4-spot.config.name}"  = var.node_pool_t4-spot.kubernetes_label
  }

  node_pools_taints = {
    "${var.node_pool_cpu.config.name}"      = var.node_pool_cpu.taints
    "${var.node_pool_t4-spot.config.name}"  = var.node_pool_t4-spot.taints
  }

  node_pools_resource_labels = {
    "${var.node_pool_cpu.config.name}"      = var.node_pool_cpu.node_pools_resource_labels
    "${var.node_pool_t4-spot.config.name}"  = var.node_pool_t4-spot.node_pools_resource_labels
  }
}

variable "project_id" {
  description = "The Project ID."
  default     = "ithome-202409-demo-2"
}
variable "network_project_id" {
  description = "The project that control shared VPC networks."
  default     = "ithome-202409-demo"
}
variable "cluster_name_suffix" {
  description = "A suffix to append to the default cluster name"
  default     = "demo2"
}
variable "region" {
  description = "The region to host the cluster in"
  default     = "us-central1"
}
variable "zones" {
  description = "The zones to host the cluster in"
  default     = ["us-central1-a"]
}
variable "network" {
  description = "The VPC network to host the cluster in"
  default     = "ithome-202409-demo-vpc"
}
variable "subnetwork" {
  description = "The subnetwork to host the cluster in"
  default     = "ithome-202409-demo-2-us-central1-subnet"
}
variable "ip_range_pods" {
  description = "The secondary ip range to use for pods"
  default     = "ithome-202409-demo-2-pod-subnet"
}
variable "ip_range_services" {
  description = "The secondary ip range to use for services"
  default     = "ithome-202409-demo-2-service-subnet"
}
variable "master_ipv4_cidr_block" {
  description = "Control plane authorized networks cidr"
  default     = "172.16.4.160/28"
}

### Node pool
variable "node_pool_cpu" {
  default = {
      config = {
        name            = "cpu"
        machine_type    = "n1-standard-4"
        max_pods_per_node = 64
        node_locations  = "us-central1-a"
        autoscaling     = true
        min_count       = 2
        max_count       = 3
        local_ssd_count = 0
        spot            = false
        disk_size_gb    = 50
        disk_type       = "pd-standard"
        image_type      = "COS_CONTAINERD"
        enable_gcfs     = true
        enable_gvnic    = false
        logging_variant = "DEFAULT"
        auto_repair     = true
        auto_upgrade    = true
        preemptible     = false
      }
      node_pools_resource_labels = {
        team = "cpu"
      }
      kubernetes_label = {
        role = "cpu"
      }
      taints = [
      ]
    }
}
variable "node_pool_t4-spot" {
  default = {
      config = {
        name            = "t4-spot"
        machine_type    = "n1-standard-4"
        accelerator_count  = "2"
        accelerator_type   = "nvidia-tesla-t4"
        gpu_sharing_strategy = "TIME_SHARING"
        max_shared_clients_per_gpu = 1
        gpu_driver_version = "LATEST"
        node_locations  = "us-central1-a"
        autoscaling     = false
        node_count      = 0
        local_ssd_count = 0
        spot            = true
        disk_size_gb    = 200
        disk_type       = "pd-ssd"
        image_type      = "COS_CONTAINERD"
        enable_gcfs     = true
        enable_gvnic    = true
        logging_variant = "DEFAULT"
        auto_repair     = true
        auto_upgrade    = true
        preemptible     = false
      }
      node_pools_resource_labels = {
        team = "ai"
      }
      kubernetes_label = {
        role = "t4-spot"
      }
      taints = [
        {
          key    = "role"
          value  = "t4-spot"
          effect = "NO_SCHEDULE"
        }
      ]
    }
}
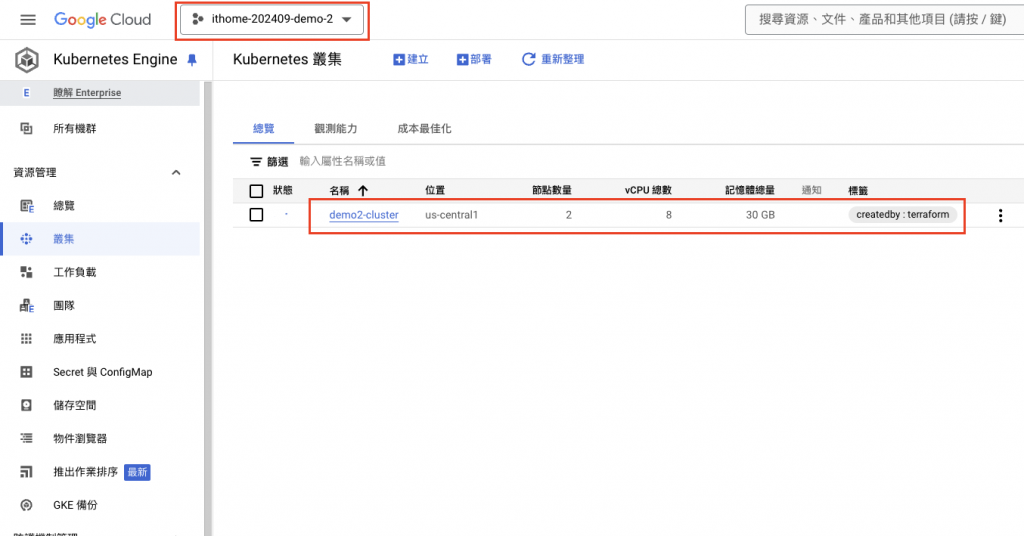
Terraform 執行時,可進入 GKE 的 UI 介面查看,如下圖,發現 Cluster 正在創建
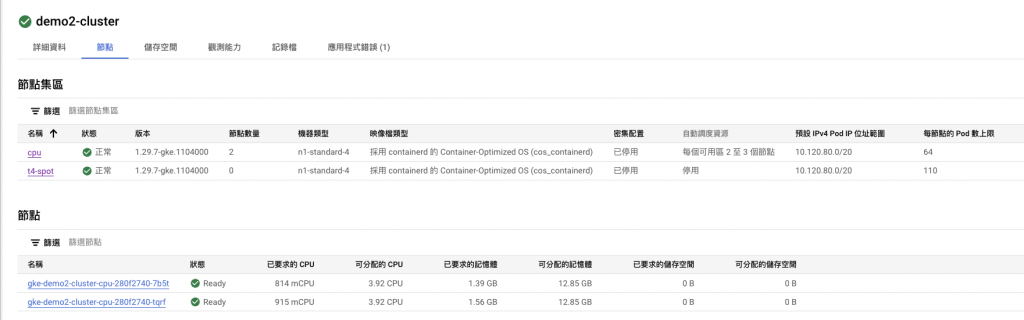
等到 Node Pool 創建完成後
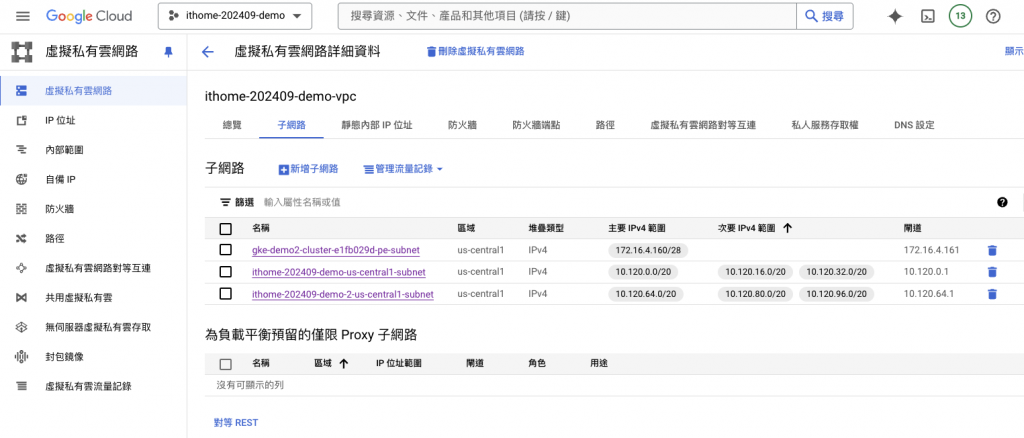
查看 Shared VPC Host Project 的虛擬網路,會發現自動創建了一個 gke-demo2-cluster-e1fb029d-pe-subnet 的子網路,是 Control Plane 所在的子網路,這是今年7月後更新的版本,所以在2024年7月以前創建的 GKE 是看不到控制節點的 Subnet。
但是會發現不能連接到外網,因為我們將 Node Pool 都建立成私有,本身不具備公網 IP,必須要透過 NAT Gateway 將封包送出,以下是創建 NAT 的 Terraform,有幾個地方需要注意
Google Cloud NAT (Network Address Translation) 讓您在沒有外部 IP 地址的情況下,將虛擬機器執行個體連線到網際網路。它會在傳輸資料時,將執行個體的內部 IP 位址轉換為 Google Cloud 的公開 IP 位址,讓執行個體能夠起始網際網路連線,而無須將它們公開在網際網路上。
以 Terraform 創建 NAT,因為以下 yaml 檔案行數不多,所以將 main.tf, variable.tf, provider.tf 合併在同一份 yaml 內
# provider.tf
terraform {
  required_providers {
    google = {
      source  = "hashicorp/google"
      version = "5.4.0"
    }
  }
  backend "gcs" {
    bucket  = "playsee-dev-terraform-bucket-tfstate"
    prefix  = "network/nat-gateway-ithome-202409-demo"
  }
}
provider "google" {
  project     = "${var.project}"
}
resource "google_compute_router" "router" {
  name    = "${var.router}"
  region  = "${var.region}"
  network = "${var.network}"

  bgp {
    asn = 64514
  }
}

# main.tf
resource "google_compute_router_nat" "nat" {
  name                               = "${var.nat}"
  router                             = "${var.router}"
  region                             = "${var.region}"
  nat_ip_allocate_option             = "AUTO_ONLY"
  source_subnetwork_ip_ranges_to_nat = "ALL_SUBNETWORKS_ALL_IP_RANGES"

  log_config {
    enable = true
    filter = "ERRORS_ONLY"
  }
}

# variable.tf
variable "project" {
  description = "GCP project ID"
  type        = string
  default = "ithome-202409-demo"
}
variable "network" {
  description = "Name of the GCP VPC Network"
  type        = string
  default = "projects/ithome-202409-demo/regions/us-central1/networks/ithome-202409-demo-vpc"
}
variable "region" {
  description = "Name of the GCP region"
  type        = string
  default = "us-central1"
}
variable "nat" {
  description = "Name of the GCP NAT"
  type        = string
  default = "ithome-202409-demo-c1"
}
variable "router" {
  description = "Name of the GCP NAT router"
  type        = string
  default = "ithome-202409-demo-vpc-router-nat"
}
創建完成後,進入 NAT 的 UI 介面查看
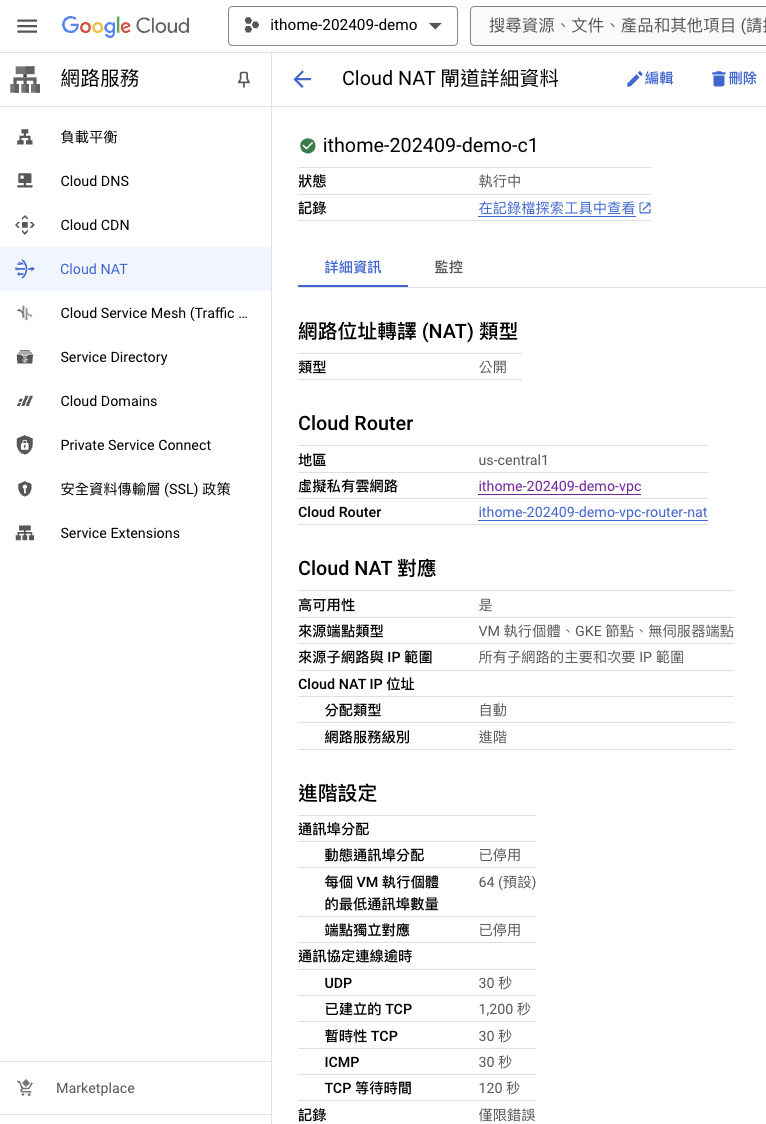
在本文中,學習了如何使用 Terraform 構建一個私有的 GKE 集群,並配置 GCP NAT 網關使其能夠訪問外部網絡。私有集群通過限制工作節點與公網的連接,極大地提高了集群的安全性。
首先定義了私有集群所需的網絡資源,包括 VPC、Subnet(子網) 和防火墻規則。接著,利用 Terraform 的模塊化特性,輕鬆地部署了私有 GKE 集群。最後,創建了一個 GCP NAT 網關,並將其與集群的子網相關聯,使得集群內的 Pod 能夠通過 NAT 網關訪問外部網絡資源,同時保持自身對外部網絡的不可見性。
通過此次實踐,希望讀者深刻體會到 Terraform 在自動化基礎設施建設方面的強大能力,以及私有 GKE 集群在安全性和靈活性方面帶來的優勢。