我們在昨天將 UI 簡單設計完成後,今天就要來實作 Apple Passkeys API 了
在實作 Apple Passkeys API 前,我們會需要設定 App 的 Associated Domains 功能
點擊「Project」->「Targets」->「Signing & Capabilities」->「+ Capability」
選擇「Associated Domains」
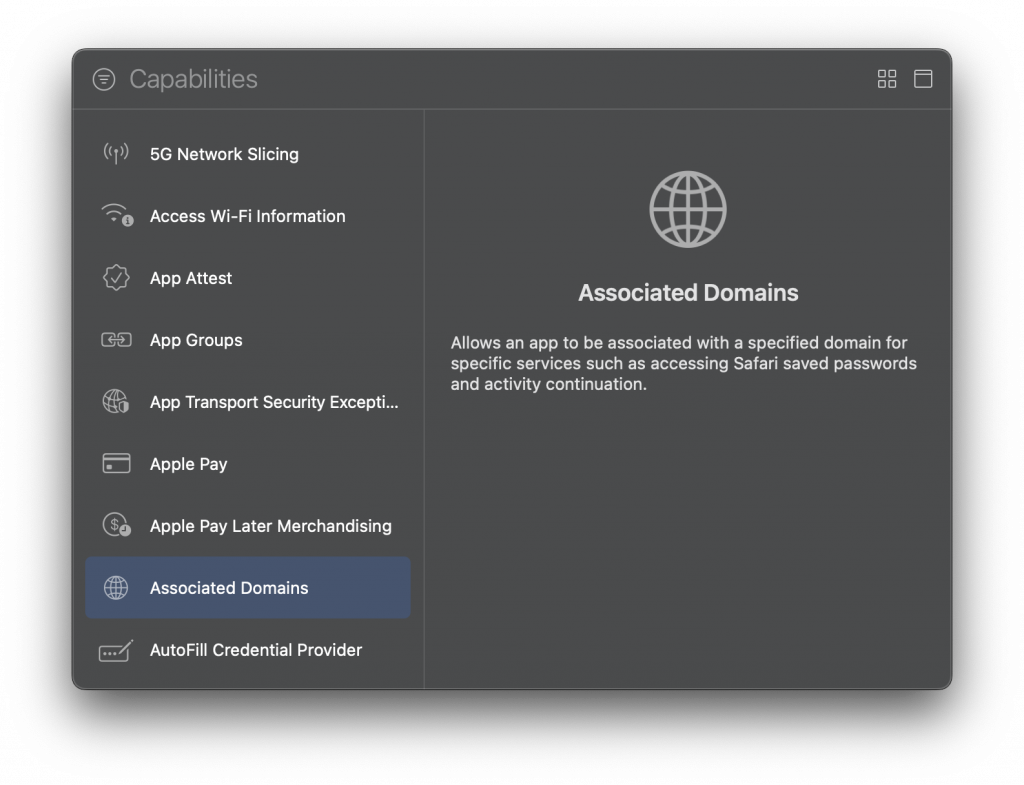
▲ 新增 Associated Domains Capability
接著,在 Domains 中新增 webcredentials:<YOUR WEBAUTHN RP SERVER DOMAIN>?mode=developer
YOUR WEBAUTHN RP SERVER DOMAIN 要換成自己的 WebAuthn RP Server 的 domain
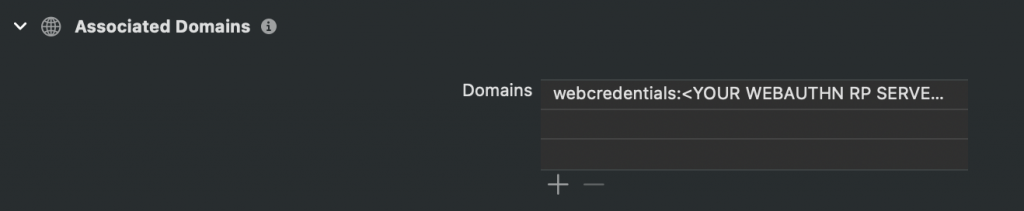
▲ 新增 webcredentials
這邊多加 ?mode=developer 是為了可以馬上進行測試所加的,如果是在 Production 環境的話,則不需加上
設定好 Capability 後,接下來要來實作 Apple Passkeys API
首先,新增一個 Manager 資料夾,並新增一個檔案叫做 PasskeysManager
接著新增一個 class 物件,叫做 PasskeysManager,並 import AuthenticationServices`,如下
import AuthenticationServices
import Foundation
import os

class PasskeysManager: NSObject {

    private let logger = Logger()
}
接著宣告一個私有常數 domain,用來在 PasskeysManager 物件中使用,並在 init 中賦值。這個是用來告訴 Passkeys API,我們的 WebAuthn RP Server 的 domain 是什麼,並作為 clientDataJSON 中的 origin
import AuthenticationServices
import Foundation

class PasskeysManager: NSObject {

    private let domain: String

    private let logger = Logger()

    init(domain: String) {
        self.domain = domain
    }
}
再來要設計 Passkeys Registration 的 Function
    func registration(username: String, challenge: String, anchor: ASPresentationAnchor) {

        self.authenticationAnchor = anchor

        let publicKeyCredentialProvider = ASAuthorizationPlatformPublicKeyCredentialProvider(relyingPartyIdentifier: domain)

        let challenge = Data(challenge.utf8)
        let userID = Data(username.utf8)

        let registrationRequest = publicKeyCredentialProvider.createCredentialRegistrationRequest(challenge: challenge, name: username, userID: userID)
        let authController = ASAuthorizationController(authorizationRequests: [registrationRequest])
        authController.delegate = self
        authController.presentationContextProvider = self
        authController.performRequests()
    }
接著再來設計 Passkeys Authentication 的 Function
    func authentication(challenge: String, anchor: ASPresentationAnchor, preferImmediatelyAvailableCredentials: Bool) {

        self.authenticationAnchor = anchor

        let publicKeyCredentialProvider = ASAuthorizationPlatformPublicKeyCredentialProvider(relyingPartyIdentifier: domain)

        let challenge = Data(challenge.utf8)

        let assertionRequest = publicKeyCredentialProvider.createCredentialAssertionRequest(challenge: challenge)

        let authController = ASAuthorizationController(authorizationRequests: [assertionRequest])
        authController.delegate = self
        authController.presentationContextProvider = self

        if preferImmediatelyAvailableCredentials {
            authController.performRequests(options: .preferImmediatelyAvailableCredentials)
        } else {
            authController.performRequests()
        }
    }
實作了 Passkeys Registration 和 Passkeys Authentication 這兩個 Function 後
我們還需要實作 ASAuthorizationControllerDelegate,讓 Passkeys API 執行完成後,可以透過 Delegation 的方式將 Authenticator 運算後的結果回傳給 App
下面就來實作 ASAuthorizationControllerDelegate
在 ASAuthorizationControllerDelegate 中,需要實作的 Function 有
func authorizationController(controller: ASAuthorizationController, didCompleteWithAuthorization authorization: ASAuthorization)
func authorizationController(controller: ASAuthorizationController, didCompleteWithError error: Error)
extension PasskeysManager: ASAuthorizationControllerDelegate {

    func authorizationController(controller: ASAuthorizationController,
                                 didCompleteWithAuthorization authorization: ASAuthorization) {
        switch authorization.credential {
        case let credentialRegistration as ASAuthorizationPlatformPublicKeyCredentialRegistration:
            logger.log("A new passkey was registered: \(credentialRegistration)")

        case let credentialAssertion as ASAuthorizationPlatformPublicKeyCredentialAssertion:
            logger.log("A passkey was used to sign in: \(credentialAssertion)")

        default:
            fatalError("Received unknown authorization type.")
        }
    }

    func authorizationController(controller: ASAuthorizationController,
                                 didCompleteWithError error: Error) {
        guard let authorizationError = error as? ASAuthorizationError else {
            logger.error("Unexpected authorization error: \(error.localizedDescription)")
            return
        }
    }
}
上面實作了 ASAuthorizationControllerDelegate 之後,我們還需要再實作 ASAuthorizationControllerPresentationContextProviding 用來回傳當前呼叫 Passkeys API 的畫面是哪一個
在 ASAuthorizationControllerPresentationContextProviding 中,需要實作的 Function 有
func presentationAnchor(for controller: ASAuthorizationController) -> ASPresentationAnchor
extension PasskeysManager: ASAuthorizationControllerPresentationContextProviding {

    func presentationAnchor(for controller: ASAuthorizationController) -> ASPresentationAnchor {
        return authenticationAnchor!
    }
}
今天我們使用 Apple Passkeys API 實作了 Passkeys Registration 和 Passkeys Authentication,明天我們要來將 Authenticator 回傳給 App 的資料進行處理!


 iThome鐵人賽