昨天我們從主題建模、prompt name 與 score 的分佈等,更全面地探勘本次賽題的訓練資料集;也透過設計一些專用於這種 code competition 、看不到 hidden test set 的比賽所適用的一些小實驗,探索 testset 和 trainset 存在的潛在差異。
今天會介紹的前幾名優勝解法,都有用到這幾天觀察到的一些現象,那就讓我們開始吧!
在研究本題的優勝解法以及討論區時,我發現大部分的做法都圍繞在如何利用兩個不同來源的、具有不同評分標準的 dataset(non-persuade, persuade) 來訓練模型,使得模型可以從資料量較多的 persuade dataset 中學到大量 general 的知識,但又不會 overfit 在它的分數分佈上;學完後,再更好地遷移到關鍵的 non-persuade dataset 上。
為什麼說他是關鍵的 dataset 呢? 因為從前幾天對 dataset 的分析,我們可以下一個小結:
Hidden test set 更有可能和 non-persuade 這個 dataset 有同樣的來源。
第四名1的作者在他的 prior-study 做了一個有趣的小嘗試:
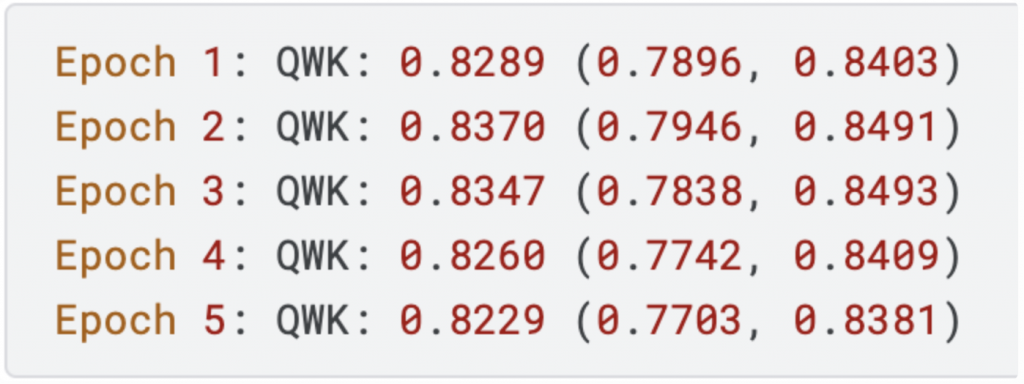
把 Non-Persuade 和 persuade 的 train data 混在一起並分出 train/validation set 之後,訓練一個 deberta 觀察其整體的 QWK 分數,以及在 non-persuade 和 persuade data 上各自的測試分數:

可以發現整體 validation set 的 QWK 雖有到 0.82 多,但其實 (non-persuade, persuade) 的評估分數是有差異的:
non-persuade 的表現會比較差。
因此作者就想,既然這兩者可能有不同的分數分佈,那我就明確地區分開來,讓模型為這兩個 dataset 各別學習呢?
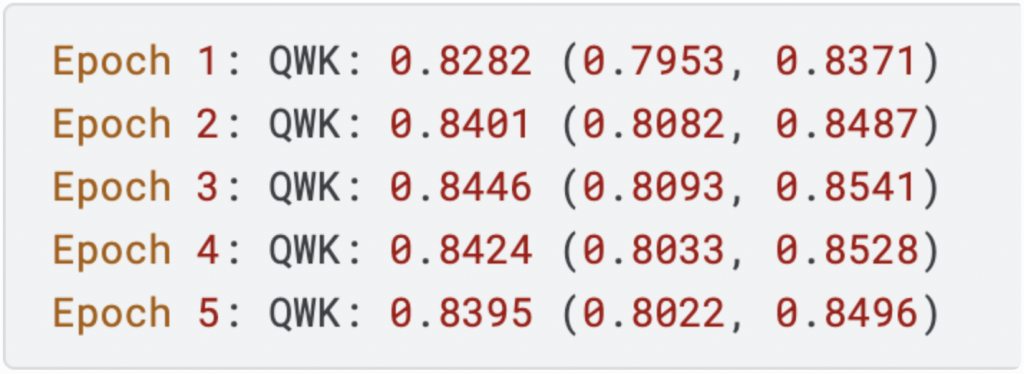
於是他在 non-persuade data 的 essay 內容前面加上 [A] 這個識別符號;在 persuade data 的 essay 前面加上 [B] 的識別符號,結果如下:

想法很簡單,沒想到效果竟然也不錯!
兩者的 QWK 都提升了。因此可得到一個結論:
顯式地告訴模型這兩個 data 的來源並加以區分,有助於提升模型的準確度。
為了深化這個想法,作者在訓練時,不只會在 essay 前面標示出不同的識別符號,還會讓不同資料來源的 data 使用模型不同的分類頭,作法如下:
model = DebertaModel(config)
    model = ScoreRegressionV1(
        backbone=HuggingFaceModel(model),
        neck=MeanPooling(),
        head=torch.nn.Linear(model.config.hidden_size, 6),
    )

class ScoreRegressionV1(nn.Module):
    def __init__(self, backbone, neck, head):
        super().__init__()
        self.backbone = backbone
        self.neck = neck
        self.head = head

    def forward(self, inputs):
        input_ids = inputs["input_ids"]
        attn_mask = inputs["attn_mask"]
        features = self.backbone(input_ids, attn_mask)
        features = self.neck(features, attn_mask)
        logits = self.head(features)
        logits = logits.float()

        data_source = inputs["data_source"]
        logits_score = logits[:, :3]
        // 這邊根據不同的 data_source(0, 1 or 2)選擇 logits 的不同 column 的數值。也就是說每個 data_source 在最後一個分類層上,都有各自對應的 neuron 來負責做預測。(只是這邊只有三個來源,我不知他為何要開 6 個 neuron 但在這邊也只會用到前 3 個而已。)
        logits_score = logits[
            torch.arange(logits_score.size(0), device=logits_score.device),
            data_source,
        ]
        return logits_score
那在 ensemble 模型的時候,他設計了下列 45 種變體,每一次的預測都會參考這 45 個模型預測出的結果,最後取平均後依照下面的 threshold 決定打分要是 1, 2, 3, 4, 5 或是 6。
thresholds = [1.692, 2.528, 3.432, 4.295, 5.082]
pred = pd.cut(
    pred,
    [-np.inf] + thresholds + [np.inf],
    labels=[1, 2, 3, 4, 5, 6],
).astype("int32")
以下是第四名作者1集成的 45 個模型的簡單介紹:
microsoft/deberta-large:
microsoft/deberta-v3-large
Qwen/Qwen2-1.5B-Instruct
除了上述提到的主要解法,他還分享為了加速 train/inference 的速度,並提升訓練的穩定度,作者 1 還使用了一些小技巧:
具體怎麼實現,直接上代碼:
DataLoader 的寫法:
dataloader = torch.utils.data.DataLoader(
        dataset,
        batch_size=16,
        num_workers=2,
        collate_fn=data_utils.MaxTokensMicrobatchCollate(
            max_tokens=4096,
            collate_fn=data_utils.DynamicPadCollate(),
        ),
    )

class MaxTokensMicrobatchCollate:
    def __init__(self, max_tokens, collate_fn, sort_samples=False):
        self.max_tokens = max_tokens
        self.collate_fn = collate_fn
        self.sort_samples = sort_samples

    def __call__(self, samples):
        if self.sort_samples:
            samples = sorted(samples, key=lambda x: x["input_ids"].size(0))
        micro_batches = []
        curr_samples = []
        curr_seq_length = 0
        for next_sample in samples:
            next_seq_length = next_sample["input_ids"].size(0)
            // 因為最後在 padding 文字時,是用 batch 裡面字數最多的 sample 的長度來當作 Padding 的目標,所以這邊 overflow 就是在估算最後 padding 完該個 micro batch 的長度
            overflow = (
                max(next_seq_length, curr_seq_length) * (len(curr_samples) + 1)
                > self.max_tokens
            )
            // 如果已經 overflow 了,而且 curr_samples 是有東西的,就直接加入到 micro _batches 裡面,這輪就收集完成;如果沒有的話,就把該個 sample 加入到 curr_samples 然後繼續下輪收集。
            if overflow and curr_samples:
                micro_batches.extend(self.collate_fn(curr_samples))
                curr_samples = [next_sample]
                curr_seq_length = next_seq_length
            else:
                curr_samples.append(next_sample)
                curr_seq_length = max(curr_seq_length, next_seq_length)
        if curr_samples:
            micro_batches.extend(self.collate_fn(curr_samples))
        return micro_batches
Training Loop:
for batch in dataloader:
    optimizer.zero_grad()
    total_batch_size = sum(micro_batch["batch_size"] for micro_batch in batch)
    for micro_batch in batch:
        micro_batch = to_gpu(micro_batch)
        loss = model(micro_batch)
        // 計算 Micro Batch 的權重比例。
        scale = micro_batch["batch_size"] / total_batch_size
        // 根據比例計算梯度。
        (loss * scale).backward()
    optimizer.step()
Inference Loop:
def predict(model, dataloader):
    results = []
    for batch in tqdm(dataloader):
        for micro_batch in batch:
            micro_batch = data_utils.to_gpu(micro_batch)
            with torch.cuda.amp.autocast(dtype=torch.float16):
                logits = model(micro_batch)
                results.append(logits.cpu().numpy())
    results = np.concatenate(results, axis=0)
第三名(2)和第四名(1) 一樣,重點放在:
如何在 persuade data 上訓練,然後更好地 transfer 到 non-persuade data 上。
他的想法是分成兩個階段:
這兩階段都各自在 persuade 或 non-persuade dataset 上訓練,但都會把另外一個 dataset 當作評估的對象,就好像兩個 dataset 在互相制衡彼此,避免模型陷入 overfitting 的陷阱,過度擬合到任何一個 dataset 的分佈。
第三名的作者還有用到其他一些實作細節,包含如下:
但這邊我不太確定作者是用什麼資料來 pretrained 的,應該也是和 essay 相關的 data,我也不太確定多做這步驟對這個題目帶來多少增益。
下面是作者進行 MLM 訓練的 code,完整代碼請見 3。我覺得很簡潔,現在訓練 MLM 變得很方便了,之後有需要的話可以直接參考下面我加上註釋的整理:
from text_unidecode import unidecode
from typing import Dict, List, Tuple
import codecs

def replace_encoding_with_utf8(error: UnicodeError) -> Tuple[bytes, int]:
    return error.object[error.start : error.end].encode("utf-8"), error.end


def replace_decoding_with_cp1252(error: UnicodeError) -> Tuple[str, int]:
    return error.object[error.start : error.end].decode("cp1252"), error.end

# Register the encoding and decoding error handlers for `utf-8` and `cp1252`.
codecs.register_error("replace_encoding_with_utf8", replace_encoding_with_utf8)
codecs.register_error("replace_decoding_with_cp1252", replace_decoding_with_cp1252)

def resolve_encodings_and_normalize(text: str) -> str:
    """Resolve the encoding problems and normalize the abnormal characters."""
    text = (
        text.encode("raw_unicode_escape")
        .decode("utf-8", errors="replace_decoding_with_cp1252")
        .encode("cp1252", errors="replace_encoding_with_utf8")
        .decode("utf-8", errors="replace_decoding_with_cp1252")
    )
    text = unidecode(text)
    return text

train['text'] = train['text'].apply(lambda x : resolve_encodings_and_normalize(x))
from transformers import AutoTokenizer, AutoModel, AutoConfig, LineByLineTextDataset, DataCollatorForLanguageModeling,Trainer, TrainingArguments

train_dataset = LineByLineTextDataset(
    tokenizer=tokenizer,
    file_path="train_text.txt", #mention train text file here
    block_size=512)

valid_dataset = LineByLineTextDataset(
    tokenizer=tokenizer,
    file_path="val_text.txt", #mention valid text file here
    block_size=512)

// mlm_probability 的值(在此例中为 0.15)表示在输入序列中,隨機選取 15% 的 token masked 掉
data_collator = DataCollatorForLanguageModeling(
    tokenizer=tokenizer, mlm=True, mlm_probability=0.15)
training_args = TrainingArguments(
    output_dir="./deberta_v3_base_chk", #select model path for checkpoint
    overwrite_output_dir=True,
    num_train_epochs=8,
    per_device_train_batch_size=4,
    evaluation_strategy= 'steps',
    save_total_limit=0,
    save_strategy='steps',
    save_steps=14456,
    eval_steps=7228,
    metric_for_best_model = 'eval_loss',
    greater_is_better=False,
    load_best_model_at_end =True,
    prediction_loss_only=True,
    report_to = "none")

trainer = Trainer(
    model=model,
    args=training_args,
    data_collator=data_collator,
    train_dataset=train_dataset,
    eval_dataset=valid_dataset)
trainer.train()
trainer.save_model(f'./deberta_v3_base')
如前面關於 prompt name 的討論,根據 prompt name 做 CV,可以觀察到不同 prompt 的 validation fold 測試結果差異很大。所以進入兩階段訓練後,作者採用 MultiLabelStratiFiedkFold 的方法,根據 prompt name 和 score 來切 6-folds。
這邊作者集成多個模型的方法是使用 weighted sum 的方法。也就是針對不同模型預測出來的結果,乘上不同的權重,最後再加總起來當成最終答案。
但是要怎麼找到每個模型最適合的權重呢?這邊作者使用 Nelder Mead 這個優化算法。
步驟如下:
聽起來有點複雜,結合 code 服用效果更佳:
# 假设你有一个包含 id 和 text 的 DataFrame
# df = pd.DataFrame({'id': ..., 'text': ...})

# 假设你有一个模型列表 models,其中包含10个模型
# models = [model1, model2, ..., model10]
oof_predictions, final_weights = kfold_predict_and_optimize(df, models, n_splits=5)

def kfold_predict_and_optimize(df, models, n_splits=5):
    kf = KFold(n_splits=n_splits, shuffle=True, random_state=42)
    oof_predictions = np.zeros((len(df), len(models)))
    fold_weights = np.zeros((n_splits, len(models)))  # 用于保存每个fold的最佳权重

    for fold, (train_idx, val_idx) in enumerate(kf.split(df)):
        X_train, X_val = df.iloc[train_idx]['text'], df.iloc[val_idx]['text']
        y_train, y_val = df.iloc[train_idx]['id'], df.iloc[val_idx]['id']

        predictions = []
        for model in models:
            model.fit(X_train, y_train)
            preds = model.predict(X_val)
            predictions.append(preds)

        predictions = np.array(predictions).T
        optimized_weights = optimize_weights(predictions, y_val)
        fold_weights[fold] = optimized_weights  # 记录当前fold的最佳权重
        oof_predictions[val_idx] = np.dot(predictions, optimized_weights)

    # 计算每个模型在不同fold上的权重平均值
    final_weights = np.mean(fold_weights, axis=0)

    return oof_predictions, final_weights
def optimize_weights(predictions, y_true):
    def loss_func(weights):
        final_prediction = np.sum(weights * predictions, axis=1)
        final_prediction = pd.cut(final_prediction * 6, bins=[-np.inf, 0.83333333, 1.66666667, 2.5, 3.33333333, 4.16666667, np.inf], labels=[0, 1, 2, 3, 4, 5])
        score = cohen_kappa_score(y_true, final_prediction, weights='quadratic')
        return -score

    initial_weights = np.ones(len(predictions[0])) / len(predictions[0])
    res = minimize(loss_func, initial_weights, method='Nelder-Mead')
    return res.x
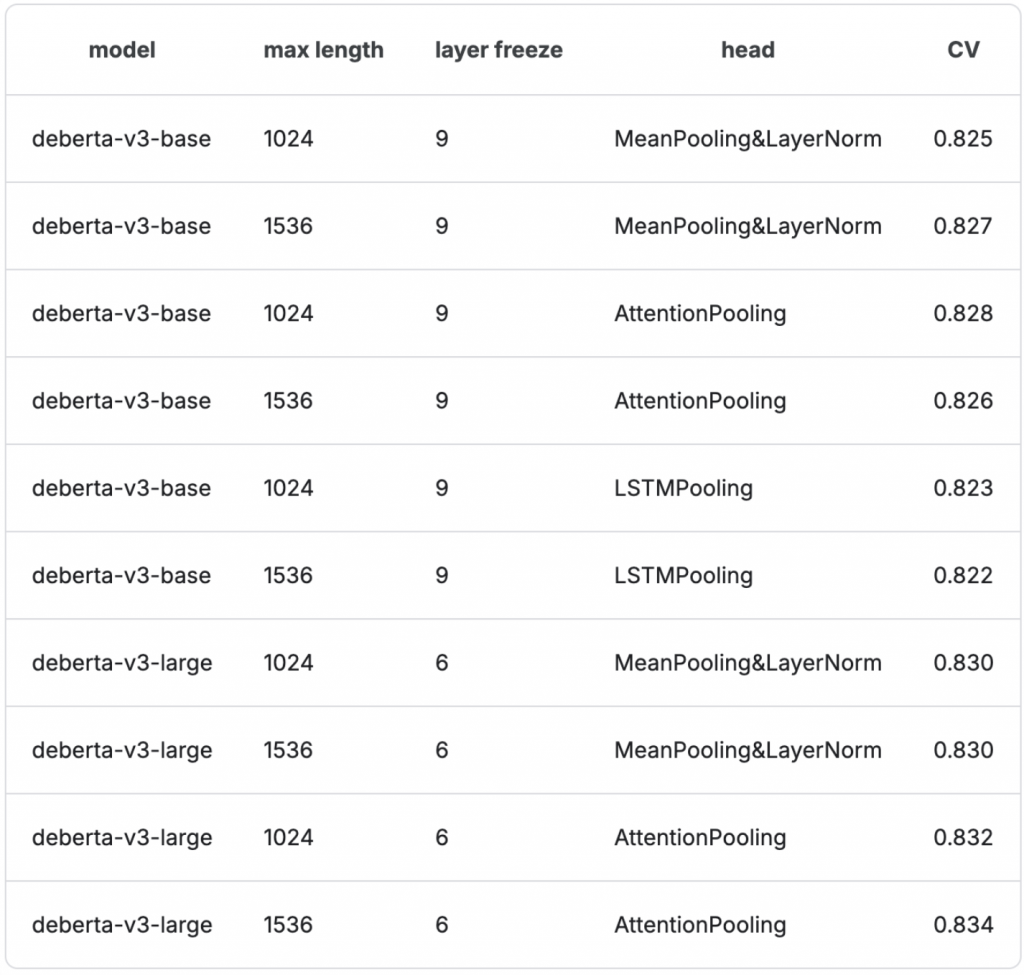
下表是2集成的所有模型的規格和 CV Score:
class CustomModel(nn.Module):
    def __init__(self, cfg, pooling_method="MeanPooling", do_layer_normalize=False):
        super().__init__()
        self.cfg = cfg
        self.do_layer_normalize = do_layer_normalize
        self.model = AutoModel.from_pretrained(cfg.model, config=self.config)
        if pooling_method == "MeanPooling":
            self.pool = MeanPooling()
        elif pooling_method == "AttentionPooling":
            self.pool = AttentionPooling()
        elif pooling_method == "LSTMPooling":
            self.pool = LSTMPooling()
        else:
            raise Exception('Pooling Method Wrong!')
        self.layer_norm1 = nn.LayerNorm(self.config.hidden_size)
        self.fc = nn.Linear(self.config.hidden_size, self.cfg.target_size)


    def feature(self, inputs):
        outputs = self.model(**inputs)
        last_hidden_states = outputs[0]
        feature = self.pool(last_hidden_states, inputs['attention_mask'])
        return feature

    def forward(self, inputs):
        feature = self.feature(inputs)
        if self.do_layer_normalize:
            feature = self.layer_norm1(feature)
        output = self.fc(feature)
        return output
作者一共實現了三種不同的 pooling 方式(實現細節用註解寫在代碼中):
class MeanPooling(nn.Module):
    def __init__(self, cfg):
        super(MeanPooling, self).__init__()
        self.cfg = cfg
    def forward(self, last_hidden_state, attention_mask):
        # Expand the attention mask to match the last_hidden_state dimensions: [batch_size, sequence_length, hidden_size]
        expanded_mask = attention_mask.unsqueeze(-1).expand_as(last_hidden_state).float()

        # Apply the attention mask to the hidden states
        masked_hidden_state = last_hidden_state * expanded_mask

        # Sum the masked hidden states along the sequence length dimension
        sum_embeddings = masked_hidden_state.sum(dim=1)

        # Sum the attention mask along the sequence length dimension
        sum_mask = expanded_mask.sum(dim=1)

        # Avoid division by zero by clamping the sum_mask to a minimum value
        sum_mask = torch.clamp(sum_mask, min=1e-9)

        # Compute the mean embeddings by dividing the summed embeddings by the summed mask
        mean_embeddings = sum_embeddings / sum_mask

        return mean_embeddings
class AttentionPooling(nn.Module):
    def __init__(self, cfg):
        super(AttentionPooling, self).__init__()
        self.cfg = cfg
        self.attention = nn.Sequential(
            nn.Linear(self.config.hidden_size, 512),
            nn.Tanh(),
            # 將 512 維的輸出縮減到 1 維,這一步的結果可以看作是每個時間步(序列中的每個元素)的注意力分數(attention score)
            nn.Linear(512, 1),
            # 將注意力分數轉換為概率分佈,這樣輸出就變成了在序列上對應每個元素的權重。dim=1 表示這個操作是在序列的維度上進行的,即針對每個序列元素計算其相對於其他元素的重要性。
            nn.Softmax(dim=1)
        )
    def forward(self, last_hidden_state, attention_mask=None):
        weight = self.attention(last_hidden_state)
        # 在序列維度上對所有元素進行加權求和,得到一個單一的特徵表示 feature
        pool_embeddings = torch.sum(weights * last_hidden_states, dim=1)
        return pool_embeddings
class LSTMPooling(nn.Module):
    def __init__(self, cfg):
        super(LSTMPooling, self).__init__()
        self.cfg = cfg
        """
        self.config.hidden_size:這是 LSTM 的輸入維度,即每個時間步輸入到 LSTM 的特徵數量。這裡,它等於 Transformer 模型的隱藏狀態的維度。

        (self.config.hidden_size) // 2:這是 LSTM 的輸出維度(隱藏層狀態的維度),因為 LSTM 是雙向的(bidirectional=True),實際上每個時間步的最終輸出將是兩倍的這個大小(來自正向和反向的隱藏層狀態拼接在一起)。

        num_layers=2:這表示 LSTM 的層數。這裡使用了兩層 LSTM,使得模型能夠學習更複雜的序列依賴。

        dropout=self.config.hidden_dropout_prob:這是在 LSTM 層之間應用的 dropout 率,用於防止過擬合。

        batch_first=True:這個參數表示輸入和輸出的數據形狀是 (batch_size, sequence_length, hidden_size),這通常與 Transformer 模型的輸出形狀保持一致。

        bidirectional=True:這表示 LSTM 是雙向的,這樣可以捕捉到序列中的前向和後向信息,進一步增強模型的特徵提取能力。
        """
        self.lstm = nn.LSTM(
            self.config.hidden_size,
            (self.config.hidden_size) // 2,
            num_layers=2,
            dropout=self.config.hidden_dropout_prob,
            batch_first=True,
            bidirectional=True)
        self.pool = MeanPooling()
    def forward(self, last_hidden_state, attention_mask):
        feature = self.lstm(last_hidden_state)
        pool_embeddings = self.pool(feature, attention_mask)
        return pool_embeddings
第一名4的做法跟前兩位一樣,重點也是在如何弭平 non-persuade 和 persuade data 的差距。
他使用 pre-train(on persuade data) -> fine-tune(on non-persuade data)的兩階段訓練方法,其作法如下:
我覺得第一名的作法和第三名其實有共同之處,都是用 relabel data 重新創造 pseudo-label 的方法來弭平這兩個 dataset 之間的差距,避免模型過度 overfit 在任何一個特定的 dataset 上。
第一名還有提到一些實作細節如下:
也就是說,他在切分folds時,總共要考慮 7(prompt name 數量)*6(6個分數級距) = 42 個 labels,根據這些 labels 的分佈切成 5-folds。
不過有趣的是,他似乎只有在第一階段 pre-train 做 CV,或是在標 pseudo-label 前使用這個 CV 策略。因為他最後提交的模型,似乎都是使用全部訓練資料下去訓練,只是調整不同模型的參數以及 random seed 而已。
創造多個可集成(ensemble)的模型變體
改變 loss function
作者使用的 backbone model 主要都是 deberta-v3-base 或是 deberta-v3-large。但是有些使用 regression 的範式訓練,以就是使用 MSE 當作 loss;有些則將 score 用 sigmoid function 轉成介在 0~1 之間的數值,然後使用 binary cross entropy 來優化
改變 pooling 方法
作者使用 GEM Pooling 或是直接使用 [CLS] token 的 embedding
使用不同 random seed 訓練多個模型
因為第二階段只會在 4.5k 的 non-persuade data 上 fine-tuned,data 數量比較少,作者發現不同 random seed 會得到差異較大的結果。所以最後他每個模型、每種訓練方式都會用 3 種不同的 random seed 訓練,最終平均這 3 個的結果當成該個訓練方式的最終輸出。
找到區分6個分數級距的最佳 threshold
由於分數一共有 6 個級距(1, 2, 3, 4, 5, 6),所以在切分 threshold 時,很自然地就會想設定 [1.5, 2.5, 3.5, 3.5, 5.5] 當成 threshold。也就是模型預測分數小於 1.5 的,就 label 成分數 1;模型預測結果介在 1.5~2.5 的,就 label 成分數 2,以此類推,如果預測結果大於 5.5 就 label 成分數 6
但由於訓練資料中每個 score(label) 的資料量不同,例如 score 3 的 data 是最多的,因此 label 為 2 的可能更常被預測成較大的數值,如果不調整 threshold,可能就會容易被捨入為 score 3。
那要如何自動找到最適合的 threshold 呢?
和前面第三名找集成模型的最佳權重一樣,現在作者也是使用一個優化算法,並定義一個 loss function,來找到這六個分數級距的最佳分割 threshold。這邊作者使用 Powell 的優化算法來優化 QWK 分數,具體程式碼如下:
predictions = [...]
true_labels = [...]

optimal_thresholds = find_optimal_thresholds(predictions, true_labels)

def find_optimal_thresholds(predictions, true_labels):
# 计算QWK分数
def qwk_score(thresholds):
    # 根据阈值将回归预测结果转换为分类
    thresholds = np.sort(thresholds)
    bins = [-np.inf] + list(thresholds) + [np.inf]
    pred_labels = pd.cut(predictions, bins=bins, labels=[1, 2, 3, 4, 5, 6])
    return -cohen_kappa_score(true_labels, pred_labels, weights='quadratic')

# 初始 threshold
initial_thresholds = [1.5, 2.5, 3.5, 4.5, 5.5]

# 使用Powell方法最小化-QWK

result = minimize(qwk_score, initial_thresholds, method='Powell')

# 返回最佳阈值
optimal_thresholds = result.x
optimal_thresholds.sort()
return optimal_thresholds
根據當下的 threshold 分割出 score 後,和 ground truth 計算 QWK(Quadratic Weighted Kappa)。由於目標是最小化 loss function 的數值,然而 QWK 應該越大越好,故乘上負號。
關於 Learning Agency Lab - Automated Essay Scoring 2.0,這個 kaggle 競賽的系列分享就到此為止啦!
今天分享前四名(第二名的 write-up 的 write-up 寫的比較讓我困惑,所以這邊只分享1, 3, 4名的做法)各自在這個賽題上試出的最優解法。
我個人覺得今天分享的三個得獎組別的做法,都有讓人覺得趣味滿滿的巧妙想法!
像是第四名透過簡單的實驗觀察到,兩種 data 應該是有不同的分佈,所以僅僅是在兩種不同來源的 data 前加上 [A], [B] 兩個識別符,就可以明顯提升 performance,於是繼續延伸出兩種 data 要用不同的 classification head 等策略。方法簡單又有效!
第一名和第三名的做法有點像,都是透過兩階段或多階段的微調,在過程中用上一個階段的模型產生 pseudo-label,讓下階段的模型在這個 pseudo-label 上繼續訓練。
剩下還有一些實用的小技巧,包含 Micro batch 在data字數差異較大時可以穩定訓練、集成模型時如何用最優化算法找到適合每個模型自己的權重、如何設計不同的 pooling 方法等等,從他們的分享中,真的可以挖掘出很多乾貨!
由於今天的分享大多是我從他們得獎後發布的
write-up 以及我 trace 他們提交的 inference code 推敲出來的,如果有發現哪裡講錯的、需要補充的地方,歡迎在討論區跟我說。🙇🏻♀️🙇🏻♀️
明天我們會開啟新的一章,進入新的賽題囉!
明天見~
謝謝讀到最後的你,希望你會覺得有趣!
如果喜歡這系列,別忘了按下訂閱,才不會錯過最新更新,也可以按讚給我鼓勵呦!
如果有任何回饋和建議,歡迎在留言區和我說✨✨
(Kaggle - Learning Agency Lab - Automated Essay Scoring 2.0 解法分享系列)
