哈囉大家好~
不知不覺今天就來到鐵人賽的第20天了!時間過得好快啊,眼看九月也要過去了![]()
好消息是明天就是星期六了(星期五晚上最幸福XD)
昨天簡單介紹登出功能後,今天要來創建填寫表單~
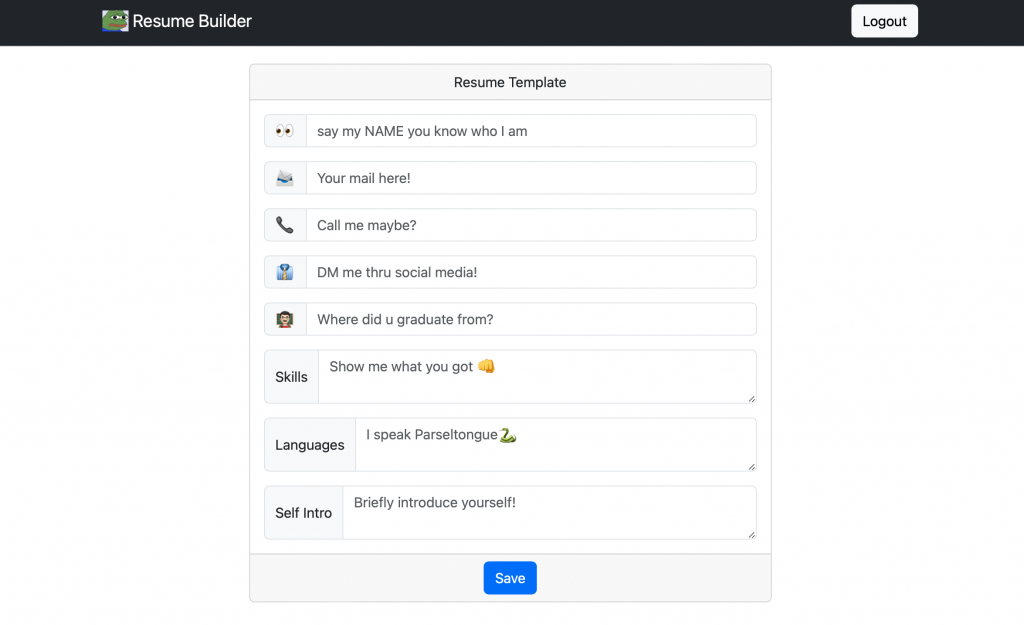
表單的介面完成圖如下:
首先要先創建一個CreateResume的component,先把想好的介面寫出來:(create-resume.blade.php)
<div>
<livewire:Navbar />
<div class="card text-center" style="width: 50%; margin: auto auto; height: 100%; margin-top: 20px;">
<div class="card-header">
Resume Template
</div>
<form wire:submit="save">
<div class="card-body">
<!-- name -->
<div class="input-group mb-3">
<span class="input-group-text" id="basic-addon1">👀</span>
<input type="text" class="form-control" placeholder="say my NAME you know who I am"
aria-label="Name" aria-describedby="basic-addon1"
wire:model="name"
>
</div>
<!-- email -->
<div class="input-group mb-3">
<span class="input-group-text" id="basic-addon1">📨</span>
<input type="text" class="form-control" placeholder="Your mail here!"
aria-label="Name" aria-describedby="basic-addon1"
wire:model="email"
>
</div>
<!-- phone -->
<div class="input-group mb-3">
<span class="input-group-text" id="basic-addon1">📞</span>
<input type="text" class="form-control" placeholder="Call me maybe?"
aria-label="Name" aria-describedby="basic-addon1"
wire:model="phone"
>
</div>
<!-- social media -->
<div class="input-group mb-3">
<span class="input-group-text" id="basic-addon1">👔</span>
<input type="text" class="form-control" placeholder="DM me thru social media!"
aria-label="Name" aria-describedby="basic-addon1"
wire:model="social"
>
</div>
<!-- education -->
<div class="input-group mb-3">
<span class="input-group-text" id="basic-addon1">👨🏻🏫</span>
<input type="text" class="form-control" placeholder="Where did u graduate from?"
aria-label="Name" aria-describedby="basic-addon1"
wire:model="education"
>
</div>
<!-- skills -->
<div class="input-group mb-3">
<span class="input-group-text">Skills</span>
<textarea class="form-control" aria-label="self-introduction"
placeholder="Show me what you got 👊"
wire:model="skills"
></textarea>
</div>
<!-- language -->
<div class="input-group mb-3">
<span class="input-group-text">Languages</span>
<textarea class="form-control" aria-label="self-introduction"
placeholder="I speak Parseltongue🐍"
wire:model="language"
></textarea>
</div>
<!-- self introduction -->
<div class="input-group">
<span class="input-group-text">Self Intro</span>
<textarea class="form-control" aria-label="self-introduction"
placeholder="Briefly introduce yourself!"
wire:model="selfIntro"
></textarea>
</div>
</div>
<!-- submit button -->
<div class="card-footer text-body-secondary">
<button type="submit" class="btn btn-primary">Save</button>
</div>
</form>
</div>
</div>
看起來很大一坨,但其實都是排版用的程式碼比較多~
這裡比較重要的就是要撈使用者填寫的資料,按下儲存按鈕後將資料存到資料庫裡。
因為使用livewire框架,所以這裡使用wire:model="example"來對應input value。
在最外圍的form標籤,處理使用者按下儲存按鈕,這裡用wire:submit="save"(此處的save會對應controller中處理儲存資料的function)
寫完前端介面後,用migration來創建一個資料表resume,並且定義資料表的架構:
<?php

use Illuminate\Database\Migrations\Migration;
use Illuminate\Database\Schema\Blueprint;
use Illuminate\Support\Facades\Schema;

return new class extends Migration
{
    public function up(): void
    {
        Schema::create('resume', function (Blueprint $table) {
            $table->id();
            $table->string('name');
            $table->string('email');
            $table->string('phone');
            $table->string('social');
            $table->string('education', length: 300);
            $table->string('skills', length: 300);
            $table->string('language', length: 200);
            $table->string('selfIntro', length: 500);
            $table->timestamps();
        });
    }
    public function down(): void
    {
        Schema::dropIfExists('resume');
    }
};
再來創建等一下幫我和MySQL資料庫互動的Model:
<?php

namespace App\Models;

use Illuminate\Database\Eloquent\Factories\HasFactory;
use Illuminate\Database\Eloquent\Model;

class Resume extends Model
{
    use HasFactory;

    protected $table = 'resume';
    protected $fillable = [
       'name',
       'email',
       'phone',
       'social',
       'education',
       'skills',
       'language',
       'selfIntro'
    ];
}
資料表準備好之後就可以來寫input的邏輯啦~
class CreateResume extends Component
{
    #[Validate('required')]
    public $name = '';

    #[Validate('required')]
    public $email = '';

    #[Validate('required')]
    public $phone = '';

    public $social = '';
    public $education = '';
    public $skills = '';
    public $language = '';
    public $selfIntro = '';

    public function save()
    {
        $this->validate();

        Resume::create([
            'name' => $this->name,
            'email' => $this->email,
            'phone' => $this->phone,
            'social' => $this->social,
            'education' => $this->education,
            'skills' => $this->skills,
            'language' => $this->language,
            'selfIntro' => $this->selfIntro
        ]);

        session()->flash('createResume', 'Created successfully!');

        return redirect()->to('/dashboard');
    }
使用者按下儲存按鈕後,就會切回dashboard頁面!
今天的新增功能介紹就簡單到這邊結束了,雖然今天的程式碼看起來比較多,但其實和前面form的部分大同小異XD
明天要來讀取我填寫的表單紀錄![]()
