在Apache POI-寫入(匯出)Excel這篇匯出的Excel僅僅是將資料寫入,沒有其他任何處理,不過Apache POI也可以對Cell進行各種外觀上的設定。
還未做任何設定的報表如下圖: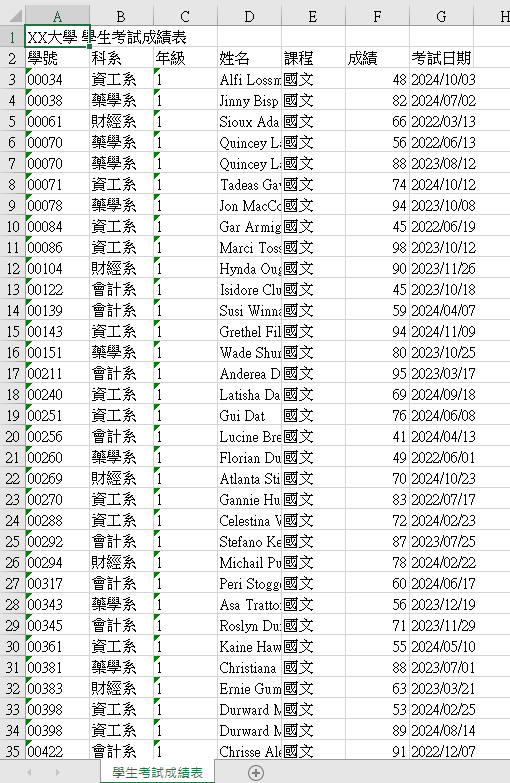
下列範例會從Apache POI-寫入(匯出)Excel這篇的程式碼來修改。
要將標題合併儲存格,需要使用到CellRangeAddress,他就像是個選取框,可以由四個參數選定範圍,分別為起始列、結束列、起始行、結束行,都是index所以從0開始。
public CellRangeAddress(int firstRow,
                        int lastRow,
                        int firstCol,
                        int lastCol)
我們的標題在第一列,有7行,因此可以在匯出的方法中加上下列程式碼,就能將標題合併儲存格了。
// 標題 合併儲存格 (起始列, 結束列, 起始行, 結束行)
CellRangeAddress cellRangeAddress = new CellRangeAddress(0, 0, 0, 6);
sheet.addMergedRegion(cellRangeAddress);

樣式的設定是以一個Cell為基準,我們可以使用CellStyle幫我們儲存任何Cell樣式的設定,並直接套用到目標的Cell上。
我想將標題列以及學號的資料文字置中,將年級的資料文字靠右對齊,因此我建立兩種CellStyle。先設定標題:
// 建立Workbook
Workbook workbook = new XSSFWorkbook();

// 設定文字置中樣式
CellStyle centerStyle = workbook.createCellStyle();
centerStyle.setAlignment(HorizontalAlignment.CENTER);

// 設定文字靠右樣式
CellStyle rightStyle = workbook.createCellStyle();
rightStyle.setAlignment(HorizontalAlignment.RIGHT);
以setCellStyle()設定標題的樣式。
// 建立excel sheet(參數為sheetname)
Sheet sheet = workbook.createSheet("學生考試成績表");
// 建立列物件(參數為列數,從0開始)
Row titleRow = sheet.createRow(0);
// 建立此列的單元格物件
Cell titleCell = titleRow.createCell(0);
// 設定cell的內容
titleCell.setCellValue("XX大學 學生考試成績表");

// 設定標題文字置中
titleCell.setCellStyle(centerStyle);
遍歷資料到學號或年級的Cell時再setCellStyle()設定樣式。
// 遍歷列的資料
for (int i = 0; i < studentCourseScoreReportModelList.size(); i++) {
    StudentCourseScoreReportModel model = studentCourseScoreReportModelList.get(i);

    // i+2因為第1列是標題,第2列是欄位名稱
    Row contentRow = sheet.createRow(i + 2);
    // 行的資料
    for (int j = 0; j < columnNames.length; j++) {
        Cell contentCell = contentRow.createCell(j);
        switch (j) {
            case 0:
                contentCell.setCellValue(model.getStudentNumber());
                // 設定文字置中
                contentCell.setCellStyle(centerStyle);
                break;
            case 1:
                contentCell.setCellValue(model.getDepartmentDesc());
                break;
            case 2:
                contentCell.setCellValue(model.getGrade());
                // 設定文字靠右
                contentCell.setCellStyle(rightStyle);
                break;
            case 3:
                contentCell.setCellValue(model.getFullName());
                break;
            case 4:
                contentCell.setCellValue(model.getCourseDesc());
                break;
            case 5:
                contentCell.setCellValue(model.getScore());
                break;
            case 6:
                contentCell.setCellValue(model.getTestDate());
                break;
        }
    }
    // 以下略
}
匯出時就能看到文字對齊方式已經調整了。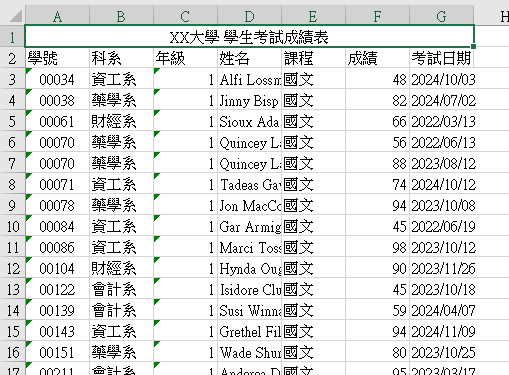
cloneStyleFrom()複製出當下這個Cell的樣式,再加上新的樣式。getCellStyle()取得樣式CellStyle,之後對樣式的調整會修改到此CellStyle,影響到後面也使用同CellStyle的Cell,因此建議使用cloneStyleFrom()。在這個範例中我想將標題以及欄位名稱都字體加粗,標題字改為藍色,且欄位名稱背景調整為淺綠色。
// 建立標題樣式
CellStyle titleStyle = workbook.createCellStyle();
titleStyle.cloneStyleFrom(titleCell.getCellStyle());

// 設定標題文字粗體、顏色為藍色
Font titleFont = titleRow.getSheet().getWorkbook().createFont();
titleFont.setBold(true);
titleFont.setColor(IndexedColors.BLUE.getIndex());
titleStyle.setFont(titleFont);
titleCell.setCellStyle(titleStyle);
在修改欄位名稱那一列時,只要設定一次CellStyle就好,之後的Cell可以直接使用設定好的CellStyle,因此只有for loop中的第一個Cell有設定樣式。
// 第2列作為欄位名稱
Row columnTitleRow = sheet.createRow(1);
// 建立欄位名稱樣式
CellStyle columnTitleStyle = workbook.createCellStyle();
// 設定欄位名稱的文字粗體
Font columnTitleFont = columnTitleRow.getSheet().getWorkbook().createFont();
columnTitleFont.setBold(true);

for (int k = 0; k < columnNames.length; k++) {
    Cell contentCell = columnTitleRow.createCell(k);
    contentCell.setCellValue(columnNames[k]);

    if (k == 0) {
        // 取得欄位名稱的樣式
        columnTitleStyle.cloneStyleFrom(contentCell.getCellStyle());
        // 設定欄位名稱的背景顏色
        columnTitleStyle.setFillForegroundColor(new XSSFColor(new java.awt.Color(197, 232, 181), null));
        columnTitleStyle.setFillPattern(FillPatternType.SOLID_FOREGROUND);
        columnTitleStyle.setFont(columnTitleFont);
    }
    contentCell.setCellStyle(columnTitleStyle);
}
調整後報表如下圖: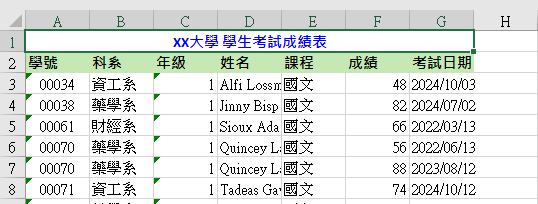
我想將第2列欄位名稱加上綠色邊框,同樣可以設定CellStyle。
// 第2列作為欄位名稱
Row columnTitleRow = sheet.createRow(1);
// 建立欄位名稱樣式
CellStyle columnTitleStyle = workbook.createCellStyle();
// 設定欄位名稱的文字粗體
Font columnTitleFont = columnTitleRow.getSheet().getWorkbook().createFont();
columnTitleFont.setBold(true);

for (int k = 0; k < columnNames.length; k++) {
    Cell contentCell = columnTitleRow.createCell(k);
    contentCell.setCellValue(columnNames[k]);

    if (k == 0) {
        // 取得欄位名稱的樣式
        columnTitleStyle.cloneStyleFrom(contentCell.getCellStyle());
        // 設定欄位名稱的背景顏色
        columnTitleStyle.setFillForegroundColor(new XSSFColor(new java.awt.Color(197, 232, 181), null));
        columnTitleStyle.setFillPattern(FillPatternType.SOLID_FOREGROUND);
        columnTitleStyle.setFont(columnTitleFont);

        // 加上邊框
        columnTitleStyle.setBorderBottom(BorderStyle.THICK);
        columnTitleStyle.setBorderLeft(BorderStyle.THICK);
        columnTitleStyle.setBorderRight(BorderStyle.THICK);
        columnTitleStyle.setBorderTop(BorderStyle.THICK);
        // 設定邊框顏色
        columnTitleStyle.setBottomBorderColor(IndexedColors.GREEN.getIndex());
        columnTitleStyle.setLeftBorderColor(IndexedColors.GREEN.getIndex());
        columnTitleStyle.setRightBorderColor(IndexedColors.GREEN.getIndex());
        columnTitleStyle.setTopBorderColor(IndexedColors.GREEN.getIndex());
    }
    contentCell.setCellStyle(columnTitleStyle);
}
匯出後樣式如下:
可以用setWrapText()設定姓名欄位自動換行。
// 遍歷列的資料
for (int i = 0; i < studentCourseScoreReportModelList.size(); i++) {
    StudentCourseScoreReportModel model = studentCourseScoreReportModelList.get(i);

    // i+2因為第1列是標題,第2列是欄位名稱
    Row contentRow = sheet.createRow(i + 2);
    // 遍歷行的資料
    for (int j = 0; j < columnNames.length; j++) {
        Cell contentCell = contentRow.createCell(j);
        switch (j) {
            case 0:
                contentCell.setCellValue(model.getStudentNumber());
                contentCell.setCellStyle(centerStyle);
                break;
            case 1:
                contentCell.setCellValue(model.getDepartmentDesc());
                break;
            case 2:
                contentCell.setCellValue(model.getGrade());
                contentCell.setCellStyle(rightStyle);
                break;
            case 3:
                contentCell.setCellValue(model.getFullName());
                CellStyle fullNameStyle = workbook.createCellStyle();
                fullNameStyle.cloneStyleFrom(contentCell.getCellStyle());
                // 設定自動換行
                fullNameStyle.setWrapText(true);
                contentCell.setCellStyle(fullNameStyle);
                break;
            case 4:
                contentCell.setCellValue(model.getCourseDesc());
                break;
            case 5:
                contentCell.setCellValue(model.getScore());
                break;
            case 6:
                contentCell.setCellValue(model.getTestDate());
                break;
        }
    }
}
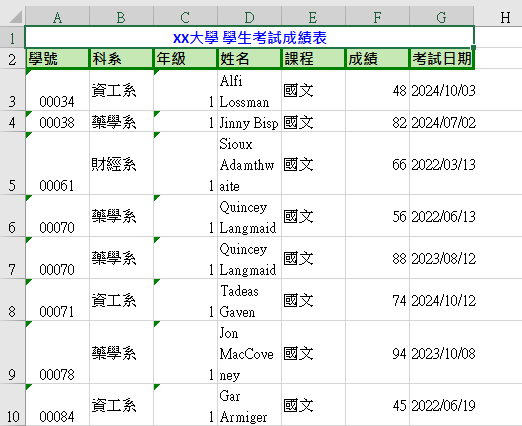
setDefaultColumnWidth()則可以設定預設行寬。
sheet.setDefaultColumnWidth(20);

雖然Apache POI有Sheet.autoSizeColumn()自動適應行寬的方法,但網路上有許多資訊顯示此方法遇到中文時計算的行寬不正確,無法顯示完整的中文字串。
在範例中因為我的欄位名稱都是中文,導致計算的行寬都比較小。
// 遍歷列的資料
for (int i = 0; i < studentCourseScoreReportModelList.size(); i++) {
    StudentCourseScoreReportModel model = studentCourseScoreReportModelList.get(i);
    // 自動調整行寬
    sheet.autoSizeColumn(i);
    // 以下略...
}
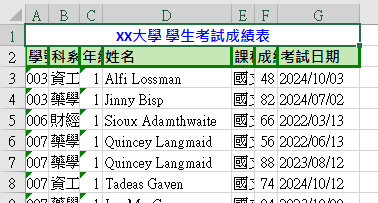
因此要正確的自動適應行寬必須要手動計算有幾個中文字,再使用setColumnWidth()設定行寬,詳細的計算可以參考java/poi 調整Excel 列寬支援自適應中文字元寬度。
而為什麼字元數量要乘以256,是因為API文件中說明,Excel的每個字元寬度是256個單位,不過調整行寬時要注意,Excel一個Cell寬度最大是255個字元,所以setColumnWidth()最多是255 * 256等於65280個單位,寬度設超過的話會拋出IllegalArgumentException。
希望之後的版本能夠修正這個問題,不然中文字要另外計算寬度是真的比較不友善。
