已經來到第十天了,我們已經學習不少Node.js的相關知識與概念,
今天要整合以下幾個模組:
把這些模組串起來,做出一個「簡易的網站伺服器」,有以下功能:
透過這樣的練習就能明白,Node.js是如何扮演「網站伺服器 + API 提供者」的角色,以及過程是如何運作的。
project/
├─ public/
│  ├─ index.html
│  ├─ style.css
│  └─ logo.jpg
└─ server.js
public/ → 放所有靜態檔案server.js → Node.js 伺服器程式import http from "node:http";
import { promises as fsp } from "node:fs";
import { fileURLToPath } from "node:url";
import { dirname, join, extname, resolve } from "node:path";
// ESM 環境模擬 __dirname
const __filename = fileURLToPath(import.meta.url);
const __dirname = dirname(__filename);
const PUBLIC_DIR = join(__dirname, "public");
// 假資料庫
let notes = [
{ id: 1, title: "第一則筆記" },
{ id: 2, title: "第二則筆記" }
];
// 常見 MIME 類型
const MIME = {
".html": "text/html; charset=utf-8",
".css": "text/css; charset=utf-8",
".js": "text/javascript; charset=utf-8",
".json": "application/json; charset=utf-8",
".png": "image/png",
".jpg": "image/jpeg",
".jpeg": "image/jpeg",
".svg": "image/svg+xml",
};
// 讀取並回應檔案
async function serveStatic(pathname, res) {
const target = pathname === "/" ? "/index.html" : decodeURIComponent(pathname);
const filePath = resolve(join(PUBLIC_DIR, "." + target));
// 防止目錄穿越攻擊
if (!filePath.startsWith(PUBLIC_DIR)) {
res.writeHead(400, { "Content-Type": "text/plain; charset=utf-8" });
return res.end("Bad Request");
}
try {
const data = await fsp.readFile(filePath);
const ext = extname(filePath);
res.writeHead(200, { "Content-Type": MIME[ext] || "application/octet-stream" });
res.end(data);
} catch {
res.writeHead(404, { "Content-Type": "text/plain; charset=utf-8" });
res.end("❌ Not Found");
}
}
// 建立伺服器
const server = http.createServer(async (req, res) => {
if (req.url.startsWith("/api/notes")) {
// API:取得所有筆記
if (req.method === "GET") {
res.writeHead(200, { "Content-Type": "application/json; charset=utf-8" });
res.end(JSON.stringify(notes));
}
// API:新增筆記
else if (req.method === "POST") {
let body = "";
req.on("data", chunk => (body += chunk));
req.on("end", () => {
const newNote = { id: Date.now(), title: JSON.parse(body).title };
notes.push(newNote);
res.writeHead(201, { "Content-Type": "application/json; charset=utf-8" });
res.end(JSON.stringify(newNote));
});
} else {
res.writeHead(405, { "Content-Type": "text/plain; charset=utf-8" });
res.end("Method Not Allowed");
}
} else {
// 靜態檔案處理
serveStatic(req.url, res);
}
});
server.listen(3000, () => {
console.log("🚀 靜態伺服器運行中:http://localhost:3000");
});
<!DOCTYPE html>
<html lang="zh">
<head>
  <meta charset="UTF-8">
  <title>Node.js 靜態伺服器 + API</title>
  <link rel="stylesheet" href="style.css">
</head>
<body>
  <h1>Hello Node.js 🚀</h1>
  <p>這是一個結合靜態檔案 & API 的伺服器。</p>

  <h2>📒 筆記列表</h2>
  <ul id="notes"></ul>

  <h2>✍️ 新增筆記</h2>
  <input type="text" id="noteInput" placeholder="輸入筆記內容">
  <button id="addBtn">新增</button>

  <script>
    const notesList = document.getElementById("notes");
    const noteInput = document.getElementById("noteInput");
    const addBtn = document.getElementById("addBtn");

    // 取得所有筆記 (GET)
    async function fetchNotes() {
      const res = await fetch("/api/notes");
      const data = await res.json();
      notesList.innerHTML = "";
      data.forEach(note => {
        const li = document.createElement("li");
        li.textContent = note.title;
        notesList.appendChild(li);
      });
    }

    // 新增筆記 (POST)
    async function addNote() {
      const title = noteInput.value.trim();
      if (!title) return alert("請輸入內容");

      await fetch("/api/notes", {
        method: "POST",
        headers: { "Content-Type": "application/json" },
        body: JSON.stringify({ title })
      });

      noteInput.value = "";
      fetchNotes(); // 新增後重新載入
    }

    addBtn.addEventListener("click", addNote);

    // 頁面載入時執行
    fetchNotes();
  </script>
</body>
</html>
body {
  font-family: sans-serif;
  background: #eef7ff;
  text-align: center;
  padding: 50px;
}

h1 {
  color: #3c873a;
}

li {
  margin: 5px 0;
  font-size: 16px;
}
path.resolve + startsWith?假設有人輸入:
http://部屬網址/../../etc/passwd
伺服器可能會「跑出去」讀取敏感檔案。
這是 目錄穿越攻擊 (Directory Traversal)。
因此要用 resolve() 與 startsWith(),確保只能存取 public/ 目錄內的檔案,避免資安漏洞。
把檔案都設定好後,只要在 終端機上 輸入 node server.js 後,就會啟動伺服器了
會看到有一行 靜態伺服器運行中:http://localhost:3000 ,表示有成功運行!
打開後會看到這樣的畫面
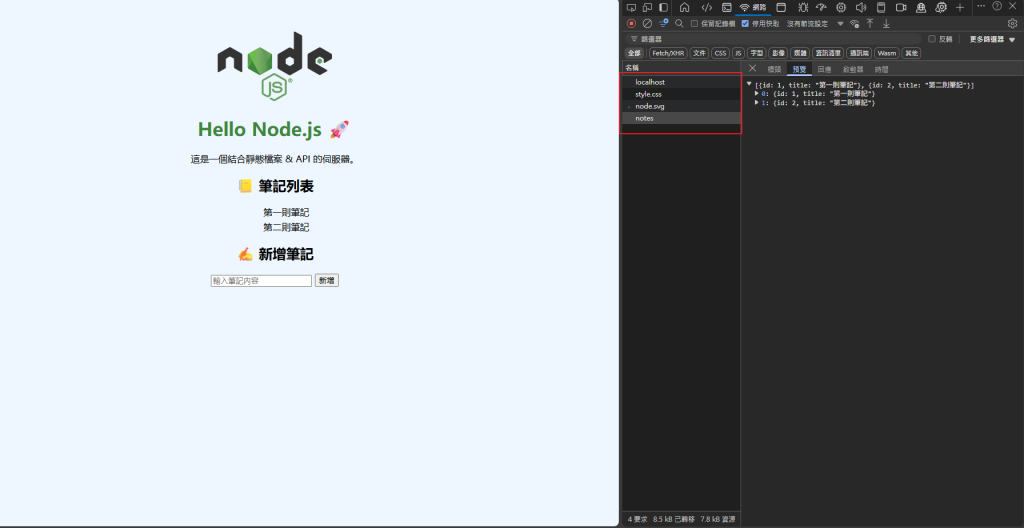
成功順利的把靜態資源都放到網頁上了!
同時,也順利的成功用 GET 拿到 notes 的資料,並渲染到頁面上。
上面的範例圖,用開發者工具看會發現到有四個請求資源,
我們來看它請求資源的過程
[Client]
  │
  ├── GET  /index.html → 靜態檔案
  ├── GET  /style.css  → 靜態檔案
  ├── GET  /node.svg   → 靜態檔案
  ├── GET  /api/notes  → API (回傳 JSON)
  └── 尚未發送 POST /api/notes → API (新增筆記)
  │
  ▼
[Node.js Server]
  │ http + fs + path
  │
  ▼
[Response]
  │
  │ HTML / CSS / JSON / 圖片
接下來,就換你動手做看看囉~
今天我們完成了一個:
/api/notes) → 讀取 & 新增筆記