哈囉大家好!
昨天的GSI按鈕登入功能完成後,要來把前端接收到的JWT存到資料庫中。
我選擇用關聯式資料庫PostgreSQL來儲存資料,使用的是Neon這個Serverless(無伺服器)PostgreSQL資料庫,有提供免費的額度~
Neon的優勢是:當資料庫閒置時會自動暫停,可以節省運行成本,並且支援資料庫分支(Branching)。
首先要登入Neon, 並建立一個資料庫實例,取得連線資訊。
因為Neon使用的是PostgreSQL,所以需要安裝Entity Framework Core專門使用的PostgreSQL Provider。
建立好C# MVC API專案後,執行下面的命令來安裝需要的套件工具:
dotnet add package Microsoft.EntityFrameworkCore
dotnet add package Npgsql.EntityFrameworkCore.PostgreSQL
dotnet add package Microsoft.EntityFrameworkCore.Tools
接下來要先建立一個DbContext類別,負責EF Core和資料庫的溝通。
因為接下來要儲存的是User的相關資訊,所以我先建立一個User的Model(即User表格需要的欄位)
using System.ComponentModel.DataAnnotations;
using System.ComponentModel.DataAnnotations.Schema;

namespace GoDutch.Models
{
    [Table("Users")]
    public class User
    {
        [Key] // primary key
        [DatabaseGenerated(DatabaseGeneratedOption.Identity)] // auto-increment
        public int Id { get; set; }

        [Required]
        public string GoogleSubId { get; set; } = string.Empty; // Google Sub ID

        [Required]
        public string Email { get; set; } = string.Empty;

        public string Name { get; set; } = string.Empty;

        // 首次建立時間
        public DateTime CreatedAt { get; set; } = DateTime.Now;
    }
}
接著就可以建立DbContext(要記得設定DbSet來對應資料表):
using GoDutch.Models;
using Microsoft.EntityFrameworkCore;

namespace GoDutch.Data
{
    public class AppDbContext : DbContext
    {
        // 這裡定義資料模型(entity)
        public DbSet<User> Users { get; set; }

        public AppDbContext(DbContextOptions<AppDbContext> options) : base(options)
        {
        }

        protected override void OnModelCreating(ModelBuilder modelBuilder)
        {
            base.OnModelCreating(modelBuilder);

            // 為GoogleSubId建立索引,加快查找速度
            modelBuilder.Entity<User>()
                .HasIndex(u => u.GoogleSubId)
                .IsUnique();
        }
    }
}
接下來要在appsettings.json檔中新增Neon提供的資料庫連接字串:
{
  "Logging": {
    "LogLevel": {
      "Default": "Information",
      "Microsoft.AspNetCore": "Warning"
    }
  },
  "AllowedHosts": "*",
  "ConnectionStrings": {
    "NeonPostgresConnection": "Host=我的neon Host;Port=5432;Database=資料庫名稱;Username=使用者名稱;Password=密碼;Include Error Detail=true"
  }
}
註:Connection String需要填寫的資訊(例如:Host, Database名稱, Username, Password等)都可以在資料庫設定裡面查看
最後要將服務初始化,所以要在專案的入口點(Program.cs)配置EF Core使用Npgsql來驅動連接Neon:
using Microsoft.EntityFrameworkCore;
using GoDutch.Data;
using System.Text.Json.Serialization;

var builder = WebApplication.CreateBuilder(args);

// 配置Connection String
var connectionString = builder.Configuration.GetConnectionString("NeonPostgresConnection")
                       ?? throw new InvalidOperationException("Connection string 'NeonPostgresConnection' not found.");

// 配置 AppDbContext
builder.Services.AddDbContext<AppDbContext>(options =>
    options.UseNpgsql(connectionString));

builder.Services.AddEndpointsApiExplorer();
builder.Services.AddSwaggerGen();

var app = builder.Build();

if (app.Environment.IsDevelopment())
{
    app.UseSwagger();
    app.UseSwaggerUI();
}

app.UseHttpsRedirection();
app.UseAuthorization();
app.MapControllers();
完成後就可以透過指令來建立migration:
dotnet ef migrations add CreateTableUser
註:這裡一開始執行指令時,出現了「因為找不到指定的命令或檔案,所以無法執行。」的錯誤訊息。
上網查了一下發現從 3.0 起,EF Core 命令列工具 (dotnet ef) 不再包含於 .NET Core SDK 裡,必須額外安裝。
安裝指令為 dotnet tool install --global dotnet-ef。
再update到資料庫:
dotnet ef database update
接著 do re mi so!
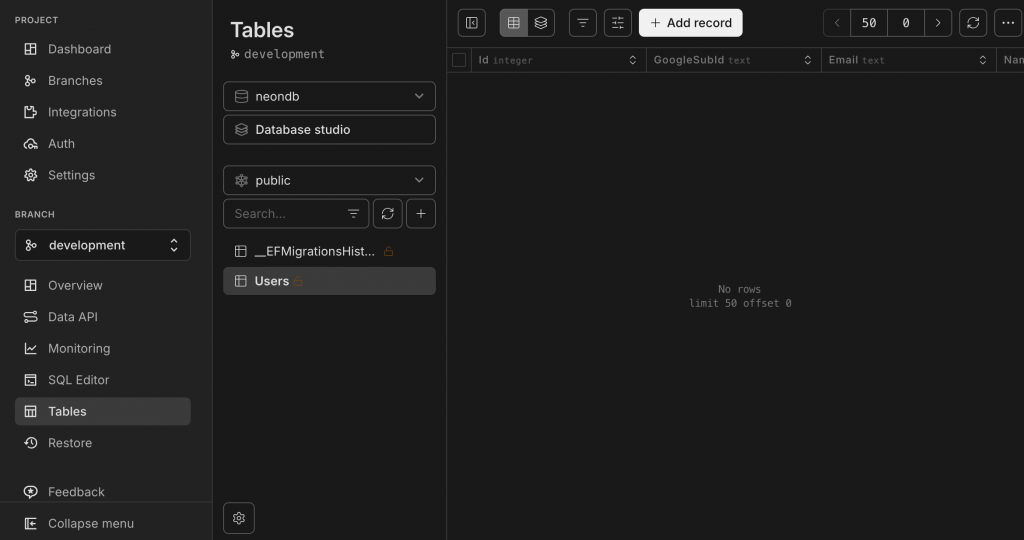
就可以在Neon介面看到資料表了(如圖示!)
