在上一篇文章中,我們學習了如何用 BackgroundTasks 處理「即發即棄」的任務。今天,我們要面對另一個在非同步世界中常見的難題:如何與「同步阻塞 (Synchronous Blocking)」的程式碼共存?

在 async/await 的世界裡,最忌諱的就是執行一個會長時間佔用 CPU 或等待 I/O 的同步函式,例如傳統的資料庫查詢、圖片處理、或是呼叫一個老舊的第三方 SDK。這樣的函式會霸佔整個事件循環 (Event Loop),導致伺服器無法處理任何其他連線請求,應用程式看起來就像「卡住」了一樣。
對此,FastAPI 對此有很好的解決方案。
FastAPI 聰明地意識到開發者不可能將所有程式碼都改為非同步。因此,它做了一個巧妙的設計:
async def 定義路由時,它會直接在主事件循環中執行。def 定義路由時,FastAPI 會自動將這個同步函式丟到一個外部的執行緒池 (Thread Pool) 中去執行。這意味著,即使你的 def 路由函式內部有阻塞操作,它也只會阻塞那個背景執行緒,而不會影響主事件循環,FastAPI 伺服器依然能順暢地處理其他請求。
run_in_threadpool如果我們想在一個 async def 的路由中,呼叫某個特定的阻塞函式呢?Starlette (FastAPI 的底層框架) 提供了一個非常有用的工具:run_in_threadpool。
這個函式可以將任何普通的同步函式,包裝成一個可等待 (awaitable) 的物件,並將其提交到執行緒池中執行。
假設我們有一個無法修改的、會阻塞的函式庫。
from fastapi import FastAPI
from starlette.concurrency import run_in_threadpool
import time
import logging
from datetime import datetime
# 設定 logger
logger = logging.getLogger("uvicorn")
app = FastAPI()
def sync_blocking_call(name: str):
"""一個模擬 CPU 密集或阻塞 I/O 的同步函式"""
current_time = datetime.now().strftime("%H:%M:%S")
logger.info(f"[{current_time}] 開始執行阻塞任務 {name}...")
time.sleep(5) # 模擬 blocking
result = f"任務 {name} 執行完畢!"
current_time = datetime.now().strftime("%H:%M:%S")
logger.info(f"[{current_time}] {result}")
return result
@app.get("/block")
async def run_blocking_task():
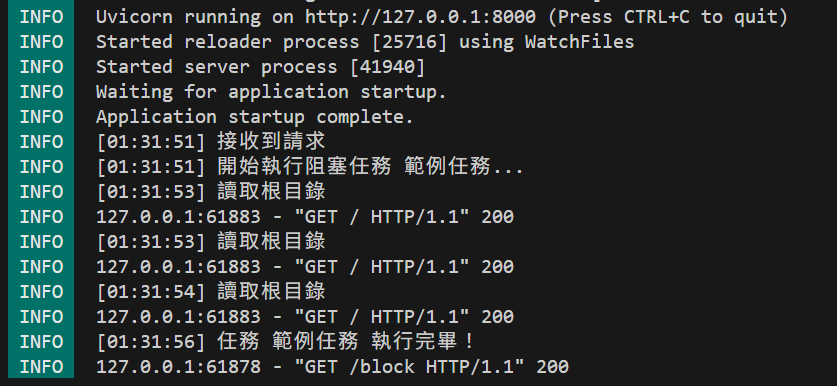
current_time = datetime.now().strftime("%H:%M:%S")
logger.info(f"[{current_time}] 接收到請求")
# 直接呼叫 sync_blocking_call("範例任務") 會阻塞整個伺服器!
# result = sync_blocking_call("範例任務")
# 正確的方式是將它交給 thread pool
result = await run_in_threadpool(sync_blocking_call, name="範例任務")
# 主事件循環在等待的 5 秒內是自由的,可以接收其他請求
return {"message": "阻塞任務已在背景執行緒池完成", "result": result}
當你呼叫這個 API 時,雖然需要等待 5 秒才能收到回應,但在這 5 秒期間,你的 FastAPI 應用是完全可以回應其他請求的(例如你可以開另一個分頁訪問其他 API)。
除了 run_in_threadpool,我們也可以使用 Python 原生的 threading 模組來手動管理執行緒。這種方法提供更多的控制權,但需要自己處理執行緒的生命週期:
import threading
import asyncio
from concurrent.futures import ThreadPoolExecutor

# ...

@app.get("/block-with-threading")
async def run_blocking_task_with_threading():
    current_time = datetime.now().strftime("%H:%M:%S")
    logger.info(f"[{current_time}] 接收到請求")

    # 方法一:使用 ThreadPoolExecutor
    with ThreadPoolExecutor() as executor:
        loop = asyncio.get_event_loop()
        result = await loop.run_in_executor(executor, sync_blocking_call, "執行緒池任務")

    return {"message": "使用 ThreadPoolExecutor 完成", "result": result}

@app.get("/block-fire-and-forget")
async def run_blocking_task_fire_and_forget():
    current_time = datetime.now().strftime("%H:%M:%S")
    logger.info(f"[{current_time}] 接收到請求")

    # 方法二:使用 threading.Thread(火力全開模式)
    def run_task():
        sync_blocking_call("背景執行緒任務")

    thread = threading.Thread(target=run_task)
    thread.daemon = True  # 主程式結束時,背景執行緒也會跟著結束
    thread.start()

    return {"message": "任務已在背景執行緒啟動,不等待結果"}
使用時機比較:
run_in_threadpool:最簡單,適用於大多數情況ThreadPoolExecutor:需要更精細的執行緒池控制時threading.Thread:需要完全自定義執行緒行為,或是「即發即棄」的背景任務使用 def 路由或 run_in_threadpool 是在非同步框架中整合傳統同步程式碼的最佳實踐。它解決了「阻塞」的問題。
然而,它和 BackgroundTasks 一樣,任務的執行依然受限於當前的伺服器。如果任務量過大,會耗盡執行緒池;如果伺服器重啟,正在執行的任務也會中斷。
如果我們希望任務的執行不僅不阻塞,還要具備高可靠性與擴展性,該怎麼辦?這就需要引入更專業的架構了,我們會在下一篇文章進行探討。


 iThome鐵人賽