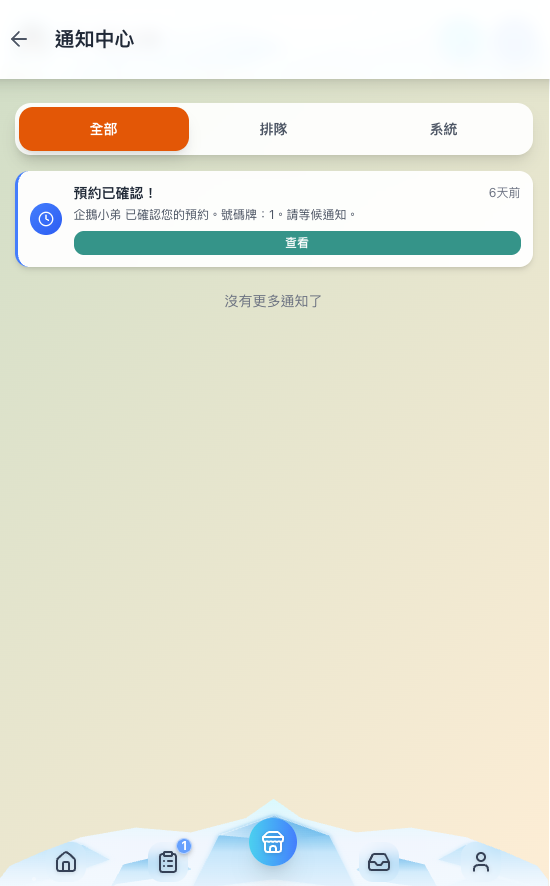
當在餐廳排隊時,商家可以即時通知,而不需要一直刷新手機畫面。
在排隊系統中,當預約狀態改變時(比如商家確認預約、開始服務等),相關的人員會立即收到通知,就像 LINE 或 WhatsApp 的訊息推送一樣。
傳統方式(需要手動刷新):
客戶 → 不斷詢問服務器「有新消息嗎?」
服務器 → 「沒有」「沒有」「沒有」「有!」
即時通知方式:
服務器 → 主動推送「你有新消息!」→ 客戶
Supabase 提供即時功能,就像建立一個「廣播電台」:
建立一個專門處理即時通知的 Hook,就像建立一個「通訊中心」:
// hooks/useRealtimeNotify.ts
import { useEffect } from "react";
import { supabase } from "@/lib/supabase/client";
import { useAuth } from "@/hooks/useAuth";

export function useRealtimeNotify() {
  const { user } = useAuth();

  // 監聽即時通知(像是「收聽廣播」)
  useEffect(() => {
    if (!user?.id) return;

    // 建立專屬頻道,就像每個人有自己的電話號碼
    const channel = supabase
      .channel(`user-${user.id}`)
      .on("broadcast", { event: "notification" }, (payload) => {
        const { title, message } = payload.payload;

        const notificationEvent = new CustomEvent("realtime-notification", {
          detail: {
            title,
            message,
            created_at: new Date().toISOString(),
          },
        });
        window.dispatchEvent(notificationEvent);
      })
      .subscribe();

    // 清理資源(離開時「掛斷電話」)
    return () => supabase.removeChannel(channel);
  }, [user?.id]);

  // 發送即時通知(像是「打電話給別人」)
  const sendNotification = async (
    userId: string,
    title: string,
    message: string
  ) => {
    await supabase.channel(`user-${userId}`).send({
      type: "broadcast",
      event: "notification",
      payload: { title, message, timestamp: Date.now() },
    });
  };

  return { sendNotification };
}
當客戶預約時,立即通知商家:
// app/my-bookings/page.tsx
import { useRealtimeNotify } from "@/hooks/useRealtimeNotify";

export default function MyBookingsPage() {
  const { sendNotification } = useRealtimeNotify();

  const handleSubmitBooking = async (bookingId: string) => {
    try {
      const booking = bookings.find((b) => b.id === bookingId);

      // 1. 先更新資料庫
      await submitBookingFromHook(bookingId);

      // 2. 發送即時通知給商家
      if (booking?.store_owner_id) {
        await sendNotification(
          booking.store_owner_id,
          "預約已發送",
          `客戶已建立 ${booking.store_name} 的預約`
        );
      }
    } catch (error) {
      console.error("預約失敗:", error);
    }
  };
}
當商家確認預約時,立即通知客戶:
// app/received-bookings/page.tsx
import { useRealtimeNotify } from "@/hooks/useRealtimeNotify";

export default function ReceivedBookingsPage() {
  const { sendNotification } = useRealtimeNotify();

  const handleAcceptBooking = async (bookingId: string) => {
    try {
      const booking = bookings.find((b) => b.id === bookingId);

      // 1. 先更新資料庫
      await acceptBooking(bookingId);

      // 2. 發送即時通知給客戶
      if (booking?.user_id) {
        await sendNotification(
          booking.user_id,
          "預約已確認!",
          `${booking.store_name} 已確認您的預約,號碼牌:${booking.queue_number}`
        );
      }
    } catch (error) {
      console.error("確認預約失敗:", error);
    }
  };
}
讓通知頁面能即時更新:
// app/notifications/page.tsx
import { useEffect, useState } from 'react';
import { useRealtimeNotify } from '@/hooks/useRealtimeNotify';

export default function NotificationsPage() {
  // 從伺服器端獲取初始通知列表
  const [notifications, setNotifications] = useState<Notification[]>([]);

  // 啟動即時通知監聽
  useRealtimeNotify();

  useEffect(() => {
    const handleRealtimeNotification = (event: CustomEvent<Partial<Notification>>) => {
      const { title, message, created_at } = event.detail;

      // 使用收到的資料建立新的通知物件
      const newNotification: Notification = {
        title: title || '新通知',
        message: message || '',
        created_at: created_at || new Date().toISOString(),
      };

      // 將新通知加到列表頂部,讓使用者馬上看到
      setNotifications(prev => [newNotification, ...prev]);
    };

    window.addEventListener('realtime-notification', handleRealtimeNotification as EventListener);

    // 在元件卸載時移除監聽器,防止記憶體洩漏
    return () => {
      window.removeEventListener('realtime-notification', handleRealtimeNotification as EventListener);
    };
  }, []);

  return (
    <div className="p-4">
      <h1 className="text-2xl font-bold mb-4">通知</h1>
      <ul>
        {notifications.map((notification) => (
          <li key={notification.id} className="border-b p-2">
            <p className="font-semibold">{notification.title}</p>
            <p>{notification.message}</p>
            <p className="text-xs text-gray-500">{new Date(notification.created_at).toLocaleString()}</p>
          </li>
        ))}
      </ul>
    </div>
  );
}
客戶提交預約
客戶 → 發送預約 → 資料存入資料庫 → 觸發器自動建立通知
商家收到通知
資料庫觸發器 → 建立通知記錄 → 即時推送給商家 → 商家看到「新預約請求」
商家確認預約
商家點擊確認 → 更新預約狀態 → 發送即時通知 → 客戶立即收到「預約已確認」
服務開始
商家點擊開始服務 → 發送即時通知 → 客戶收到「輪到您了!」
# 啟動本地 Supabase
supabase start

# 在瀏覽器中打開應用,同時開啟多個分頁模擬不同用戶
即時通知功能讓排隊系統更加人性化,用戶不再需要不斷刷新頁面等待更新。
... to be continued
有任何想討論歡迎留言,或需要指正的地方請鞭大力一點,歡迎訂閱、按讚加分享,分享給想要提升開發效率的朋友
