
大家好,歡迎來到第二十五天!在 Day 24,我們成功建立了 Android 平台的完整部署流程,從 Keystore 管理到 Firebase App Distribution 的自動化發布。今天,我們要面對 iOS 平台的部署挑戰,學習如何將 Crew Up 應用程式成功上架到 Apple App Store。
從專案開發的經驗來看,iOS 上架最大的挑戰不是理論,而是實際執行中遇到的各種問題。今天我們將分享在 Crew Up 專案中遇到的真實問題,以及如何一步步解決並建立穩定的上架流程。
在深入問題解決之前,讓我們先了解 iOS 上架需要的基本設定。這些設定在 Crew Up 專案中都有實際應用:
建立 iOS Distribution Certificate:
在 Crew Up 專案中,我們需要建立正確的 Apple Distribution 證書。以下是我們實際使用的步驟:
步驟 1: 準備 Certificate Signing Request (CSR)
# 在 Mac 上建立 CSR
# 1. 開啟 Keychain Access
# 2. 選單:Keychain Access > Certificate Assistant > Request a Certificate From a Certificate Authority
# 3. 填寫資訊:
#    - User Email Address: 您的 Apple ID email
#    - Common Name: 您的姓名或公司名稱
#    - CA Email Address: 留空
#    - Request is: Saved to disk
# 4. 選擇儲存位置並命名為 "CertificateSigningRequest.certSigningRequest"
步驟 2: 在 Apple Developer Portal 建立證書
步驟 3: 選擇正確的證書類型
步驟 4: 上傳 CSR 檔案
CertificateSigningRequest.certSigningRequest 檔案步驟 5: 下載證書
distribution.cer 或 ios_distribution.cer
步驟 6: 安裝證書到 Keychain
.cer 檔案步驟 7: 驗證證書安裝
# 檢查證書是否正確安裝
security find-identity -v -p codesigning

# 應該看到類似這樣的輸出:
# 1) ABC1234567890ABCDEF1234567890ABCDEF123456 "Apple Distribution: Your Company OU"
步驟 8: 匯出 .p12 檔案(包含私鑰)
ios_distribution.p12
步驟 9: 轉換為 Base64 格式
# 方法 1: 直接轉換並複製到剪貼簿
base64 -i ios_distribution.p12 | pbcopy

# 方法 2: 轉換並顯示內容(用於檢查)
base64 -i ios_distribution.p12

# 方法 3: 轉換並儲存到檔案
base64 -i ios_distribution.p12 > ios_distribution_base64.txt

# 方法 4: 一行指令完成轉換和複製
cat ios_distribution.p12 | base64 | pbcopy

# 複製的內容將用於 GitHub Secret: IOS_CERTIFICATE
建立 Provisioning Profile:
在 Crew Up 專案中,我們使用 com.yourcompany.yourapp 作為 App ID。以下是我們實際使用的步驟:
步驟 1: 確認 App ID 存在
com.yourcompany.yourapp)步驟 2: 建立新的 Provisioning Profile
步驟 3: 選擇 App ID
步驟 4: 選擇 Distribution Certificate
步驟 5: 命名和產生 Profile
Crew Up Distribution)步驟 6: 下載 Provisioning Profile
Crew_Up_Distribution.mobileprovision
步驟 7: 安裝 Provisioning Profile
.mobileprovision 檔案~/Library/MobileDevice/Provisioning Profiles/
步驟 8: 驗證 Profile 安裝
# 檢查已安裝的 Provisioning Profiles
ls -la ~/Library/MobileDevice/Provisioning\ Profiles/

# 檢查 Profile 內容
security cms -D -i ~/Library/MobileDevice/Provisioning\ Profiles/*.mobileprovision | grep -A 5 "Name"
步驟 9: 轉換為 Base64 格式
# 找到正確的 Profile 檔案(通常是最新的)
cd ~/Library/MobileDevice/Provisioning\ Profiles/
ls -lt *.mobileprovision | head -1

# 方法 1: 直接轉換並複製到剪貼簿
base64 -i YOUR_PROFILE.mobileprovision | pbcopy

# 方法 2: 轉換並顯示內容(用於檢查)
base64 -i YOUR_PROFILE.mobileprovision

# 方法 3: 轉換並儲存到檔案
base64 -i YOUR_PROFILE.mobileprovision > profile_base64.txt

# 方法 4: 一行指令完成轉換和複製
cat YOUR_PROFILE.mobileprovision | base64 | pbcopy

# 方法 5: 批次處理多個檔案
for file in *.mobileprovision; do
    echo "Processing: $file"
    base64 -i "$file" | pbcopy
    echo "Base64 content copied to clipboard for: $file"
done

# 複製的內容將用於 GitHub Secret: IOS_PROVISIONING_PROFILE
在 Crew Up 專案中,我們需要設定以下 GitHub Secrets 來支援 iOS 自動化部署:
iOS 相關 Secrets:
IOS_CERTIFICATE (證書 Base64):
# 方法 1: 直接轉換並複製
base64 -i ios_distribution.p12 | pbcopy

# 方法 2: 轉換並檢查內容長度
base64 -i ios_distribution.p12 | wc -c

# 方法 3: 轉換並儲存到檔案(備份用)
base64 -i ios_distribution.p12 > certificate_base64.txt

# 方法 4: 驗證轉換結果
base64 -d certificate_base64.txt > verify.p12
file verify.p12  # 應該顯示 "data"
IOS_PROVISIONING_PROFILE (Profile Base64):
# 方法 1: 直接轉換並複製
cd ~/Library/MobileDevice/Provisioning\ Profiles/
base64 -i YOUR_PROFILE.mobileprovision | pbcopy

# 方法 2: 自動找到最新的 Profile
ls -t *.mobileprovision | head -1 | xargs base64 -i | pbcopy

# 方法 3: 批次轉換所有 Profiles
for profile in *.mobileprovision; do
    echo "=== $profile ==="
    base64 -i "$profile"
    echo ""
done

# 方法 4: 驗證 Profile 內容
base64 -i YOUR_PROFILE.mobileprovision | base64 -d | security cms -D
IOS_GOOGLESERVICE_INFO_PLIST (Firebase 配置 Base64):
# 方法 1: 直接轉換並複製
base64 -i ios/Runner/GoogleService-Info.plist | pbcopy

# 方法 2: 轉換並檢查內容
base64 -i ios/Runner/GoogleService-Info.plist | head -c 100

# 方法 3: 驗證轉換結果
base64 -i ios/Runner/GoogleService-Info.plist | base64 -d | plutil -p -
App Specific Password:
Crew Up 專案需要的 GitHub Secrets 清單:
IOS_CERTIFICATE: Base64 編碼的 .p12 檔案IOS_CERTIFICATE_PASSWORD: .p12 檔案密碼IOS_PROVISIONING_PROFILE: Base64 編碼的 .mobileprovision 檔案APPLE_ID: Apple Developer 帳戶 emailAPPLE_ID_PASSWORD: App Specific PasswordAPPLE_TEAM_ID: Apple Developer Team IDIOS_GOOGLESERVICE_INFO_PLIST: iOS Firebase 設定檔案的 Base64 編碼在 Crew Up 專案中,我們需要設定 Firebase iOS 設定:
取得 GoogleService-Info.plist:
base64 -i ios/Runner/GoogleService-Info.plist | pbcopy
IOS_GOOGLESERVICE_INFO_PLIST 中在深入問題解決之前,讓我們先理解 iOS 證書系統的工作原理。這個理解對解決 Crew Up 專案中遇到的問題非常重要:
┌─────────────────┐    ┌──────────────────┐    ┌─────────────────┐
│   Mac Keychain  │    │ Apple Developer  │    │   Provisioning  │
│                 │    │     Portal       │    │     Profile     │
├─────────────────┤    ├──────────────────┤    ├─────────────────┤
│ 1. 產生 CSR      │───▶│ 2. 上傳 CSR      │    │ 5. 建立 Profile  │
│    + 私鑰        │    │ 3. 核發證書(.cer) │◀───│    (包含證書)    │
│                 │◀───│ 4. 下載證書       │    │                 │
│ 6. 安裝證書      │    │                  │    │ 7. 下載 Profile  │
│    與私鑰配對    │    │                   │    │                 │
└─────────────────┘    └──────────────────┘    └─────────────────┘
流程說明:
關鍵要點:
完成上述設定後,我們滿懷信心地執行了第一次 iOS 建置。一切看起來都很完美:證書已安裝、Provisioning Profile 已配置、GitHub Secrets 已設定。然而,現實給了我們一個響亮的耳光...
我們以為一切都設定完美,興奮地執行了第一次建置,結果卻迎來一個神秘的錯誤。看著 CI/CD 日誌中那串長長的證書資訊,我們困惑不已...
subject=UID=com.yourcompany.yourapp, CN=Apple Push Services: com.yourcompany.yourapp, OU=N7V3Q734KR, O=Modern Wizard OU, C=EE
這個錯誤訊息看起來很技術性,但關鍵在於 CN=Apple Push Services 這幾個字。我們最初使用的是 Apple Push Services 證書,但 iOS 上架需要的是 Apple Distribution 證書。這是一個常見的混淆點,也是我們遇到的第一個陷阱。
問題分析:
Apple Developer Portal 中有多種證書類型,每種都有特定用途:
解決方案:
重新申請正確的證書類型:
驗證證書類型:
# 檢查證書內容
openssl pkcs12 -in ios_distribution.p12 -nokeys -passin pass:"YOUR_PASSWORD" | grep "subject"
重新匯出 .p12 檔案:
解決了證書類型的問題後,我們滿懷信心地再次執行了建置,結果卻迎來了一個更神秘的錯誤:
0 valid identities found
這個錯誤訊息幾乎沒有提供任何線索。我們的證書和 Provisioning Profile 看起來都沒問題,但 CI/CD 環境就是找不到有效的簽名身份。在花了數小時追查後,我們終於發現了問題的根源,一個非常隱密卻極其常見的陷阱:開發者帳號不匹配。
問題分析:
我們發現,私鑰是在本機產生的,永遠不會離開建立 CSR 的那台 Mac。問題在於:
因為私鑰被鎖在 A 帳號的鑰匙圈 (Keychain) 裡,所以當我們試圖安裝屬於 B 帳號的憑證時,系統根本無法將兩者配對,導致簽名身份無效。
為什麼會發生這個問題:
私鑰是在本機產生的,永遠不會離開建立 CSR 的那台 Mac。這是導致 Apple ID 不匹配時出現「找不到私鑰」問題的根本原因。當您使用不同的 Apple ID 登入 Mac 時,Keychain 會將私鑰與該 Apple ID 關聯,導致證書無法正確配對。
具體表現:
.cer 文件沒有反應security import 命令執行成功但證書不顯示security find-identity 找不到有效的簽名身份解決步驟:
重要提醒:
驗證方法:
# 檢查 Keychain 中的證書
security find-identity -v -p codesigning

# 應該看到類似這樣的輸出:
# 1) ABC1234567890ABCDEF1234567890ABCDEF123456 "Apple Distribution: Your Company OU"
解決了證書問題後,我們以為終於可以順利建置了。但命運再次捉弄了我們,這次的錯誤訊息更加明確:
Provisioning profile "Crew Up Distribution" doesn't include signing certificate "Apple Distribution: Modern Wizard OU (***)"
這個錯誤訊息清楚地告訴我們問題所在:Provisioning Profile 不包含我們的簽名證書。原來,當我們更新證書後,Provisioning Profile 也需要同步更新。這就像是一個連鎖反應,一個問題解決了,卻引發了另一個問題。
問題分析:
當我們更新了證書後,Provisioning Profile 也需要重新產生以包含新的證書。
為什麼會發生這個問題:
Provisioning Profile 是一個包含證書、App ID 和設備資訊的設定檔。當您建立新的證書時,舊的 Provisioning Profile 仍然指向舊的證書,因此需要更新以包含新的證書。
解決方案:
編輯 Provisioning Profile:
更新 GitHub Secrets:
# 轉換新的 Provisioning Profile 為 Base64
cd ~/Library/MobileDevice/Provisioning\ Profiles
base64 -i YOUR_NEW_PROFILE.mobileprovision | pbcopy
IOS_PROVISIONING_PROFILE Secret驗證 Profile 內容:
# 檢查 Profile 包含的證書
security cms -D -i YOUR_PROFILE.mobileprovision | grep -A 5 "DeveloperCertificates"
經過重重困難,我們終於成功建置了 iOS App!但就在最後一步上傳到 TestFlight 時,又遇到了新的挑戰:
Missing password for user ***, and running in non-interactive shell
這個錯誤讓我們意識到,CI/CD 環境無法像我們在本地一樣互動式輸入密碼。原來,標準的 Apple ID 登入受雙重認證 (2FA) 保護,這在非互動式的 CI/CD 環境中是無法操作的。
問題分析:
CI/CD 環境中無法互動式輸入密碼,需要使用 App-Specific Password 或 API Key。
為什麼會發生這個問題:
標準的 Apple ID 登入受雙重認證 (2FA) 保護,這在非互動式的 CI/CD 環境中是無法操作的。因此需要使用 App-Specific Password,這是一個專門為自動化工具產生的密碼,不受 2FA 限制。
解決方案:
確認 App Specific Password:
修正 Fastfile 設定:
# Fastfile 中的修正
upload_to_testflight(
  skip_waiting_for_build_processing: true,
  username: ENV["FASTLANE_USER"],
  team_id: ENV["APPLE_TEAM_ID"],
  app_identifier: "com.yourcompany.yourapp"
)
確認 GitHub Actions 環境變數:
# GitHub Actions 環境變數
env:
  FASTLANE_USER: ${{ secrets.APPLE_ID }}
  FASTLANE_APPLE_APPLICATION_SPECIFIC_PASSWORD: ${{ secrets.APPLE_ID_PASSWORD }}
  APPLE_ID_PASSWORD: ${{ secrets.APPLE_ID_PASSWORD }}
  APPLE_TEAM_ID: ${{ secrets.APPLE_TEAM_ID }}
驗證 Secrets 設定:
APPLE_ID 是正確的 Apple ID emailAPPLE_ID_PASSWORD 是 App Specific Password (格式:xxxx-xxxx-xxxx-xxxx)APPLE_TEAM_ID 是正確的 Team ID證書類型區分:
私鑰管理:
環境變數設定:
# .github/workflows/ci-cd.yml
- name: Build and Deploy iOS to TestFlight
  run: |
    echo "🔧 Environment variables:"
    echo "APPLE_ID: $APPLE_ID"
    echo "APPLE_TEAM_ID: $APPLE_TEAM_ID"
    echo "APPLE_ID_PASSWORD: [HIDDEN]"
    echo ""
    echo "📱 Running Fastlane beta..."
    cd ios
    bundle exec fastlane beta --verbose
  env:
    APPLE_ID: ${{ secrets.APPLE_ID }}
    APPLE_ID_PASSWORD: ${{ secrets.APPLE_ID_PASSWORD }}
    APPLE_TEAM_ID: ${{ secrets.APPLE_TEAM_ID }}
GitHub Secrets 設定:
APPLE_ID: 您的 Apple ID emailAPPLE_ID_PASSWORD: App-Specific PasswordAPPLE_TEAM_ID: 您的 Team IDIOS_CERTIFICATE: Base64 編碼的 .p12 證書IOS_CERTIFICATE_PASSWORD: 證書密碼IOS_PROVISIONING_PROFILE: Base64 編碼的 .mobileprovisionAppfile 設定:
# ios/fastlane/Appfile
apple_id(ENV["APPLE_ID"])
team_id(ENV["APPLE_TEAM_ID"])
app_identifier("com.yourcompany.app")
Fastfile 建置配置:
# ios/fastlane/Fastfile
build_app(
  scheme: "production",
  workspace: workspace_path,
  configuration: "Release-production",
  export_method: "app-store",
  output_directory: output_dir,
  output_name: "Runner.ipa",
  clean: true,
  silent: false,
  include_bitcode: false,
  include_symbols: true,
  export_options: {
    provisioningProfiles: {
      "com.yourcompany.app" => "Your App Distribution"
    },
    signingStyle: "manual",
    teamID: ENV["APPLE_TEAM_ID"],
    method: "app-store"
  }
)
在 Crew Up 專案中,我們經常需要將 iOS 憑證轉換為 Base64 格式。以下是我們實際使用的工具:
通用 Base64 轉換:
# 轉換並複製到剪貼簿
base64 -i filename.ext | pbcopy

# 轉換並顯示內容
base64 -i filename.ext

# 轉換並儲存到檔案
base64 -i filename.ext > filename_base64.txt

# 驗證轉換結果
base64 -d filename_base64.txt > verify.ext
file verify.ext
批次處理多個檔案:
# 批次轉換目錄中的所有檔案
for file in *.p12 *.mobileprovision *.plist; do
    if [ -f "$file" ]; then
        echo "=== Converting: $file ==="
        base64 -i "$file" | pbcopy
        echo "Base64 content copied to clipboard for: $file"
        echo "Press Enter to continue with next file..."
        read
    fi
done
檢查 Base64 內容:
# 檢查 Base64 字串長度
echo "YOUR_BASE64_STRING" | wc -c

# 檢查 Base64 字串是否有效
echo "YOUR_BASE64_STRING" | base64 -d > /dev/null && echo "Valid Base64" || echo "Invalid Base64"

# 預覽 Base64 內容(前 100 字元)
echo "YOUR_BASE64_STRING" | head -c 100
自動化腳本範例:
#!/bin/bash
# iOS 憑證 Base64 轉換腳本

echo "🔐 iOS Certificate Base64 Converter"
echo "=================================="

# 檢查 .p12 檔案
if [ -f "ios_distribution.p12" ]; then
    echo "📱 Converting iOS Distribution Certificate..."
    base64 -i ios_distribution.p12 | pbcopy
    echo "✅ Certificate Base64 copied to clipboard"
else
    echo "❌ ios_distribution.p12 not found"
fi

# 檢查 Provisioning Profile
PROFILE_DIR="$HOME/Library/MobileDevice/Provisioning Profiles"
if [ -d "$PROFILE_DIR" ]; then
    LATEST_PROFILE=$(ls -t "$PROFILE_DIR"/*.mobileprovision 2>/dev/null | head -1)
    if [ -n "$LATEST_PROFILE" ]; then
        echo "📋 Converting latest Provisioning Profile..."
        base64 -i "$LATEST_PROFILE" | pbcopy
        echo "✅ Profile Base64 copied to clipboard"
    else
        echo "❌ No Provisioning Profiles found"
    fi
fi

echo "🎉 Conversion completed!"
目前我們的 CI/CD 流程已經通過了證書驗證和建置階段,TestFlight 上傳也已經配置完成。在下一篇文章中,我將分享:
就在我們準備測試最終的 iOS 上架流程時,遇到了意外的挑戰:GitHub 服務出現了問題。
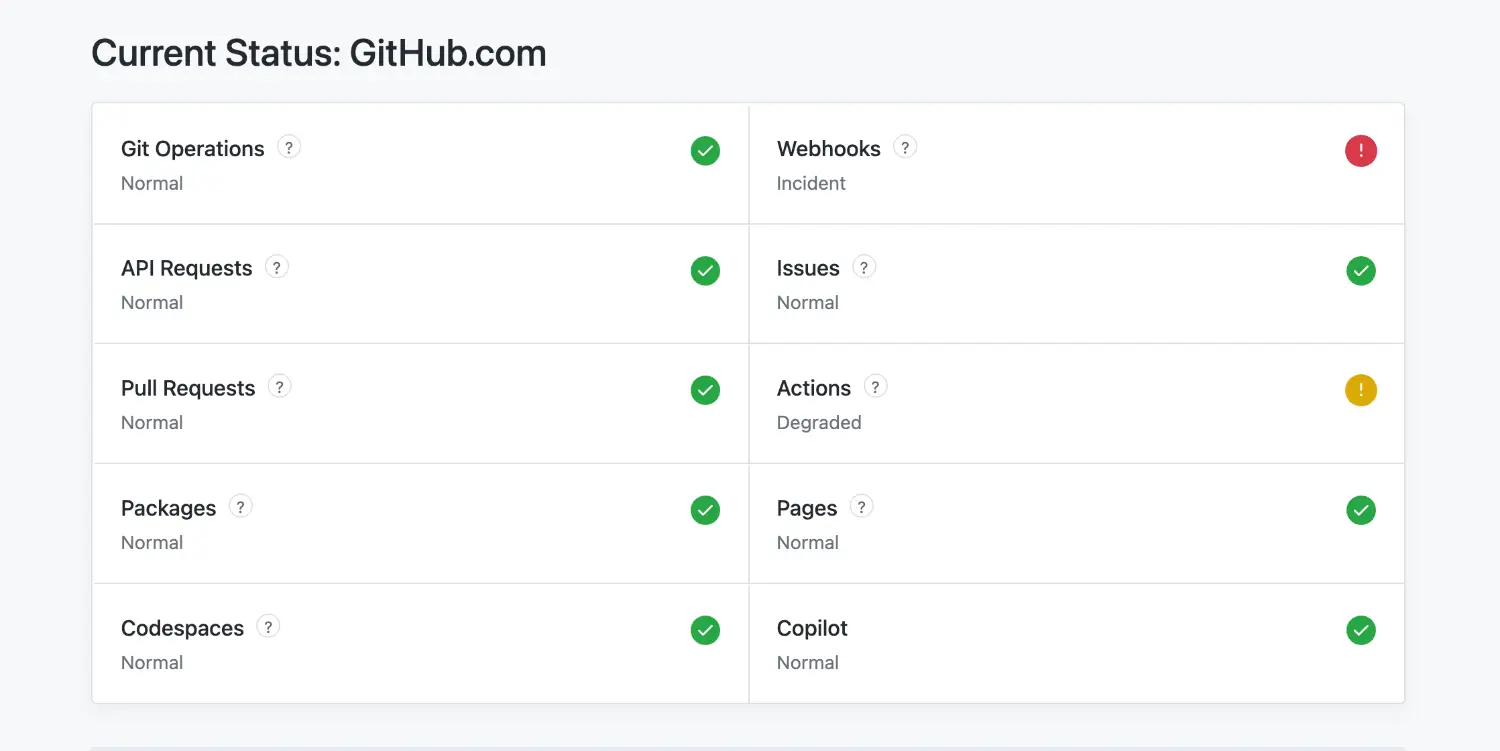
這個意外的服務問題提醒我們:在軟體開發的世界裡,不僅要處理代碼問題,還要應對外部服務的不可預測性。真正的開發者需要具備:
由於 GitHub 服務問題,明天的內容將有所調整:
如果 GitHub 服務恢復正常:
如果 GitHub 服務仍有問題:
無論哪種情況,我們都會繼續我們的開發之旅,因為真正的開發者從不因為外部問題而停止學習和進步。
iOS 上架是一個充滿挑戰的過程,但每一次錯誤都是學習的機會。今天的分享希望能幫助其他開發者避免我們遇到的陷阱。
記住: 在軟體開發的世界裡,沒有什麼是「應該很簡單」的。每一個看似簡單的步驟背後,都有無數的細節需要處理。
更重要的是: 當外部服務出現問題時,真正的開發者會展現出韌性和適應能力,找到解決方案並繼續前進。
明天(Day 26),我們將根據 GitHub 服務狀況,分享 iOS 上架的最終解決方案或探索 AI Agent 開發的新領域。
期待與您在 Day 26 相見!

 iThome鐵人賽