在這篇技術深潛中,我們將探討如何將最新的 Google Gemini 模型整合到現代網頁技術堆疊中。我們使用 Gemini 3 Flash Preview 來產生具洞察力且冷門的事實,並使用 Gemini 2.5 Flash 提供高品質的文字轉語音 (TTS) 功能。我們將逐步講解如何實作同步音訊傳輸、利用動態 WAV 標頭建構進行即時串流,以及使用 Angular 進行專業級的瀏覽器播放。
技術堆疊包括:
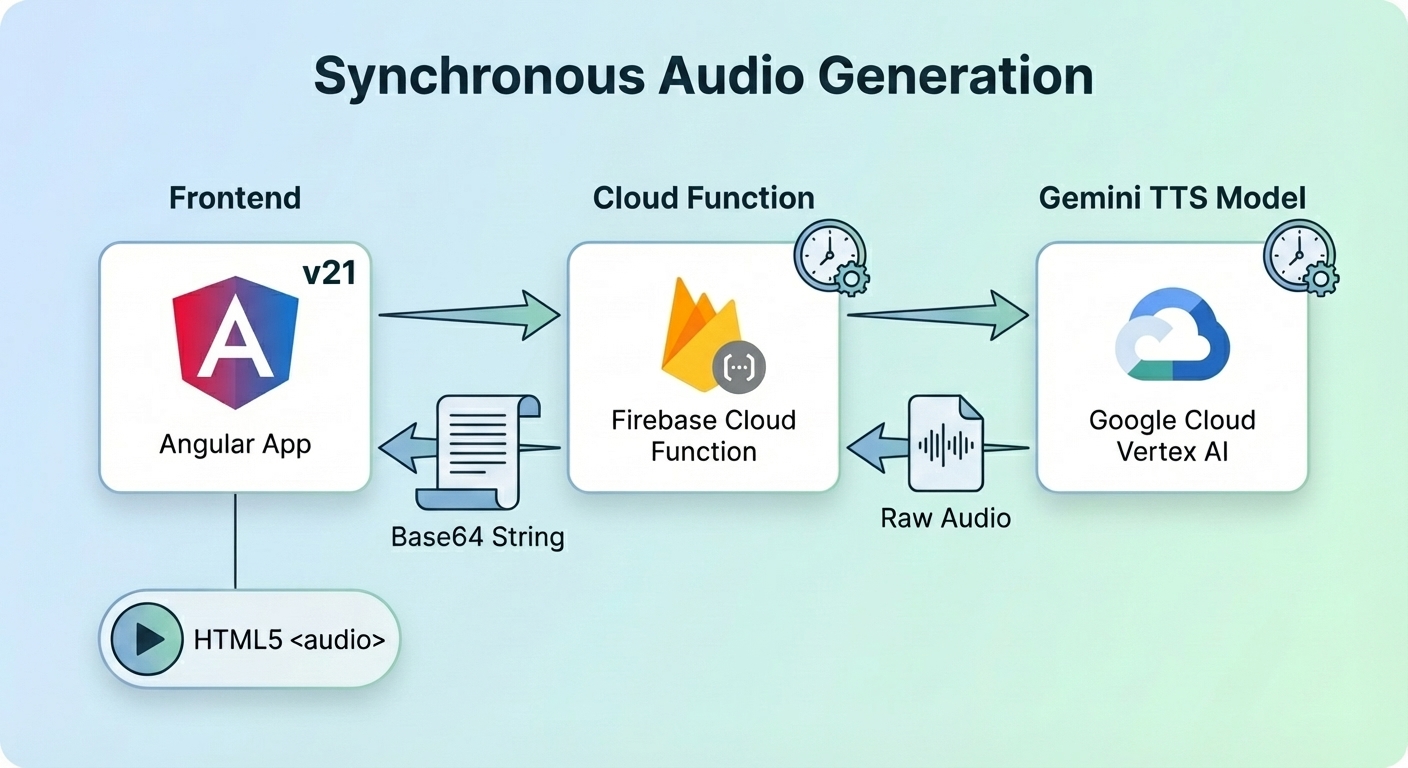
雲端函式產生音訊,在將原始資料從 L16 mime 類型轉換為 WAV mime 類型後,返回給 Angular 應用程式播放語音。
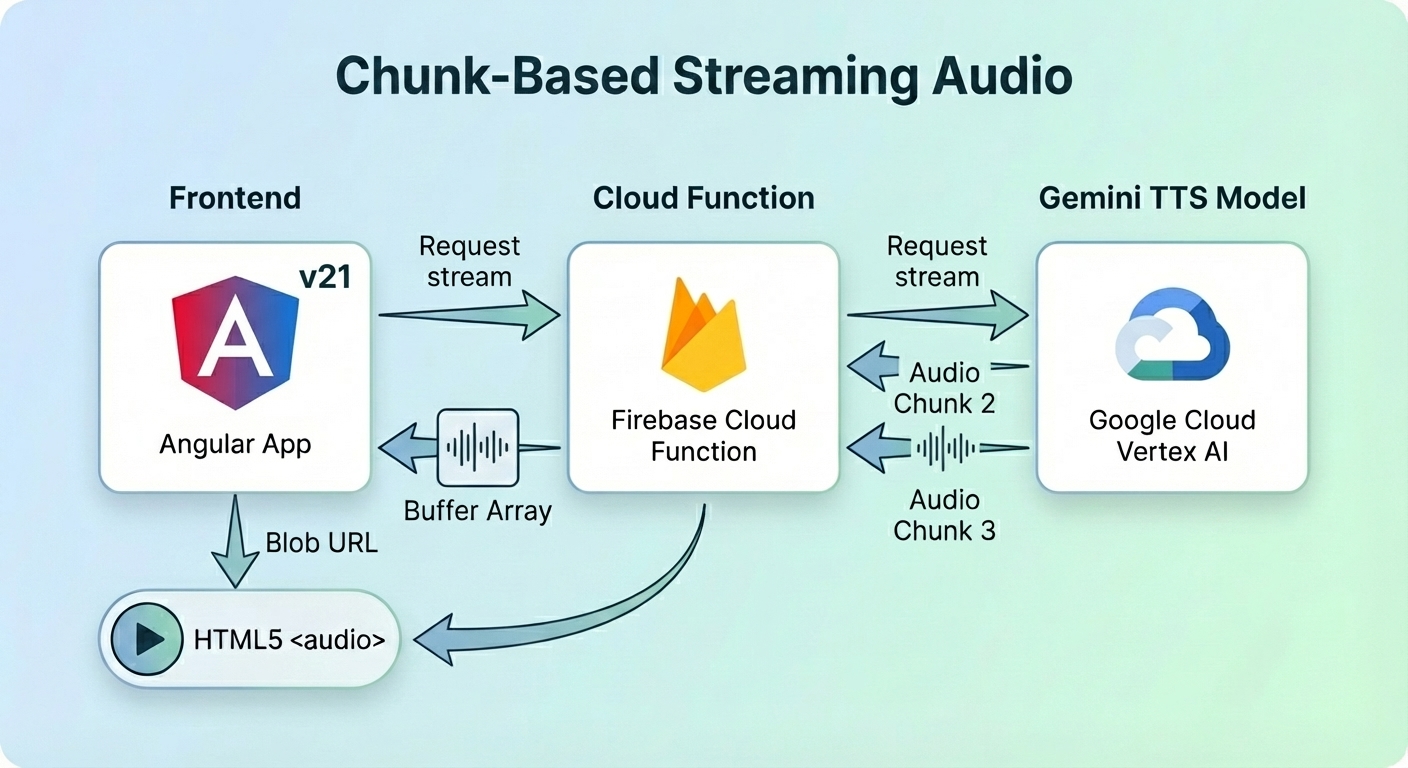
Angular 應用程式想要串流音訊,因此雲端函式從 Gemini TTS 模型獲取串流。函式在將原始資料發送到用戶端之前將其轉換為 base64 緩衝區。處理完所有分塊後,函式計算 WAV 標頭並將其傳回。用戶端在建立 Blob URL 之前收集所有分塊和 WAV 標頭。
Angular 應用程式將 Blob URL 指派給 HTML5 <audio> 元件以播放語音。
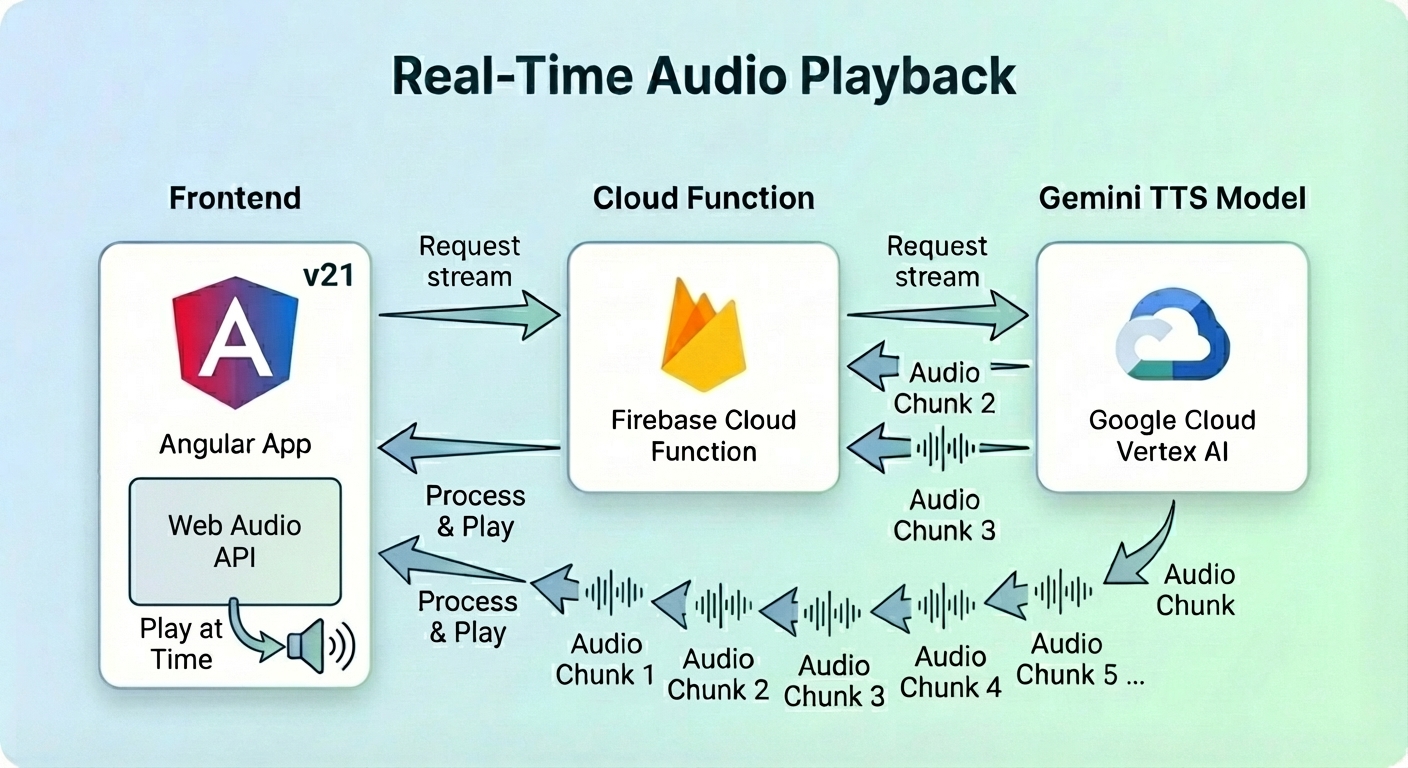
這是一種用於即時串流語音的高階且低延遲方法。
同樣地,Angular 應用程式要求串流音訊,而雲端函式將分塊傳輸給它。
用戶端使用 Web Audio API (AudioContext) 在分塊到達時排程並播放它們,而不是等到最後才建構有效的 Blob URL。
在深入研究函式之前,我為文字轉語音操作定義了不同的語調和語音設定檔。Gemini TTS 允許我使用預建語音來敘述文字。
此外,我在提示詞中加入了語調,以確保聲音聽起來像黑武士 (Darth Vader) 或充滿活力的人。
// text-to-audio/constants/tone.const.ts

export const DARTH_VADER_TONE = `You are a voice-over specialist for an advanced Text-to-Speech engine.
Your goal is to generate text and formatting that mimics the voice of Darth Vader (James Earl Jones).
**Vocal Characteristics:**
1.  **Pitch:** Extremely low, resonant, and bass-heavy.
2.  **Cadence:** Slow, deliberate, and rhythmic. Never rush. Each word carries the weight of authority.
3.  **Timbre:** Authoritative, menacing, and slightly gravelly, but with perfect clarity.
4.  **Breathing:** Every 2-3 short sentences (or one long sentence), you must insert
a mechanical respirator sound marker: [Mechanical Breath: Inhale/Exhale]
Read the text below EXACTLY once:`;

export const LIGHT_TONE = `Speak with a high-pitched, infectious energy.
End every sentence with a rising, joyful intonation.
Sound incredibly eager to please, as if you’ve just won a prize.
Read the text below EXACTLY once:`;
DARTH_VADER_TONE 確保語音聽起來像黑武士,具有低沈且厚重的呼吸聲。另一方面,LIGHT TONE 讓語音以充滿活力且愉悅的情緒說話。
import { GenerateContentConfig } from '@google/genai';

export function createVoiceConfig(voiceName = "Kore"): GenerateContentConfig {
    return {
      responseModalities: ["audio"],
      speechConfig: {
          voiceConfig: {
              prebuiltVoiceConfig: {
                  voiceName,
              },
          },
      },
    };
}
我定義了一個 createVoiceConfig 函式來協助建立語音配置。voiceName 是預建語音名稱,例如 Kore 和 Puck。未提供引數時,預設語音為 Kore。
const KORE_VOICE_CONFIG = createVoiceConfig();

const PUCK_VOICE_CONFIG = createVoiceConfig("Puck");
後端進入點利用了 onCall 觸發器。我們使用三元運算式根據用戶端的能力來判斷提供串流回應 (acceptsStreaming 為 true) 還是同步回應 (acceptsStreaming 為 false)。
import { onCall } from "firebase-functions/v2/https";
import { readFactFunction, readFactFunctionStream } from "./read-fact";

const cors = process.env.WHITELIST ? process.env.WHITELIST.split(",") : true;
const options = {
    cors,
    enforceAppCheck: true,
    timeoutSeconds: 180,
};

export const readFact = onCall(options, ({ data, acceptsStreaming }, response) =>
    acceptsStreaming && response ? readFactFunctionStream(data, response) : readFactFunction(data),
);
import { HttpsError } from "firebase-functions/v2/https";

export function validate(value: string | undefined, fieldName: string, missingKeys: string[]) {
    const err = `${fieldName} is missing.`;
    if (!value) {
        logger.error(err);
        missingKeys.push(fieldName);
        return "";
    }

    return value;
}

export function validateAudioConfigFields() {
    const env = process.env;
    const vertexai = (env.GOOGLE_GENAI_USE_VERTEXAI || "false") === "true";

    const missingKeys: string[] = [];
    const location = validate(env.GOOGLE_CLOUD_LOCATION, "Vertex Location", missingKeys);
    const model = validate(env.GEMINI_TTS_MODEL_NAME, "Gemini TTS Model Name", missingKeys);
    const project = validate(env.GOOGLE_CLOUD_QUOTA_PROJECT, "Google Cloud Project", missingKeys);

    if (missingKeys.length > 0) {
        throw new HttpsError("failed-precondition", `Missing environment variables: ${missingKeys.join(", ")}`);
    }

    return {
        genAIOptions: {
            project,
            location,
            vertexai,
        },
        model,
    };
}
validateAudioConfigFields 函式驗證 Gemini TTS 模型名稱、Google 專案 ID 和 Google Cloud 位置是否已定義。當 missingKeys 列表非空時,將擲回錯誤並停止 TTS 操作。
export type WavConversionOptions = {
    numChannels: number;
    sampleRate: number;
    bitsPerSample: number;
};
import { HttpsError } from "firebase-functions/v2/https";

export function encodeBase64String(rawData: string, mimeType: string): string {
  const wavBuffer = convertToWav(rawData, mimeType);
  const base64Data = Buffer.from(wavBuffer).toString("base64");
  return `data:audio/wav;base64,${base64Data}`;
}

export function convertToWav(rawData: string, mimeType: string): Buffer<ArrayBuffer> {
    const options = parseMimeType(mimeType);
    const wavHeader = createWavHeader(rawData.length, options);
    const buffer = Buffer.from(rawData, "base64");

    return Buffer.concat([wavHeader, buffer]);
}

export function parseMimeType(mimeType: string) {
    const [fileType, ...params] = mimeType.split(";").map((s) => s.trim());
    const format = fileType.split("/")[1];

    const options: Partial<WavConversionOptions> = {
        numChannels: 1,
    };

    if (format && format.startsWith("L")) {
        const bits = parseInt(format.slice(1), 10);
        if (!isNaN(bits)) {
            options.bitsPerSample = bits;
        }
    }

    for (const param of params) {
        const [key, value] = param.split("=").map((s) => s.trim());
        if (key === "rate") {
            options.sampleRate = parseInt(value, 10);
        }
    }

    if (!isWavConversionOptions(options)) {
        throw new HttpsError(
            "invalid-argument",
            `Invalid or incomplete mimeType: "${mimeType}". ` +
                "Could not determine all required WAV options (sampleRate, bitsPerSample).",
        );
    }

    return options;
}

function isWavConversionOptions(options: Partial<WavConversionOptions>): options is WavConversionOptions {
    // A valid WavConversionOptions object must have all properties as valid numbers.
    return (
        typeof options.numChannels === "number" &&
        !isNaN(options.numChannels) &&
        typeof options.sampleRate === "number" &&
        !isNaN(options.sampleRate) &&
        typeof options.bitsPerSample === "number" &&
        !isNaN(options.bitsPerSample)
    );
}

export function createWavHeader(dataLength: number, options: WavConversionOptions) {
    const { numChannels, sampleRate, bitsPerSample } = options;

    const byteRate = (sampleRate * numChannels * bitsPerSample) / 8;
    const blockAlign = (numChannels * bitsPerSample) / 8;
    const buffer = Buffer.alloc(44);

    buffer.write("RIFF", 0); // ChunkID
    buffer.writeUInt32LE(36 + dataLength, 4); // ChunkSize
    buffer.write("WAVE", 8); // Format
    buffer.write("fmt ", 12); // Subchunk1ID
    buffer.writeUInt32LE(16, 16); // Subchunk1Size (PCM)
    buffer.writeUInt16LE(1, 20); // AudioFormat (1 = PCM)
    buffer.writeUInt16LE(numChannels, 22); // NumChannels
    buffer.writeUInt32LE(sampleRate, 24); // SampleRate
    buffer.writeUInt32LE(byteRate, 28); // ByteRate
    buffer.writeUInt16LE(blockAlign, 32); // BlockAlign
    buffer.writeUInt16LE(bitsPerSample, 34); // BitsPerSample
    buffer.write("data", 36); // Subchunk2ID
    buffer.writeUInt32LE(dataLength, 40); // Subchunk2Size

    return buffer;
}
Gemini TTS 模型產生的音訊 mime 類型為 audio/L16。HTML 音訊播放器元件不支援此 mime 類型。因此,需要從 L16 轉換為 WAV 類型。
encodeBase64String 使用原始資料和 mime 類型建立一個帶有有效 WAV 標頭的 WAV 緩衝區。它將 data:audio/wav;base64, 前置於緩衝區以形成編碼的 base64 資料 URL。
createWavHeader 建立一個 44 位元組的 WAV 標頭。
convertToWav 呼叫 createWavHeader 來建立 WAV 標頭,並將其與 base64 緩衝區連接以建立完整的 WAV 緩衝區。
async function withAIAudio(callback: (ai: GoogleGenAI, model: string) => Promise<string | number[] | undefined>) {
    try {
        const variables = validateAudioConfigFields();
        if (!variables) {
            return "";
        }

        const { genAIOptions, model } = variables;
        const ai = new GoogleGenAI(genAIOptions);
        return await callback(ai, model);
    } catch (e) {
        console.error(e);
        if (e instanceof HttpsError) {
            throw e;
        }
        throw new HttpsError("internal", "An internal error occurred while setting up the AI client.", { originalError: (e as Error).message });
    }
}
withAIAudio 是一個高階函式,它執行回呼函式以傳回 Promise<string | number[] | undefined>。字串可以是編碼的 base64 資料 URL、WAV 標頭或 undefined。
在同步工作流程中,readFactFunction 函式使用 KORE_VOICE_CONFIG 和 DARTH_VADER_TONE 產生整個音訊部分。結果被轉換為 WAV 緩衝區並作為 Base64 資料 URL 傳回。
export async function readFactFunction(text: string) {
    return withAIAudio((ai, model) => generateAudio({ ai, model }, text));
}
text 是 Angular 應用程式傳遞給雲端函式以轉換為語音的冷門事實。
function createAudioParams(model: string, contents: string, config?: GenerateContentConfig) {
    return {
        model,
        contents: {
            role: "user",
            parts: [
                {
                    text: contents,
                },
            ],
        },
        config,
    };
}
createAudioParams 建立包含模型名稱、文字和語音配置的內容配置。
function extractInlineAudioData(response: GenerateContentResponse): {
    rawData: string | undefined;
    mimeType: string | undefined;
} {
    const { data: rawData, mimeType } = response.candidates?.[0]?.content?.parts?.[0]?.inlineData ?? {};

    return { rawData, mimeType };
}

function getBase64DataUrl(response: GenerateContentResponse): string {
  const { rawData, mimeType } = extractInlineAudioData(response);

  if (rawData && mimeType) {
    return encodeBase64String(rawData, mimeType);
  }
  throw new Error("Audio generation failed: No audio data received.");
}
getBase64DataUrl 從內嵌資料中擷取原始資料和 mime 類型。它將原始資料和 mime 類型都提供給 encodeBase64String 函式以傳回編碼的 base64 資料 URL。
async function generateAudio(aiTTS: AIAudio, text: string): Promise<string> {
  try {
    const { ai, model } = aiTTS;
    const contents = `${DARTH_VADER_TONE.trim()} ${text.trim()}`;

    const response = await ai.models.generateContent(
      createAudioParams(model, contents, KORE_VOICE_CONFIG)
    );

    return getBase64DataUrl(response);
  } catch (error) {
    console.error("Error generating audio:", error);
    throw error;
  }
}
generateAudio 函式將文字附加到黑武士語調後形成提示詞。接著它使用 ai 執行個體來產生音訊回應。最後,它將 response 傳遞給 getBase64DataUrl 以傳回編碼的 base64 資料 URL。
為了提供更好的使用者體驗,我將音訊分塊在產生時立即發送到用戶端。我在疊代串流時累計總位元組長度,最後再使用長度和 WAV 選項建構 WAV 標頭。
export async function readFactFunctionStream(text: string, response: CallableResponse<unknown>) {
    return withAIAudio((ai, model) => generateAudioStream({ ai, model }, text, response));
}
async function generateAudioStream(
    aiTTS: AIAudio,
    text: string,
    response: CallableResponse<unknown>,
): Promise<number[] | undefined> {
    try {
        const { ai, model } = aiTTS;
        const contents = `${LIGHT_TONE.trim()} ${text.trim()}`;

        const chunks = await ai.models.generateContentStream(createAudioParams(model, contents, PUCK_VOICE_CONFIG));

        let byteLength = 0;
        let options: WavConversionOptions | undefined = undefined;
        for await (const chunk of chunks) {
            const { rawData, mimeType } = extractInlineAudioData(chunk);
            if (!options && mimeType) {
                options = parseMimeType(mimeType);
                response.sendChunk({
                    type: "metadata",
                    payload: {
                        sampleRate: options.sampleRate,
                    },
                });
            }

            if (rawData && mimeType) {
                const buffer = Buffer.from(rawData, "base64");
                byteLength = byteLength + buffer.length;
                response.sendChunk({
                    type: "data",
                    payload: {
                        buffer,
                    },
                });
            }
        }

        if (options && byteLength > 0) {
            const header = createWavHeader(byteLength, options);
            return [...header];
        }

        return undefined;
    } catch (error) {
        console.error(error);
        throw error;
    }
}
generateAudioStream 從 ai.models.generateContentStream 獲取分塊串流。每個分塊在發送到用戶端之前都會轉換為緩衝區。在退出函式之前,它會根據位元組長度和 WAV 選項建構 WAV 標頭。
import { Injectable } from '@angular/core';
import { FirebaseApp } from 'firebase/app';
import { Functions } from 'firebase/functions';
import { RemoteConfig } from 'firebase/remote-config';

@Injectable({
  providedIn: 'root'
})
export class ConfigService  {

    remoteConfig: RemoteConfig | undefined = undefined;
    firebaseApp: FirebaseApp | undefined = undefined;
    functions: Functions | undefined = undefined;

    loadConfig(firebaseApp: FirebaseApp, remoteConfig: RemoteConfig, functions: Functions) {
      this.firebaseApp = firebaseApp;
      this.remoteConfig = remoteConfig;
      this.functions = functions;
    }
}
ConfigService 保留對 Cloud Functions 的引用,以便在 SpeechService 中使用。
loadConfig 被呼叫以在 provideAppInitializer 中執行初始化。
SpeechService 處理網路呼叫並將下載的分塊重新組合成單個 Blob。
export function constructBlobURL(parts: BlobPart[]) {
  return URL.createObjectURL(new Blob(parts, { type: 'audio/wav' }));
}
export type SerializedBuffer = {
  type: 'Buffer';
  data: number[];
}

export type StreamMessage =
    | {
        type: "metadata";
        payload: {
          sampleRate: number;
        }
      }
    | {
        type: "data";
        payload: {
          buffer: SerializedBuffer,
        }
      };
import { constructBlobURL } from '@/photo-panel/blob.util';
import { inject, Injectable } from '@angular/core';
import { Functions, httpsCallable } from 'firebase/functions';
import { StreamMessage } from '../types/stream-message.type';
import { ConfigService } from './config.service';

@Injectable({
  providedIn: 'root'
})
export class SpeechService  {
    private configService = inject(ConfigService);

    private get functions(): Functions {
      if (!this.configService.functions) {
        throw new Error('Firebase Functions has not been initialized.');
      }
      return this.configService.functions;
    }

    async generateAudio(text: string) {
      const readFactFunction = httpsCallable<string, string>(
        this.functions, 'textToAudio-readFact'
      );

      const { data: audioUri } = await readFactFunction(text);
      return audioUri;
    }

    async generateAudioStream(text: string) {
      const readFactStreamFunction = httpsCallable<string, number[] | undefined, StreamMessage>(
        this.functions, 'textToAudio-readFact'
      );

      return readFactStreamFunction.stream(text);
    }

    async generateAudioBlobURL(text: string) {
      const { stream, data } = await this.generateAudioStream(text);

      const audioParts = [];
      for await (const audioChunk of stream) {
        if (audioChunk && audioChunk.data) {
          if (audioChunk && audioChunk.type === 'data') {
            audioParts.push(new Uint8Array(audioChunk.payload.buffer.data));
          }
        }
      }

      const wavHeader = await data;
      if (wavHeader && wavHeader.length) {
        audioParts.unshift(new Uint8Array(wavHeader));
      }

      return constructBlobURL(audioParts);
    }
}
generateAudio 直接呼叫雲端函式 textToAudio-readFact 並接收編碼的 base64 資料 URL。
generateAudioStream 呼叫相同的函式,但它希望從伺服器接收串流結果。
generateAudioBlobURL 在 for await 迴圈中將所有分塊下載到 audioParts 陣列中。await data 等待 WAV 標頭並將其插入 audioParts 陣列的開頭。接著 createTtsURL 輔助函式從中建立 Blob URL。
import { SpeechService } from '@/ai/services/speech.service';
import { inject, Injectable, OnDestroy, signal } from '@angular/core';

const INT16_MAX_VALUE = 32768;

@Injectable({
  providedIn: 'root'
})
export class AudioPlayerService implements OnDestroy  {
  private audioCtx: AudioContext | undefined = undefined;
  private speechService = inject(SpeechService);

  private nextStartTime = 0;
  private activeSources: AudioBufferSourceNode[] = [];

  playbackRate = signal(1);

  async playStream(text: string) {
      this.stopAll();

      this.playbackRate.set(this.setRandomPlaybackRate());

      try {
        const { stream } = await this.speechService.generateAudioStream(text);
        for await (const audioChunk of stream) {
          if (audioChunk.type === 'metadata') {
            this.initializeAudioContext(audioChunk.payload.sampleRate);
          } else if (audioChunk.type === 'data') {
            if (!this.audioCtx) {
              console.warn("Audio data received before metadata. Skipping chunk.");
              continue;
            }
            this.processChunk(audioChunk.payload.buffer.data);

          }
        }
      } catch (error) {
        console.error('Failed to play audio stream:', error);
        // Optionally, reset state or notify the user
        this.stopAll();
      }
  }

  private stopAll() {
    this.activeSources.forEach(sourceNode => {
      try {
        sourceNode.stop();
        sourceNode.disconnect();
      } catch (e) {
        // It's common for stop() to be called on a node that has already finished.
        // We can safely ignore these "InvalidStateError" exceptions.
      }
    });

    this.activeSources = [];
    this.nextStartTime = 0;
    if (this.audioCtx) {
      this.audioCtx?.close();
      this.audioCtx = undefined;
    }
  }

  private processChunk(rawData: number[]) {
    const float32Data = this.normalizeSoundSamples(rawData);
    if (float32Data.length === 0 || !this.audioCtx) {
      return;
    }

    const buffer = this.audioCtx.createBuffer(1, float32Data.length, this.audioCtx.sampleRate);
    buffer.copyToChannel(float32Data, 0);

    const sourceNode = this.connectSource(buffer);
    sourceNode.playbackRate.value = this.playbackRate();

    const playTime = Math.max(this.nextStartTime, this.audioCtx.currentTime);
    sourceNode.start(playTime);

    const actualDuration = buffer.duration / this.playbackRate();
    this.nextStartTime = playTime + actualDuration;
  }

  private normalizeSoundSamples(rawData: number[]) {
    const rawBuffer = new Uint8Array(rawData).buffer;

    const byteLength = rawBuffer.byteLength % 2 === 0 ? rawBuffer.byteLength : rawBuffer.byteLength - 1;
    if (byteLength === 0) {
      return new Float32Array(0);
    }

    const int16Data = new Int16Array(rawBuffer, 0, byteLength / 2);
    const float32Data = new Float32Array(int16Data.length);
    for (let i = 0; i < int16Data.length; i++) {
      float32Data[i] = (int16Data[i] * 1.0) / INT16_MAX_VALUE;
    }
    return float32Data;
  }

  private setRandomPlaybackRate(min = 0.85, max = 1.3) {
    const rawRate = Math.random() * (max - min) + min;
    return Math.round(rawRate * 100) / 100;
  }

  private connectSource(buffer: AudioBuffer) {
    if (!this.audioCtx) {
      throw new Error("Audio context is not initialized.");
    }

    const sourceNode = this.audioCtx.createBufferSource();
    sourceNode.buffer = buffer;
    sourceNode.connect(this.audioCtx.destination);

    this.activeSources.push(sourceNode);

    // Cleanup: Remove from array when this specific chunk finishes playing
    sourceNode.onended = () => {
      const index = this.activeSources.indexOf(sourceNode);
      if (index >= 0) {
        this.activeSources.splice(index, 1);
      }
    };

    return sourceNode;
  }

  private initializeAudioContext(sampleRate: number) {
    // Ensure any old context is closed before creating a new one.
    if (this.audioCtx) {
      this.audioCtx.close();
    }

    this.audioCtx = new AudioContext({ sampleRate });
    if (this.audioCtx.state === 'suspended') {
      this.audioCtx.resume();
    }

    this.nextStartTime = this.audioCtx.currentTime;
  }

  ngOnDestroy(): void {
    this.stopAll();
  }
}
瀏覽器通常會阻止 AudioContext 啟動,直到發生使用者互動。if (this.audioCtx.state === 'suspended') { this.audioCtx.resume(); } 會在 AudioContext 被暫停時將其恢復。
playStream 重用 this.speechService.generateAudioStream(text) 來獲取分塊串流。processChunk 將原始資料轉換為 float32 陣列,建立 AudioBuffer,將音訊緩衝區連接到節點,並將節點添加到 AudioContext。節點被安排在 nextStartTime 播放以避免重疊。playStream 特意忽略了 WAV 標頭以減少延遲。
在 ngOnDestroy 生命週期掛鉤中,所有來源節點都會停止播放並從 AudioContext 斷開連接。這樣做是為了避免記憶體洩漏,特別是當使用者在所有節點播放並移除之前點擊 Web Audio API 按鈕產生新緩衝區時。
ObscureFactComponent 和 TextToSpeechComponent父元件 ObscureFactComponent 協調產生的文字,並將產生的 URI 傳遞給原生音訊元件。
import { Signal } from '@angular/core';

function isValidBlobUrl(url: string) {
  try {
    const parsed = new URL(url);
    return parsed.protocol === 'blob:';
  } catch (e) {
    console.error(e);
    return false;
  }
}

export function revokeBlobURL(dataUrl: Signal<string | undefined>) {
  const blobUrl = dataUrl();
  if (blobUrl && isValidBlobUrl(blobUrl)) {
    URL.revokeObjectURL(blobUrl);
  }
}
// generate-audio.util.ts

import { signal, WritableSignal } from '@angular/core';

export const ttsError = signal('');

export type GenerateSpeechMode = 'sync' | 'stream' | 'web_audio_api';

export async function generateSpeechHelper(
  text: string,
  loadingSignal: WritableSignal<boolean>,
  urlSignal: WritableSignal<string | undefined>,
  speechFn: (fact: string) => Promise<string>
) {

  try {
    ttsError.set('');
    loadingSignal.set(true);
    const uri = await speechFn(text);
    urlSignal.set(uri);
  } catch (e) {
    console.error(e);
    ttsError.set('Error generating speech from text.');
  } finally {
    loadingSignal.set(false);
  }
}

export async function streamSpeechWithWebAudio(
    text: string,
    loadingSignal: WritableSignal<boolean>,
    webAudioApiFn: (text: string) => Promise<void>
) {
    try {
      loadingSignal.set(true);
      await webAudioApiFn(text);
    } catch (e) {
      console.error(e);
      ttsError.set('Error streaming speech using the Web Audio API.');
    } finally {
      loadingSignal.set(false);
    }
}
<div>
    <h3>關於這些標籤的一個令人驚訝或冷門的事實</h3>
    @if (interestingFact()) {
      <p>{{ interestingFact() }}</p>

      <app-error-display [error]="ttsError()" />

      <app-text-to-speech
        [isLoadingSync]="isLoadingSync()"
        [isLoadingStream]="isLoadingStream()"
        [isLoadingWebAudio]="isLoadingWebAudio()"
        [audioUrl]="audioUrl()"
        (generateSpeech)="generateSpeech($event)"
        [playbackRate]="playbackRate()"
      />
    } @else {
      <p>這些標籤沒有任何有趣或冷門的事實。</p>
    }
</div>
當使用者點擊 TextToSpeechComponent 中的任何按鈕時,generateSpeech 自訂事件會向 ObscureFactComponent 發送一個 GenerateSpeechMode。ObscureFactComponent 執行 generateSpeech 方法,檢查 mode 的值,並相應地產生語音。
import { SpeechService } from '@/ai/services/speech.service';
import { ErrorDisplayComponent } from '@/error-display/error-display.component';
import { ChangeDetectionStrategy, Component, inject, input, OnDestroy, signal } from '@angular/core';
import { revokeBlobURL } from '../blob.util';
import { generateSpeechHelper, GenerateSpeechMode, streamSpeechWithWebAudio, ttsError } from './generate-audio.util';
import { AudioPlayerService } from './services/audio-player.service';
import { TextToSpeechComponent } from './text-to-speech/text-to-speech.component';

@Component({
  selector: 'app-obscure-fact',
  templateUrl: './obscure-fact.component.html',
  imports: [
    TextToSpeechComponent,
    ErrorDisplayComponent
  ],
  changeDetection: ChangeDetectionStrategy.OnPush,
})
export class ObscureFactComponent implements OnDestroy {
  interestingFact = input<string | undefined>(undefined);

  speechService = inject(SpeechService);
  audioPlayerService = inject(AudioPlayerService);

  audioUrl = signal<string | undefined>(undefined);
  playbackRate = this.audioPlayerService.playbackRate;

  ttsError = ttsError;

  async generateSpeech({ mode }: { mode: GenerateSpeechMode }) {
    const fact = this.interestingFact();
    if (fact) {
      revokeBlobURL(this.audioUrl);
      this.audioUrl.set(undefined);

      if (mode === 'sync' || mode === 'stream') {
        const loadingSignal = mode === 'stream' ? this.isLoadingStream : this.isLoadingSync;
        const speechFn = (text: string) => mode === 'stream' ?
            this.speechService.generateAudioBlobURL(text) :
            this.speechService.generateAudio(text);
        await generateSpeechHelper(fact, loadingSignal, this.audioUrl, speechFn);
      } else if (mode === 'web_audio_api') {
        await streamSpeechWithWebAudio(
          fact,
          this.isLoadingWebAudio,
          (text: string) => this.audioPlayerService.playStream(text));
      }
    }
  }

  ngOnDestroy(): void {
    revokeBlobURL(this.audioUrl);
  }
}
透過利用 Angular 和 Firebase Gen 2 串流函式,我們可以建立流暢的 AI 驅動語音體驗。使用 Gemini 3 Flash Preview 進行文字產生,並使用 Gemini 2.5 Flash 進行具有角色特徵的 TTS (如我們的黑武士範例),可以實現真正身歷其境的網頁應用程式。
 Connie
