
iT邦幫忙

0

【Day 09】資料落地:將結構化待辦事項自動寫入 Notion 資料庫

  • 分享至 

  • xImage
  •  

在昨天的 Day 08 中,我們成功使用 JavaScript 腳本將 Dify 回傳的 JSON 字串解析為 3 個獨立的 n8n 資料項目(Items)。今天我們要完成自動化任務管線中最關鍵的環節——「資料落地」,將提煉後的任務自動寫入 Notion 資料庫,打造即時更新的智慧待辦看板!


一、為什麼選擇 Notion 作為儲存落地端?

  1. 整合便利與免去 OAuth 繁瑣設定:相較於 Google Sheets 需要在 Google Cloud Console 配置 OAuth 同意畫面、Client ID 及重新導向 URI,Notion 透過內部整合金鑰(Internal Integration Secret)即可快速安全地授權。
  2. 多維度檢視(Views):寫入 Notion 資料庫後,可依優先級(Priority)切換為看板視圖(Kanboard),或依時間(Time)切換為日曆視圖。
  3. n8n 自動迭代機制(Auto-Iteration):上一關輸出的 3 個獨立 Items,在串接 Notion 節點時會自動執行 3 次寫入動作,無需手動建立迴圈(Loop)。

二、Notion 端事前準備

  1. 建立資料庫表格:
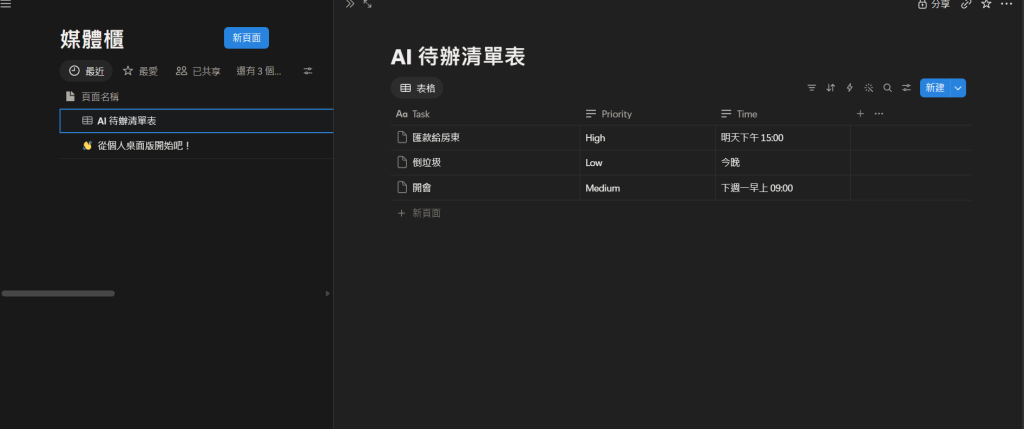
    在 Notion 中建立名為 AI 待辦清單表格 的 Table Database,設定以下直欄屬性:
  • Task(標題欄位 Title)
  • Priority(文字屬性 Text)
  • Time(文字屬性 Text)
  1. 建立整合與取得 Secret:
    前往 Notion 開發者後台建立 Connection,取得 Internal Integration Secret。
  2. 頁面授權連線:
    在資料庫頁面右上角選單中的「連接 (Connections)」加入剛建立的整合,確保 n8n 具備讀寫權限。

三、n8n 節點設定步驟

  1. 新增 Notion 節點:
    在畫布中將 Code in JavaScript 節點連線至新增的 Notion 節點。
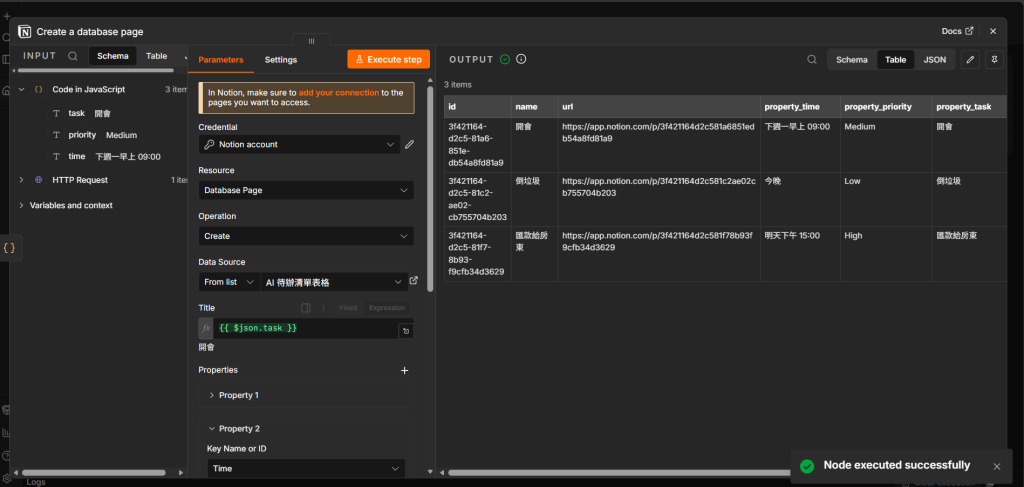
  2. 操作設定:
  • Resource:Database Page
  • Operation:Create
  • Data Source:選擇 From list 並選定 AI 待辦清單表格
  1. 欄位映射(Property Mapping):
  • Title:切換為 Expression 模式,填入 {{ $json.task }}
  • Property 1 (Priority):Key 設定為 Priority,Text 填入 {{ $json.priority }}
  • Property 2 (Time):Key 設定為 Time,Text 填入 {{ $json.time }}

四、測試與執行成果

點擊節點右上角的 Execute step 執行測試,節點狀態回傳綠色勾選並顯示 Node executed successfully。
https://ithelp.ithome.com.tw/upload/images/20261010/20184386KGEsmUylUt.png

切換至 Notion 資料庫頁面,三筆待辦任務已自動按照對應欄位完整寫入:
https://ithelp.ithome.com.tw/upload/images/20261010/20184386T7Flg4AIq9.png

明日預告

資料順利落地至 Notion 後,整個任務解析管線(Parsing & Persistence)已完全打通。明天 【Day 10】 我們將接回前端觸發源,配置 Webhook 輸入,實現從外部傳入文字到寫入看板的端到端全自動化!


圖片
  熱門推薦
圖片
{{ item.channelVendor }} | {{ item.webinarstarted }} |
{{ formatDate(item.duration) }}
直播中

尚未有邦友留言

立即登入留言
