前言提要:
原本是透過
rpm -Uvh http://nginx.org/packages/centos/7/noarch/RPMS/nginx-release-centos-7-0.el7.ngx.noarch.rpm
yum install nginx
的方式去安裝nginx,並進行反向代理web網頁的
但是現在需要安裝purge來做cache的清理
只是在網路上找了許多資料,purge的安裝方式都是需要和nginx同一安裝路徑並做源碼安裝的
purge的安裝方式如下
wget http://labs.frickle.com/files/ngx_cache_purge-2.3.tar.gz

tar zxvf ngx_cache_purge-2.3.tar.gz
然後進入nginx的安裝路徑中進行源碼配置
./configure --prefix=/etc/nginx --sbin-path=/usr/sbin/nginx --modules-path=/usr/lib64/nginx/modules --conf-path=/etc/nginx/nginx.conf --error-log-path=/var/log/nginx/error.log --http-log-path=/var/log/nginx/access.log --pid-path=/var/run/nginx.pid --lock-path=/var/run/nginx.lock --http-client-body-temp-path=/var/cache/nginx/client_temp --http-proxy-temp-path=/var/cache/nginx/proxy_temp --http-fastcgi-temp-path=/var/cache/nginx/fastcgi_temp --http-uwsgi-temp-path=/var/cache/nginx/uwsgi_temp --http-scgi-temp-path=/var/cache/nginx/scgi_temp --user=nginx --group=nginx --with-http_ssl_module --with-http_realip_module --with-http_addition_module --with-http_sub_module --with-http_dav_module --with-http_flv_module --with-http_mp4_module --with-http_gunzip_module --with-http_gzip_static_module --with-http_random_index_module --with-http_secure_link_module --with-http_stub_status_module --with-http_auth_request_module --with-http_xslt_module=dynamic --with-http_image_filter_module=dynamic --with-http_geoip_module=dynamic --with-http_perl_module=dynamic --add-module=/tmp/ngx_cache_purge-2.3 --with-threads --with-stream --with-stream_ssl_module --with-http_slice_module --with-mail --with-mail_ssl_module --with-file-aio --with-ipv6 --with-http_v2_module --with-cc-opt='-O2 -g -pipe -Wall -Wp,-D_FORTIFY_SOURCE=2 -fexceptions -fstack-protector-strong --param=ssp-buffer-size=4 -grecord-gcc-switches -m64 -mtune=generic'
並進行編譯及安裝
make && make install
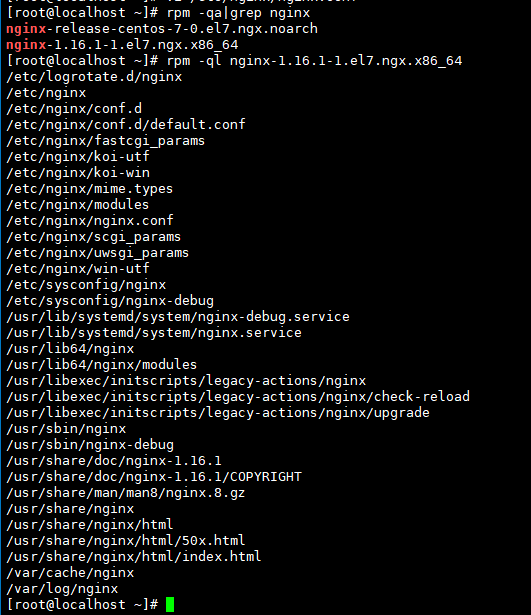
到目前為止,看起來都是需要找到nginx的路徑中,但卡在我是用yum 安裝nginx的方式,所以實在不曉得應該要到哪個路徑去安裝
下圖示我的nginx安裝路徑資訊

因為真的找不到好的解法,或者是否有其他能安裝purge,真的得麻煩板上的大大們了
#另外安裝待碼的來源,因為看了太多網頁,實在找不到了,這是我記錄下來的

先nginx -v確認你的版本,到官方下載相同版本的nginx待編譯,依照 footmark.info 那邊的教學步驟是可以完成安裝動態模組