今天,來到鐵人賽第十三天。
先說一下,這個前言,小編寫了三遍,三遍版本都不一樣?!
為什麼?因為,沒存檔,就不小心手殘按到別的,跳出去了....
本來,講精靈寶可夢的,夢一直碎?!
沒有啦,只是要說,精靈寶可夢,聽說有新的聖誕皮卡丘可以抓。
小編,已經有很長一陣子,沒有開啟這個遊戲了,不知道是不是已經退燒?
沒玩的主要原因是,因為,它必須要隨時有網路,才好玩,而小編的手機,只能在有公用的 wifi才能玩呀。
每次要玩,都要走好長遠的路,去圖書館呀,...不一定有網路的學校呀....
所以,才很久沒有玩了!
總之,仍然還有興緻的人,可以快去抓寶喔~祝福大家都收獲滿滿!
這邊,我們著重在web application 的開發。
Express.js 提供簡單的方法去建立一個web server,也可以根據應用程式所設定的不同的路由,去render 網頁。
之前,我們已經建立了一個 myapp資料夾(應用程式),並且,為這應用程式,安裝好express module。
現在,我們要使用它!
首先,我們載入express.js module,並且新增一個web server 如下:
var express = require('express');
var app = express();

// define routes here..

var server = app.listen(5050, function () {
    console.log('Node server is running..');
});
這例子,我們載入express.js module,express module 回傳一個function。這個函式會回傳一個可以配置express 應用程式的物件。
這個app 物件,包含一些方法,包括 路由設定,配置,及中介軟體函數,它可以render 網頁,註冊一個樣版引擎。
app.listen() 建立了一個node.js web server,我們可以給一個 主機位置 及 port,設置方式跟 http.Server.listen() 一樣。
接著,我們執行 node app.js 你可以開啟瀏覽器,並執行 http://localhost:5050
發現如下圖。
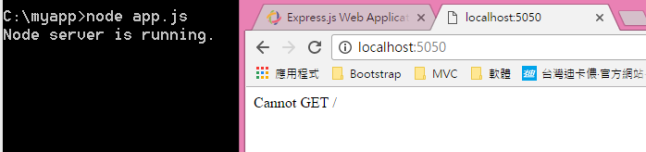
伺服器被成功啟動,但是卻出現 Cannot GET/這是因為,我們還沒設定 路由,也沒render 任何的page。
我們現在要用app物件,為我們的應用程式定義不同的路由, 這個app物件,包含 get(), post(), put(), delete() 方法,分別可以定義 HTTP 的 GET, POST,PUT,DELETE的路由請求。
var express = require('express');
var app = express();

app.get('/', function (req, res) {
    res.send("<html><body><h1>Hello World</h1></body></html>");
});

app.post('/submit-data', function (req, res) {
    res.send('POST Request');
});

app.put('/update-data', function (req, res) {
    res.send('PUT Request');
});

app.delete('/delete-data', function (req, res) {
    res.send('DELETE Request');
});

var server = app.listen(5000, function () {
    console.log('Node server is running..');
});
這個例子裡,我們用app.get(), app.post(), app.put(), app.delete() 定義了HTTP的 GET, POST, PUT, DELETE 的路由請求。函式裡的第一個參數,是路由的路徑,附加在base url之後。回傳函式參數則包含request, response兩個物件;執行這些請求時,函式有所作用。
我們執行 node epserver.js ,並且開啟網頁 http://localhost:5050
結果如圖:
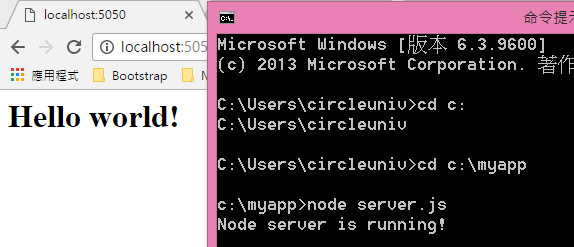
以上,完成簡單的 expressJS 網頁應用程式。
接下來,這一篇有趣了起來,我們可以建立表單,並且處理post 的請求,進而顯示資料。
首先,先建立一個 index.html 表單如下:
<!DOCTYPE html>
<html xmlns="http://www.w3.org/1999/xhtml">
<head>
<meta charset="utf-8" />
<title></title>
</head>
<body>
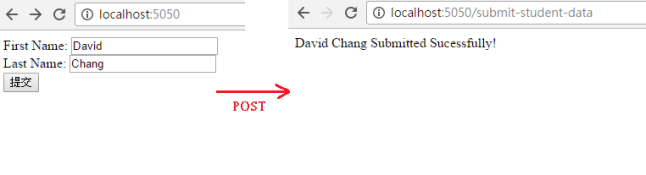
<form action="/submit-student-data" method="post">
First Name: <input name="firstName" type="text" />
Last Name: <input name="lastName" type="text" />
<input type="submit" />
</form>
</body>
</html>
接著,我們可以開始撰寫路由。
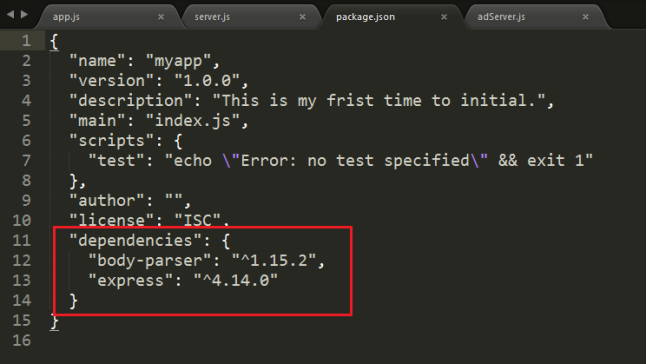
這邊值得注意的是,我們需要用到一個中介軟體函式,這個中介軟體名為 body-parser,它需要透過npm安裝。而這個模組的功能是用來解析JSON, buffer, 字串, 及 HTTP Post 請求提交的url 編碼資料。
安裝方式:在 command pormpt , 輸入
npm install body-parser –save
現在,我們可以看到,已經裝好第二個套件:
var express = require('express');
var app = express();

var bodyParser = require("body-parser");
app.use(bodyParser.urlencoded({ extended: false }));

app.get('/', function (req, res) {
    res.sendFile(__dirname+'/index.html');  //回應靜態文件
});

app.post('/submit-student-data', function (req, res) {
    var name = req.body.firstName + ' ' + req.body.lastName;

    res.send(name + ' Submitted Successfully!');
});

var server = app.listen(5000, function () {
    console.log('Node server is running..');
});
注意!在這例子中,app.get()裡的回傳函式,我們要以物件 res 回應一個 “靜態文件“,也就是我們另外新增好的 index.html,它必須用絕對路徑,所以,我們加了 __dirname,它是node.js關鍵字,用來返回目前這個.js檔的絕對路徑,後面附上 /檔名
執行結果: