延續[Day18 - Splunk] Nagios and Splunk integration - 1/4,本文分享Splunk透過「Splunk for Nagios」App與Nagios進行整合之實作經驗
[Lab Information]
此實作範例已事先安裝Nagios及Splunk forwarder於同一台主機上,主機資訊如下:
OS: Rat Hat Enterprise Linux 6.2 64 bit
Linux Kernel: 2.6.32
CPU Type: Intel Xeon CPU E5-2620 2.00GHz
CPU Core: 8
Memory: 16GB
Universal Forwarder version: 5.0.4
OS root password: 12345678
IP: 192.168.0.102
Splunk Forwarder admin password: changeme
Package directory: /root/plugin
Splunk Forwarder directory: /opt/splunkforwarder
Nagios directory: /usr/local/nagios
[Download MK Livestatus Package]
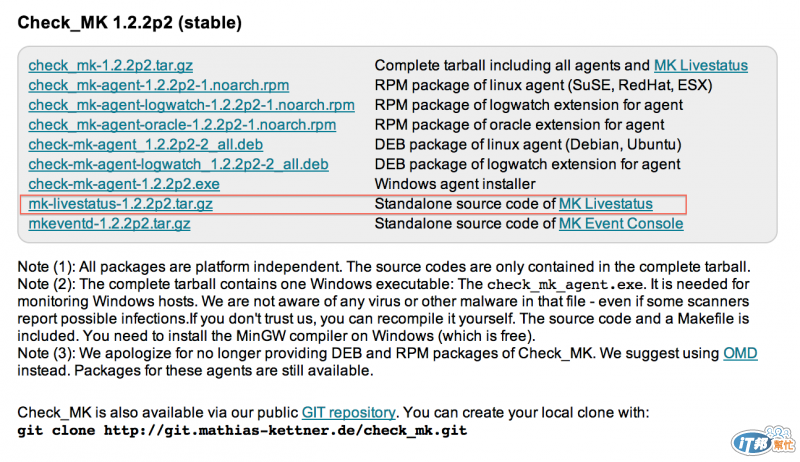
因後續安裝的「Splunk for Nagios」App版本為:3.0,故需安裝套件:mk-livestatus
請至MK Livestatus下載頁面進行下載
此實作範例使用版本為:1.2.2p2,如下圖紅框處示:
[Install On Nagios Server]
使用帳號:root登入Nagios Server,並參閱下列步驟執行:
透過yum command安裝下列套件:
yum install gcc-c++* xinetd -y
切換至mk-livestatus套件所存放的目錄下,解壓縮完畢後開始進行安裝:
cd /root/plugin
tar -zxf mk-livestatus-1.2.2p2.tar.gz
cd mk-livestatus-1.2.2p2
bash configure
make && make install
於目錄:/usr/local/nagios下建立目錄:mk-livestatus,並更改使用者名稱為:nagios,及群組名稱為:apache,如下步驟:
mkdir /usr/local/nagios/mk-livestatus && chown nagios:apache /usr/local/nagios/mk-livestatus
編輯檔案:/usr/local/nagios/etc/nagios.cfg,並參照下列步驟進行異動:
vim /usr/local/nagios/etc/nagios.cfg
#Add the following lines in "/usr/local/nagios/etc/nagios.cfg" file.
broker_module=/usr/local/lib/mk-livestatus/livestatus.o /usr/local/nagios/mk-livestatus/live
[Configure To Start]
mk-livestatus是透過Super Daemon進行管理,若要啓動此程式,須進行下列步驟:
於目錄:/etc/xinetd.d下新增檔案:livestatus,並新增下列內容:
vim /etc/xinetd.d/livestatus
#Add the following lines in "/etc/xinetd.d/livestatus" file.
service livestatus
{
type = UNLISTED
port = 6557
socket_type = stream
protocol = tcp
wait = no
cps = 100 3
instances = 500
per_source = 250
flags           = NODELAY
user		= nagios
server		= /usr/local/bin/unixcat
server_args     = /usr/local/nagios/mk-livestatus/live
only_from       = 127.0.0.1 192.168.0.101 192.168.0.102
disable		= no
}
執行下列步驟即可啓動:
/etc/init.d/xinetd start
若要設定開機自動啓動,可參閱以下步驟:
chkconfig xinetd on
chkconfig xinetd --list
透過下列步驟可確認程式是否執行:
/etc/init.d/xinetd status
netstat -taulnp | grep 6557
執行結果如下圖示:

5. 重新啓動Nagios Daemon即可:
/etc/init.d/nagios restart
可執行下列步驟確認mk-livestatus套件是否正常運作
echo 'GET hosts' | unixcat /usr/local/nagios/mk-livestatus/live
下一篇文章將延續此議題,分享如何讓Splunk Server可以接收Splunk Forwarder所搜集的資訊
[Reference]
Splunk for Nagios
MK Livestatus
Download Check_MK


 iThome鐵人賽