網誌好讀版:http://hungys.logdown.com/posts/236044-using-azure-xplat-cli-2
昨天我們已經與讀者介紹了 Azure xplat-cli 的安裝已經基礎的帳號設定,今天的 Part2 將開始帶領讀者使用 CLI 來管理 Azure 上的服務,礙於篇幅的限制,將以我們先前曾經介紹過的網站服務 (Websites) 為例。其實大多數的指令使用方法都可以透過 CLI 的 help 指令來查詢到,所以筆者並不打算在本文中巨細靡遺的介紹每項操作,否則讀者可能也會感到厭煩。
首先我們在終端機下使用 azure 的指令,可以看到基本的功能分類以及版本資訊:
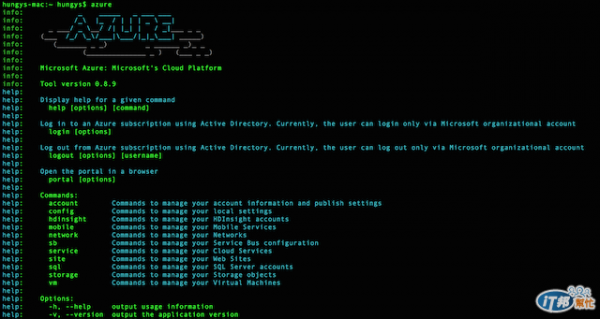
從官方 GitHub 專案上可以將 Azure xplat-cli 的功能大致歸納如下,若有遺漏的地方可以自行前往 GitHub repo 查詢:
儲存體服務 (Storage)
建立與管理儲存體服務帳號
建立與管理容器及 Blob 儲存體
網站服務 (Websites)
建立與管理網站服務
下載站台日誌檔或取得即時日誌串流
部署管理
設定 GitHub 整合
建立與管理 swap slots
建立與管理 WebJobs
虛擬機器 (Virtual Machines)
建立與管理 Windows 或 Linux VM
建立與管理 VM 端點
建立與管理 VM 映像檔
建立與管理憑證
建立與管理 Docker VM
雲端服務 (Cloud Services)
建立與管理雲端服務
網路 (Network)
匯入與會出網路組態
建立與管理虛擬網路
建立與管理 DNS 伺服器
行動服務 (Mobile Services)
建立與管理行動服務
管理表格、指令檔與組態
取用日誌記錄或資料
服務匯流排 (Service Bus)
建立與管理服務匯流排命名空間
SQL 資料庫 (SQL Databases)
建立與管理 SQL 伺服器、防火牆規則與資料庫
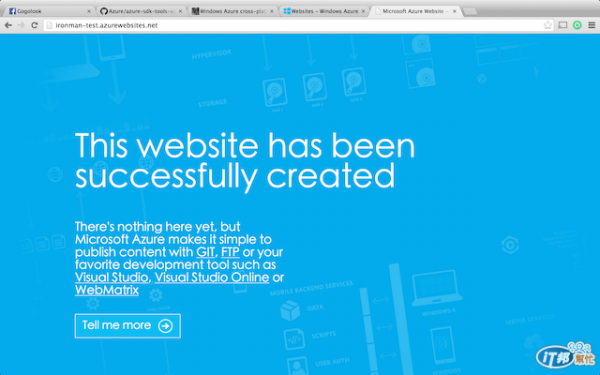
若要建立一個網站,可以使用 azure site create [option] [name] 的指令:
$ azure site create --location "East Asia" ironman-test
info:    Executing command site create
+ Getting sites
+ Getting locations
info:    Creating a new web site at ironman-test.azurewebsites.net
\info:    Created website at ironman-test.azurewebsites.net
+
info:    site create command OK
此時我們打開瀏覽器輸入對應的網站,以筆者的範例為例就是「ironman-test.azurewebsites.net」,可以發現該網站確實已經在一行指令之內建立起來了。
假如我們想要 azure site create 這個指令的設定有更深入的了解,可以在後面加上 -h 或 --help 來調出 CLI 的說明:
$ azure site create -h
help:    Create a web site
help:
help:    Usage: site create [options] [name]
help:
help:    Options:
help:      -h, --help                       output usage information
help:      -v, --verbose                    use verbose output
help:      --json                           use json output
help:      --location <location>            the geographic region to create the website
help:      --hostname <hostname>            the custom host name to use
help:      --slot <slot>                    the name of the slot
help:      --git                            Configure git on web site and local folder
help:      --gitusername <gitusername>      the publishing username for git
help:      --github                         Configure github on web site and local folder
help:      --githubusername <username>      the github username
help:      --githubpassword <password>      the github password
help:      --githubrepository <repository>  the github repository full name (i.e. user/repository)
help:      -s, --subscription <id>          the subscription id
其中可以看到 [name] 本身也不是一個必填的參數,如果沒有填的話則會是由互動式的指令來引導您填入。另外,幾乎每個指令都有 --json 這個選項,若設定的話則可以直接產生一組 json 輸出,如果有對於輸出作處理的需求會相當方便。
若要將目前訂閱下的所有網站服務列出,可以使用 azure site list 的指令:
$ azure site list
info:    Executing command site list
+ Getting locations
+ Getting sites
data:    Name                             Slot  Status   Location   Mode  URL
data:    -------------------------------  ----  -------  ---------  ----  -------------------------------------------------
data:    tlc2013                                Running  East Asia  Free  tlc2013.azurewebsites.net
data:    ironman-test                           Running  East Asia  Free  ironman-test.azurewebsites.net
data:    eecscamp2014                           Running  East Asia  Free  eecscamp2014.azurewebsites.net
info:    site list command OK
若要查詢某個網站的細節資訊,可以使用 azure site show [name] 的指令:
$ azure site show ironman-test
info:    Executing command site show
info:    Showing details for site
+ Getting site information
+ Getting site config information
+ Getting repository settings
+ Getting diagnostic settings
+ Getting site instances information
+ Getting locations
data:
data:    Web Site Name:  ironman-test
data:    Site Mode:      Free
data:    Enabled:        true
data:    Availability:   Normal
data:    Last Modified:  Fri Oct 03 2014 21:49:06 GMT+0800 (CST)
data:    Location:       East Asia
data:
data:    Host Name
data:    ------------------------------
data:    ironman-test.azurewebsites.net
data:
data:    Instance Id
data:    ----------------------------------------------------------------
data:    99931c55eef738f67454119b239895f2198ebb9dafba381ead98e3252ddf180b
data:
data:    App Setting                   Value
data:    ----------------------------  -------
data:    WEBSITE_NODE_DEFAULT_VERSION  0.10.29
data:
data:    Default Documents
data:    -----------------
data:    Default.htm
data:    Default.html
data:    Default.asp
data:    index.htm
data:    index.html
data:    iisstart.htm
data:    default.aspx
data:    index.php
data:    hostingstart.html
data:
data:    Platform & Frameworks
data:    ---------------------
data:    .NET Framework Version:     v4.0
data:    PHP Version:                5.4
data:    Work Process:               32-bit
data:    Worker Count:               1
data:
data:    Logging and Diagnostics
data:    -----------------------
data:    HTTP Logging:
data:
data:    Source Control
data:    --------------
data:    Type:            None
data:    Git Repository:  https://ironman-test.scm.azurewebsites.net/ironman-test.git
data:    Branch:          master
info:    site show command OK
有興趣的話可以嘗試在指令最後加上 --json,則會是產生 json 格式的輸出,如果有將輸出作進一步處理的需求會相當實用。
如果需要開啟、關閉或重啟網站服務的話,可以透過對應的 start、stop 及 restart 指令:
$ azure site start ironman-test   # Start a website
$ azure site stop ironman-test   # Stop a website
$ azure site restart ironman-test   # Restart a website
在偵錯方面,假如有即時瀏覽日誌串流的需求,可以使用 azure site log 底下的相關指令:
$ azure site log tail ironman-test
info:    Executing command site log tail
2014-10-03T14:09:03  Welcome, you are now connected to log-streaming service.
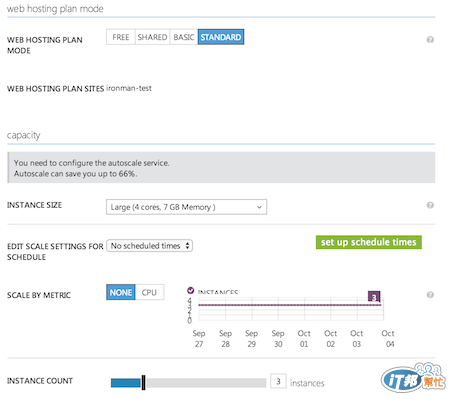
Azure 網站服務本身提供了多種規模可以依照需求做選擇,除了免費、基本、標準三種模式之外,還可以設定執行個體的數量及大小,假如今天預期到網站會有大量的流量,我們希望將剛剛的 ironman-test 網站提升到標準模式,並開啟 3 個「Large:4 核心、7 GB 記憶體」的實體來服務:
$ azure site scale mode standard ironman-test
info:    Executing command site scale mode
+ Updating a site configuration
info:    site scale mode command OK
$ azure site scale instances --instances 3 --size large ironman-test
info:    Executing command site scale instances
+ Getting site information
+ Updating a server farm
info:    site scale instances command OK
若我們這時開啟 Management Portal 來驗證,可以發現確實網站服務已經在數秒內就新部署了更強大的實體來供應我們的服務,這些設定其實都有對應的選項在網頁上可以選擇,而且還貼心的提醒我們可以開啟 Auto-Scaling 的功能,可以省下 66% 的花費,顯然被發現筆者開了太多的資源了(燒錢狀態)。
剛剛筆者調整到了這麼大的網站規模,想趕緊把測試的網站刪除,免得被白白收了費用,此時可以使用 azure site delete 的指令來幫助我們快速刪除:
$ azure site delete ironman-test
info:    Executing command site delete
Delete site ironman-test? [y/n] y
+ Deleting site
info:    Site ironman-test has been deleted
info:    site delete command OK
筆者在調整網站規模的小節中最後曾用 Management Portal 的截圖來對比我們的指令操作,其實可以發現如果對指令不甚熟悉的話,網頁的管理界面就能夠滿足我們的所有設定需求,甚至有更人性化的提示。所以在此筆者其實建議初學者可以嘗試使用圖形化的管理界面來使用 Azure,除非有大量重複操作的需求才使用 CLI 來操作。
當然,某些時候,CLI 還是可以讓我們省下不少時間,回想一下我們在 Day3 時曾經帶領讀者將 WordPress 與 Storage 整合,當時會需要取得儲存體帳號的 Primary Key,那時我們留給讀者自行去摸索操作。如果我們今天要使用 CLI 來達到相同目的的話,其實只需要一行指令就可以達成:
$ azure storage account keys list wordpress
info:    Executing command storage account keys list
+ Getting storage account keys
data:    Primary Sle+ArS71TRNLxxxxxxxxJt/fZOef/UxxxxxxxxmI/suJS0DT5zLy1evLbw+gSaKxhUxG3o/ugApC35Vds04jA==
data:    Secondary 5ScrvlR05h3xxxxxxxxoGBV/VVKPcxxxxxxxxAD5LV9HG1ZLT0KZ1Jwu/9m1/fCo88lbzPGZARdAZQAR94xzfQ==
info:    storage account keys list command OK
這時候便會有種搥心肝的感覺,原來不需要繁雜的登入及操作,甚至等待有點緩慢的 Mangement Portal,這也是筆者刻意選在這時候向大家介紹 Azure 所提供的跨平台 CLI 的原因。CLI 與 GUI 的操作本身各有優勢與劣勢,雖然打指令看起來很帥很專業,但有時候其實並不會有更高的效率,這點就留給讀者自行摸索了!

