上一篇應該已經大概明白 SVG 的動畫是怎麼一回事,但仍然有很多屬性和設定沒有解釋清楚,然而這些屬性和設定,才是 SVG 動畫的最精華所在,讓我們繼續看下去~ XD(英文夠好的人也可以來 W3C 這邊 瞧瞧) ( oxxostudio.tw 同步發表:SVG 研究之路 (22) - 深入理解 SMIL Animation )
1. xlink:href
如同 defs 定義,因為在 SVG 的使用上,往往會運用許多定義檔來構成圖形,因此我們可以運用 xlink:href 的方式,將動畫套用在具有某個 id 的圖形上,就不需要將動畫寫在圖形裏頭。

<rect width="60" height="60" x="50" y="50" fill="#0c0" id="qq">
</rect>
<rect width="60" height="60" x="50" y="50" fill="none" stroke="#000">
</rect>
<animate dur="2s" attributeName="x" repeatCount="indefinite" to="100" xlink:href="#qq"/>
2. attributeName
屬性的名稱,顧名思義就是當你設定了這個屬性,就會以這個屬性去進行動畫,下面的範例分別讓正方形水平和垂直移動。
<rect width="60" height="60" x="50" y="50" fill="#c00">
  <animate dur="2s" attributeName="x" repeatCount="indefinite" to="100"/>
</rect>
<rect width="60" height="60" x="50" y="50" fill="none" stroke="#000">
  <animate dur="2s" attributeName="y" repeatCount="indefinite" to="100"/>
</rect>
3. attributeType ( auto | CSS | XML )
屬性的類別,預設值為 auto,如果明確知道該屬性是 CSS 還是 XML ,就可以直接在這邊下定義,不過其實使用自動就好,因為會自動先去 CSS 的屬性找,找不到再去 XML 的屬性找,原則上來說應該都不會有問題。
4. 動畫影格屬性
4.1: calcMode ( discrete | linear | paced | spline )
指定動畫的進行速度模式,預設為 linear,也就是以同樣速度進行變化,如果遇到不支援的,則直接使用 discrete 的模式,直接跳到下一個狀態 ( from 直接跳到 to ),至於 paced ,則與 linear 相同,平均分配速度,不過就不能使用後面的 keyTimes 和 keySplines ,而 spline 就一定得用 keyTimes 和 keySplines 來配合運作。 ( 不清楚的話,繼續往下看,後面會有範例 )
4.2: values
values 是一連串的值,中間使用「分號」隔開,也就是 from 到 to 之間的值,例如從 from="0" to="10" 進行了 10 秒,我們加上 value="0,2,10",則 0-2 會跑五秒,2-10 會跑五秒。
<rect width="60" height="60" x="50" y="50" fill="#f80">
  <animate dur="2s" attributeName="x" values="50;60;100" repeatCount="indefinite"/>
</rect>
<rect width="60" height="60" x="50" y="50" fill="none" stroke="#000">
  <animate dur="2s" attributeName="x" repeatCount="indefinite" to="100"/>
</rect>
4.3: keyTimes
keyTimes 就是指動畫的時間,根據 W3C 的規範,若要使用 keyTimes,則必須遵守幾個原則:
● keyTimes 為 0-1 之間的浮點數。
● keytimes 後面的值一定要大於前面的值。
● 若和 values 做搭配,values 裡面有幾個值,設定 keyTimes 就要設定幾個值。
● 如果動畫只有 from 和 to,keyTimes 就只能設定兩個值。
● 如果使用了 linear 和 discrete,則 keyTimes 第一個值須為 0。
● 如果只有 from 和 to ,又設為無限重複 indefinite,則 keyTimes 將被忽略。
● keytimes 定義錯誤則會被忽略 。
下面這個是範例,可以看到時間不同的動畫移動:
<rect width="60" height="60" x="50" y="50" fill="#c6c">
  <animate dur="2s" attributeName="x" values="50;75;100" keyTimes="0;.9;1" repeatCount="indefinite"/>
</rect>
<rect width="60" height="60" x="50" y="50" fill="none" stroke="#000">
  <animate dur="2s" attributeName="x" repeatCount="indefinite" to="100"/>
</rect>
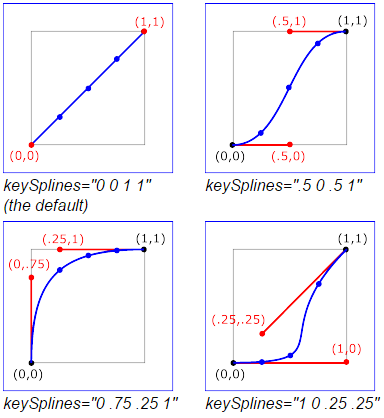
4.4: keySplines
keySplines 跟 CSS3 Cubic Bezier 其實超像的 ( 參考:CSS3 Cubic Bezier ),不過 keySplines 的彈性沒有 CSS3 Cubic Bezier 來得大,只能限定在 0-1 之間的範圍,而且必須與 keyTimes 一同使用,一個值裡面有四個數字,以分號隔開,比 keyTimes 少一個值,我們可由下圖看到藉由控制 keySplines,可以達到讓動畫加減速的效果。 ( 別忘記還要在 calcMode="spline" 的情形下使用)

<rect width="60" height="60" x="50" y="50" fill="#0cc">
  <animate dur="2s" attributeName="x" to="100" keyTimes="0;1" keySplines="0 .75 .25 1" repeatCount="indefinite" calcMode="spline"/>
</rect>
<rect width="60" height="60" x="50" y="50" fill="none" stroke="#000">
  <animate dur="2s" attributeName="x" repeatCount="indefinite" to="100"/>
</rect>
4.5: from
動畫起始時的屬性數值
4.6: to
動畫結束時的屬性數值
4.7: by
動畫相對於起始的屬性數值
5. 動畫時間屬性
5.1: begin
begin 可以說是動畫時間屬性裏頭最重要的了,上頭我們只提到了 begin 可以延遲時間,但其實 begin 裏頭卻有許多的學問:
● 時間設定:
首先我們看到 begin 的時間單位,可以使用 h、min、s 與 ms 這四個單位,不過通常都是 s 和 ms 就足夠使用,因為要用 SVG 直接刻一個幾分鐘或幾小時的動畫,實在是...然而如果不給單位,預設的就是 s 秒數。
● id.end; id.begin:
可以指定某個 id 的動畫結束之後再開始,還可以提早或延遲時間開始,或是指定某個動畫開始時就一起開始。

<rect width="60" height="60" x="50" y="50" fill="#0cc">
  <animate id="a1" dur="2s" attributeName="x" to="100"/>
  <animate dur="2s" attributeName="y" to="100" begin="a1.end"/>
</rect>
<rect width="60" height="60" x="150" y="50" fill="#f80">
  <animate id="a1" dur="2s" attributeName="x" to="200"/>
  <animate dur="2s" attributeName="y" to="100" begin="a1.end+1s"/>
</rect>
<rect width="60" height="60" x="250" y="50" fill="#c00">
  <animate id="a1" dur="2s" attributeName="x" to="300"/>
  <animate dur="2s" attributeName="y" to="100" begin="a1.end-1s"/>
</rect>
● id.event;event
指定某個 id 的事件或是某個事件之後,就執行動畫,下面的範例,點選灰色矩形,就會執行動畫。
<rect id="qq" width="120" height="30" x="50" y="10" fill="#aaa"/>
<rect width="60" height="60" x="50" y="50" fill="#0c0">
  <animate dur="2s" attributeName="x" to="100" begin="qq.click"/>
</rect>
● id.repeat(整數)
某個 id 元素的動畫執行幾次之後就會接續執行。

● indefinite
可以直接使用超連結來控制動畫。

<rect width="60" height="30" x="50" y="50" fill="#c00">
  <animate id="a1" dur="2s" attributeName="y" to="100" begin="indefinite" repeatCount="indefinite"/>
</rect>
<a xlink:href="#a1"><text x="50" y="30">開始動畫</text></a>
5.2: dur
動畫的持續時間,除了時間單位,也可以設為 indefinite。
5.3: end
動畫終止的時間。可指定多個值,以分號區隔,表示可在多個不同時間點終止,用法與 begin 相同。
5.4: min / max
執行動畫最短和最長的時間,數值必須大於 0,min 其實沒有太直接的效果,而 max 倒是很容易可以看出來,當我們設定 max 為 10s,動畫將會在 10s 的時候停止。

<rect width="60" height="60" x="50" y="50" fill="#c00">
  <animate dur="4s" attributeName="x" repeatCount="indefinite" to="100" max="10s"/>
</rect>
<rect width="60" height="60" x="50" y="50" fill="none" stroke="#000">
  <animate dur="4s" attributeName="x" repeatCount="indefinite" to="100"/>
</rect>
5.5: restart (always | whenNotActive | never)
剛剛上面的範例有提到「可以使用超連結來控制動畫」,以及某個 id 點擊事件來觸發動畫,但使用的過程中會發現,每點一次動畫就跑一次,坦白說還真是有點討厭,這時候就必須使用 restart 的屬性,restart 總共有三個設定值,預設是 always,也就是每點一次就會執行一次,而 never 也很好理解就是永遠不會再觸發點擊的動作,另外一個設定就是 whenNotActive,這表示動畫正在執行的時候,點擊是沒有做用的。下面的範例設定動畫跑了三秒會停止,在動畫進行中,怎麼點擊按鈕都是沒有反應的。
<rect width="30" height="30" x="50" y="50" fill="#c00">
    <animate id="a1" dur="1s" attributeName="width" to="100" begin="indefinite" repeatCount="indefinite" restart="whenNotActive" max="3s"/>
</rect>
<a xlink:href="#a1"><text x="50" y="30">開始動畫</text></a>
5.6: repeatCount
動畫執行的次數,設定 indefinite 則是無限次循環。
5.7: repeatDur
動畫執行的時間,設定 indefinite 則是無限長。
5.8: fill ( freeze | remove )
這裡的 fill 不是填色的 fill,而是提供動畫結束時的一個屬性,屬性包含了 freeze 和 remove,remove 是預設值,也就是動畫結束之後,圖形返回原本的狀態,而 freeze 則是在動畫結束後,固定在結束的狀態。
<rect width="60" height="60" x="50" y="50" fill="#c00">
  <animate dur="2s" attributeName="x" to="100" fill="freeze"/>
</rect>
<rect width="60" height="60" x="50" y="50" fill="none" stroke="#000">
  <animate dur="2s" attributeName="x" to="100" fill="remove"/>
</rect>
6. 動畫添加與合併屬性
6.1: additive ( replace | sum )
這是可以把動畫效果進行置換 replace 或相加 sum 的屬性,例如在 animateTransform 裏頭,type 會有 rotate、traslate、scale 和 skew 等設定,如果我們使用 replace,後面的動畫就會置換掉前面的動畫,使用 sum 就會將兩個動畫效果加在一起。下面的範例把位移、放大和旋轉三個效果合而為一,因為放大會改變位置,所以使用 translate 把位置調整回來。

<rect width="60" height="60" x="50" y="50" fill="#069">
  <animateTransform attributeName="transform" dur="2s" type="translate" from="50,50" to="-50,-50"  repeatCount="indefinite" additive="sum"/>
  <animateTransform attributeName="transform" dur="2s" type="scale" from="1" to="2"  repeatCount="indefinite" additive="sum"/>
  <animateTransform attributeName="transform" dur="2s" type="rotate" from="0,80,80" to="360,80,80" repeatCount="indefinite" additive="sum"/>
</rect>
6.2: accumulate ( none | sum )
設定動畫結束後,是否從結束的地方接續動畫下去,none 是預設值,如果我們使用 sum,則會在第一段動畫結束的狀態繼續往下加,例如一開始縮放是 1>2,下一段就是2>4,下一段就是4>6,依此類推,不過使用者個屬性有規定,如果不是重複的動畫就不能使用。
<rect width="10" height="10" x="0" y="0" fill="#069">
  <animateTransform attributeName="transform" dur="2s" type="scale" from="1" to="2"  repeatCount="indefinite" accumulate="sum"/>
</rect>
<rect width="10" height="10" x="0" y="0" fill="#c00">
  <animateTransform attributeName="transform" dur="2s" type="scale" from="1" to="2"  repeatCount="indefinite" accumulate="none"/>
</rect>
以上就是 SVG SMIL Animation 的詳細用法,當然,還有更多的細節等待我們去挖掘,畢竟在 W3C 這篇文章內容可是我的幾百倍吧 ( 制定者,不意外呀哈哈 ),不過瞭解上述的用法,其實就可以做出許多別人辦不到的特效囉!