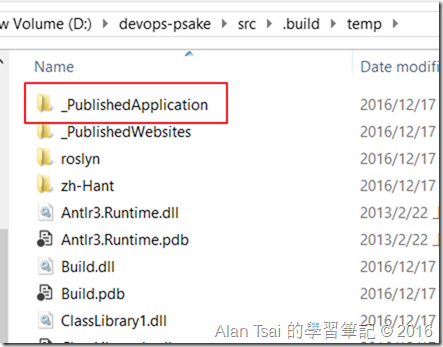
在上篇瞭解到如果什麼都沒調整的情況下,建製出來的內容會放在一起,根本無法區分哪些內容屬於哪些專案。
也提到了.Ner 4.5能夠使用GenerateProjectSpecificOutputFolder,但是假設是.Net 4.5以下呢?
這篇我們會沿著這個思路,看看為什麼Asp .Net Mvc專案有個_PublishedWebsite,並且我們是否能夠使用這個資訊來做些處理。
sample 程式在 github devops-psake sample/chapter8
同步發表於我的部落格:http://blog.alantsai.net/2016/12/devopsSeries-buildOutputProblem-2.html (部落格的格式會漂亮一些,ithome不支援html好不方便)
如果我們用editor把web專案的csproj打開,在靠近下面的部分,我們會看到幾個Target

一般的Library專案只會有第一個target:Microsoft.CSharp.targets,而Web專案多了一個target:Microsoft.WebApplication.targets
如果把Microsoft.WebApplication.targets打開,我們會看到:有個target叫做:_CopyWebApplicationLegacy
這個Target有很多不同檔案類型的判斷,我們可以利用這個作為我們Console複製的target
首先在BuildProject建立MSBuildTargets\ApplicationBuild.targets,這個檔案將會是我們target的位置

在來,我們先定義出要建立的資料夾名稱參數applicationoutputdirectory:
<project xmlns="http://schemas.microsoft.com/developer/msbuild/2003" defaulttargets="Build"><propertygroup><applicationoutputdirectory>$(OutDir)_PublishedApplication\$(MSBuildProjectName)</applicationoutputdirectory></propertygroup></project>
再來,我們會建立當MSBuild執行的時候要執行我們複製的動作
<project>
...
 <propertygroup><prepareforrundependson>
   $(PrepareForRunDependsOn);
   _CopyApplication
  </prepareforrundependson></propertygroup>
...
</project>
這個意思是,我們會在PrepareForRunDependsOn這個事件插入我們的事件,不過首先要先把之前的執行完,然後在執行我們等一下定義的_CopyApplication這個task
接下來我們可以複製 _CopyWebApplicationLegacy所有的東西,並且做一些調整:
把console的csproj打開,然後加入import target的部分在最下面:
<import project="..\BuildProject\MSBuildTargets\ApplicationBuild.targets"></import>

最後整個檔案內容是:
<project xmlns="http://schemas.microsoft.com/developer/msbuild/2003" defaulttargets="Build">
  <propertygroup>
  <applicationoutputdirectory>$(OutDir)_PublishedApplication\$(MSBuildProjectName)</applicationoutputdirectory>
 </propertygroup>

 <propertygroup>
  <prepareforrundependson>
   $(PrepareForRunDependsOn);
   _CopyApplication
  </prepareforrundependson>
 </propertygroup>

 <target condition="'$(OutDir)' != '$(OutputPath)'" name="_CopyApplication">
    <!-- Log tasks -->
    <message text="Copying Web Application Project Files for $(MSBuildProjectName)"></message>

    <!-- Create the _PublishedWebsites\app\bin folder -->
    <makedir directories="$(ApplicationOutputDirectory)\bin"></makedir>

    <!-- Copy build outputs to _PublishedWebsites\app\bin folder -->
    <copy retrydelaymilliseconds="$(CopyRetryDelayMilliseconds)" retries="$(CopyRetryCount)" skipunchangedfiles="true" destinationfolder="$(ApplicationOutputDirectory)\bin" sourcefiles="@(IntermediateAssembly)"></copy>
    <copy retrydelaymilliseconds="$(CopyRetryDelayMilliseconds)" retries="$(CopyRetryCount)" skipunchangedfiles="true" destinationfolder="$(ApplicationOutputDirectory)\bin" sourcefiles="@(AddModules)"></copy>
    <copy condition="'$(_SGenDllCreated)'=='true'" retrydelaymilliseconds="$(CopyRetryDelayMilliseconds)" retries="$(CopyRetryCount)" skipunchangedfiles="true" destinationfolder="$(ApplicationOutputDirectory)\%(Content.SubFolder)%(Content.RecursiveDir)" sourcefiles="$(IntermediateOutputPath)$(_SGenDllName)"></copy>
    <copy condition="'$(_DebugSymbolsProduced)'=='true'" retrydelaymilliseconds="$(CopyRetryDelayMilliseconds)" retries="$(CopyRetryCount)" skipunchangedfiles="true" destinationfolder="$(ApplicationOutputDirectory)\bin" sourcefiles="$(IntermediateOutputPath)$(TargetName).pdb"></copy>
    <copy condition="'$(_DocumentationFileProduced)'=='true'" retrydelaymilliseconds="$(CopyRetryDelayMilliseconds)" retries="$(CopyRetryCount)" skipunchangedfiles="true" destinationfolder="$(ApplicationOutputDirectory)\bin" sourcefiles="@(DocFileItem)"></copy>
    <copy retrydelaymilliseconds="$(CopyRetryDelayMilliseconds)" retries="$(CopyRetryCount)" skipunchangedfiles="true" sourcefiles="@(IntermediateSatelliteAssembliesWithTargetPath)" destinationfiles="@(IntermediateSatelliteAssembliesWithTargetPath->'$(ApplicationOutputDirectory)\bin\%(Culture)\$(TargetName).resources.dll')"></copy>
    <copy retrydelaymilliseconds="$(CopyRetryDelayMilliseconds)" retries="$(CopyRetryCount)" skipunchangedfiles="true" destinationfolder="$(ApplicationOutputDirectory)\bin" sourcefiles="@(ReferenceComWrappersToCopyLocal); @(ResolvedIsolatedComModules); @(_DeploymentLooseManifestFile); @(NativeReferenceFile)"></copy>

    <!-- copy any referenced assemblies to _PublishedWebsites\app\bin folder -->
    <copy retrydelaymilliseconds="$(CopyRetryDelayMilliseconds)" retries="$(CopyRetryCount)" skipunchangedfiles="true" sourcefiles="@(ReferenceCopyLocalPaths)" destinationfiles="@(ReferenceCopyLocalPaths->'$(ApplicationOutputDirectory)\bin\%(DestinationSubDirectory)%(Filename)%(Extension)')"></copy>

    <!-- Copy items that have been marked to be copied to the bin folder -->
    <copy retrydelaymilliseconds="$(CopyRetryDelayMilliseconds)" retries="$(CopyRetryCount)" skipunchangedfiles="true" destinationfolder="$(ApplicationOutputDirectory)\bin" sourcefiles="@(_SourceItemsToCopyToOutputDirectory)"></copy>
    <copy retrydelaymilliseconds="$(CopyRetryDelayMilliseconds)" retries="$(CopyRetryCount)" skipunchangedfiles="false" destinationfolder="$(ApplicationOutputDirectory)\bin" sourcefiles="@(_SourceItemsToCopyToOutputDirectoryAlways)"></copy>


    <!-- Copy items that need to be bin deployed to the bin folder -->
    <copy retrydelaymilliseconds="$(CopyRetryDelayMilliseconds)" retries="$(CopyRetryCount)" skipunchangedfiles="true" destinationfolder="$(ApplicationOutputDirectory)\bin\%(RecursiveDir)" sourcefiles="@(_binDeployableAssemblies)"></copy>

  </target>
</project>
其實第5步的複製有些東西是可以調整更符合console專案,但是這就留給讀者去嘗試
透過這次修改MSBuild相信對於為什麼不直接用MSBuild而是用Psake有所瞭解,看MSBuild真的太不容易
這篇算是比較快速帶過,如何利用MSBuild來做到一些我們想要擴充的動作,在非.Net 4.5之前,這個是我們唯一的做法,不過相較於上一篇提到的方式,這個方法實在太繁瑣了。
在接下來的篇章,我會持續使用上篇的做法,並且我們開始要進入到執行測試的階段,不過在進入測試之前,還有一個問題要先解決,那就是當建制失敗應該會怎麼樣。


 iThome鐵人賽