我那時候完成的freecodecamp 的前端認證我就決定要學react. 我選react 的最大原因是因為它是最大的前端框架, 加上我看104, react的相關工作最多. 而且當時angular在改版, 好像被批評太常改版跟改太大了. 阿 vue 當時沒考慮.
那我馬上上facebook react網站做它的教學, 結果發現怎麼他嗎的難. 完全看不懂. 而且觀念跟之前寫的ES5完全不一樣. 當時很多教學寫法也不一致, 有人用ES5, 有人用ES6, 有人用ES7+. 害我這個新手看得都軟掉了.
之後上了一些udemy課程, 參加react maker 的讀書會, 就比較了解了. 那我來分享一些react的基本概念.
組件使你可以將UI 劃分為一個一個獨立,可複用的小部件,並可以對每個部件進行單獨的設計.
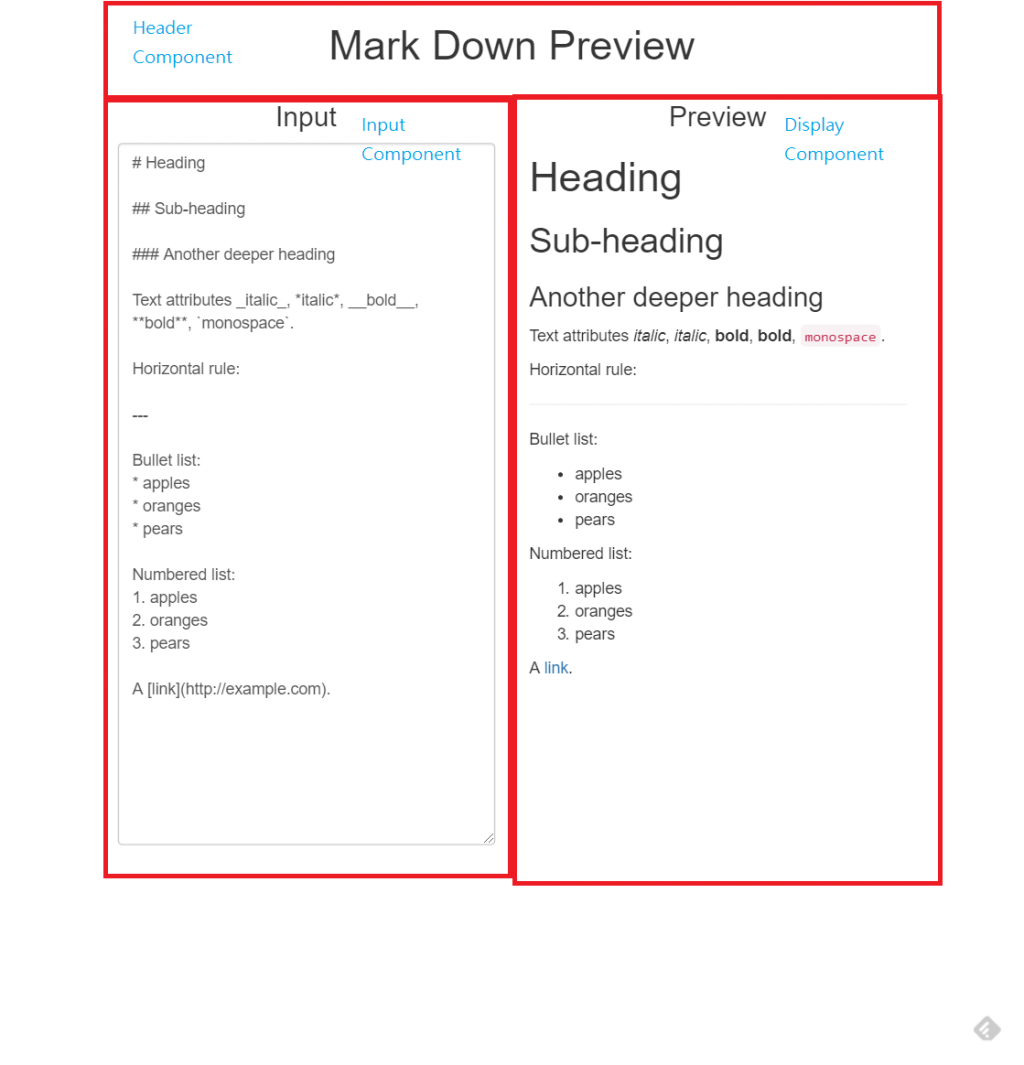
接下來的範例我會用我的markdown 專案demo來做講解. (PS. 這是我第一個react專案, 寫的很爛, 請多多包涵)
這一個網頁有三個component: header, input, display.
每一個component可以設定自己的state. state允許React組件在不違反上述規則的情況下,根據用戶操作,網絡響應,或者其他隨便什麼東西,來動態地改變其輸出. 根據不同的 state(透過 setState() 修改)Component 會出現對應的顯示結果.
在我的App.js 連結, 我有個狀態儲存 使用者輸入的text. 然後以下有一些function 可以針對state來做變更. 譬如handleAddInput, 就是把輸入的input 塞進狀態裡面. 要記得改變狀態要用setState.
import React, { Component } from 'react'; // eslint-disable-line no-unused-vars
import Header from './components/header'; // eslint-disable-line no-unused-vars
import Input from './components/input'; // eslint-disable-line no-unused-vars
import Display from './components/display'; // eslint-disable-line no-unused-vars

class App extends Component {
  constructor() {
    super();
    this.state = {
        text: "",
    };
  }

  handleAddInput = (input) => {
    this.setState({
      text: input
    });
  }// eslint-disable-next-line
  render() {
    const { text } = this.state;

    return (
      <div className="container">
      <Header />
      <Input
        handleAddInput={this.handleAddInput}
        text={text}
      />
      <Display text={text} />
      </div>
    );
  }
}

export default App;
因為我們UI裡面有很多 component, 那component 跟 component 要對話要交流怎麼辦? 這時候就要用props. 所以以上的範例我們要把 this.state.text 跟handleAddInput 傳給Input component. 然後我在Input component 可以用 this.props 來接收 App.js 傳來的質跟function
App.js
...
   return (
      <div className="container">
      <Header />
      <Input
        handleAddInput={this.handleAddInput}
        text={text}
      />
      <Display text={text} />
      </div>
    );
...

Input.js

import React, {Component} from 'react';

class Input extends Component {

    componentDidMount() {
        const initialText = '# Heading\n\n## Sub-heading\n\n### Another deeper heading\n\nText attributes _italic_, *italic*, __bold__, **bold**, `monospace`.\n\nHorizontal rule:\n\n---\n\nBullet list:\n* apples\n* oranges\n* pears\n\nNumbered list:\n1. apples\n2. oranges\n3. pears\n\nA [link](http://example.com).';
        const {handleAddInput} = this.props;
        handleAddInput(initialText);
    }

    addInput = (e) => {
        const {handleAddInput} = this.props; //注意這裡
        handleAddInput(e.target.value);
    }

    render() {
        const {text} = this.props;

        return (
            <div className="col-sm-6">
                <h3 className="text-center">Input</h3>
                <textarea cols="30" rows="30" className="form-control" onChange={this.addInput} value={text}></textarea>  //注意這裡
            </div>
        )
    }
}

export default Input;
好拉! 今天先介紹到這邊, 如果要玩demo surge 可以來這裡 或可以來這裡看code github


 iThome鐵人賽