若是還有印象前兩天介紹完 Replication Controller 以及 Deployment 對 Pod 物件的操作,讀者應該可以發現Pod 的生命週期是非常動態的。以應用程式升級(rollout) 為例,Deployment 會先創建新的 Pod 去取代現有的 Pod 物件,也因此,我們需要一個中間橋樑,來確保終端使用者(end user)或是其他應用服務,可以在該應用程式升級時,仍可以連到該應用程式中可用的Pod (available pods)。
今天學習筆記如下:
小提醒:今天的程式碼都可以在 demo-service 上找到。
首先我們將介紹什麼是 Service,如上述前言所提到,我們需要在 Pod 前面再接一層橋樑,確保每次存取應用程式服務時,都能連結到正在運行的Pod。若是還記得,我們前幾天常使用的指令kubectl expose,就會知道該指令可以幫我們創建一個新的 Service 物件,來讓Kubernetes Cluster中運行的 Pod與外部互相溝通。
而一個新的 Service 可以為 Pods 做到以下幾件事情:
創建一個ClusterIp,讓Kubernetes Cluster中的其他服務,可以透過這個 ClusterIp 訪問到正在運行中的Pods
在每次創建 Service 物件時,Kubernetes 就會預設一組virtual IP 給 Service 物件。除非我們在 Service yaml 指定想要的 virtual IP,否則 Kubernetes 每次都會隨機指定一組virtual IP。
創建一個NodePort,讓在 Kubernetes Cluster外但在同一個 Node 上的其他服務,可以透過這個 NodePort 訪問到 Kubernetes Cluster 內正在運行中的 Pods。
如果我們的Kubernetes Cluster是架在第三方雲端服務(cloud provider),例如 Amazon 或 Google Cloud Platform,我們可以透過這些 cloud provider 提供的 LoadBalancer ,幫我們分配流量到每個 Node 。我們可以指定--type=LoadBalancer,如此 cloud provider 就會自動幫我們創建好相對應的 Load Balancer 物件,在 [Day 15] 介紹kops - 在AWS 上打造Kubernetes Cluster 將會介紹到如何透過指令創建 Load Balancer。
還記得昨天透過 kubectl expose 的指令,為我們創建的 Service 物件嗎
$ kubectl expose deploy hello-deployment --type=NodePort --name=my-deployment-service
今天我們將透過 my-service.yaml ,創建一個與昨天 kubectl expose 相同行為的Service物件。
apiVersion: v1
kind: Service
metadata:
  name: hello-service
spec:
  type: NodePort
  ports:
  - port: 3000
    nodePort: 30390
    protocol: TCP
    targetPort: 3000
  selector:
    app: my-deployment
apiVersion
Service使用的Kubernetes API是v1版本號
metadata.name
則可以指定該Service的名稱
spec.type
可以指定Service的型別,可以是NodePort或是LoadBalancer
spec.ports.port
可以指定,創建的Service的Cluster IP,是哪個port number去對應到targetPort
spec.ports.nodePort
可以指定Node物件是哪一個port numbrt,去對應到targetPort,若是在Service的設定檔中沒有指定的話,Kubernetes會隨機幫我們選一個port number
spec.ports.targetPort
targetPort是我們指定的 Pod 的 port number,由於我們會在Pod中運行一個port number 3000 的 web container,所以我們指定hello-service的特定port number都可以導到該web container。
spec.ports.protocol
目前 Service 支援TCP與UDP兩種protocl,預設為TCP
spec.selector
selector則會幫我們過濾,在範例中,我們創建的Service會將特定的port number收到的流量導向 標籤為app=my-pod的 Pods
若是細心的讀者,在閱讀前幾天介紹的 Replication Controller, Replication Set 或是 Deployment 的yaml檔時,可以發現 Kubernetes 在創建每個物件的設定檔都非常相似。
首先,一樣先確定minikube是否正常運作
$ kubectl get node
NAME       STATUS    ROLES     AGE       VERSION
minikube   Ready     <none>    4d        v1.8.0
接著透過 昨天我們使用的 my-deployment.yaml 創建一個Deployment物件,
$ kubectl create -f ./my-deployment.yaml
deployment "hello-deployment" created
確認Pod都在狀態都已經在Running之後,
$ kubectl get pods --show-labels
NAME                               READY     STATUS    RESTARTS   AGE       LABELS
hello-deployment-898fdcc4f-wdvn9   1/1       Running   0          29m       app=my-deployment,...
hello-deployment-898fdcc4f-wlr75   1/1       Running   0          29m       app=my-deployment,...
hello-deployment-898fdcc4f-zv274   1/1       Running   0          29m       app=my-deployment,...
我們就可以準備創建 Service 囉,指令如下
$ kubectl create -f ./my-service.yaml
service "hello-service" created
這時,我們可以透過kubectl get services 或是 kubectl get svc來查看目前service的狀態。

可以看到我們創建的hello-service物件,被賦予一組Cluster IP 10.111.116.249,這時可以使用 第五天學習筆記分享的alpine 來查看 Service在Cluster中是否正常運作,使用指令如下:
$ kubectl run -i --tty alpine --image=alpine --restart=Never -- sh
使用alpine查看cluster狀況

可以看到curl 10.104.188.91:3000 回傳 Hello World!字串,代表 hello-service 有正常運作。此外,我們也指定NodePort為 30390,可透過minikube service指令查看
$ minikube service hello-service --url
http://192.168.99.100:30390
可以透過本機端的瀏覽器打開http://192.168.99.100:30390,也可以看到hello-service,我們從Kubernetes Cluster的外部服務訪問到 web app且回傳Hello World的字串。

如果我們,刪除目前的hello-service物件,又重新產生一個新的hello-service,會發現該物件的Cluster IP以及minikube上的url都會不同。這是因為這些virtual ip都是系統賦予的,除非我們在設定檔指定相對的Cluster IP,否則每次產生的Service物件的IP都會與先前不相同,以下述指令為例:
$ kubectl get svc
NAME            TYPE        CLUSTER-IP      EXTERNAL-IP   PORT(S)          AGE
hello-service   NodePort    10.104.188.91   <none>        3000:30390/TCP   23m
kubernetes      ClusterIP   10.96.0.1       <none>        443/TCP          24m

$ kubectl delete svc/hello-service && kubectl create -f ./my-service.yaml
service "hello-service" deleted
service "hello-service" created


$ kubectl get svc
NAME            TYPE        CLUSTER-IP     EXTERNAL-IP   PORT(S)          AGE
hello-service   NodePort    10.98.220.99   <none>        3000:30390/TCP   10s
kubernetes      ClusterIP   10.96.0.1      <none>        443/TCP          56m
可以看到原本的CLUSTER-IP從10.104.188.91變為10.98.220.99
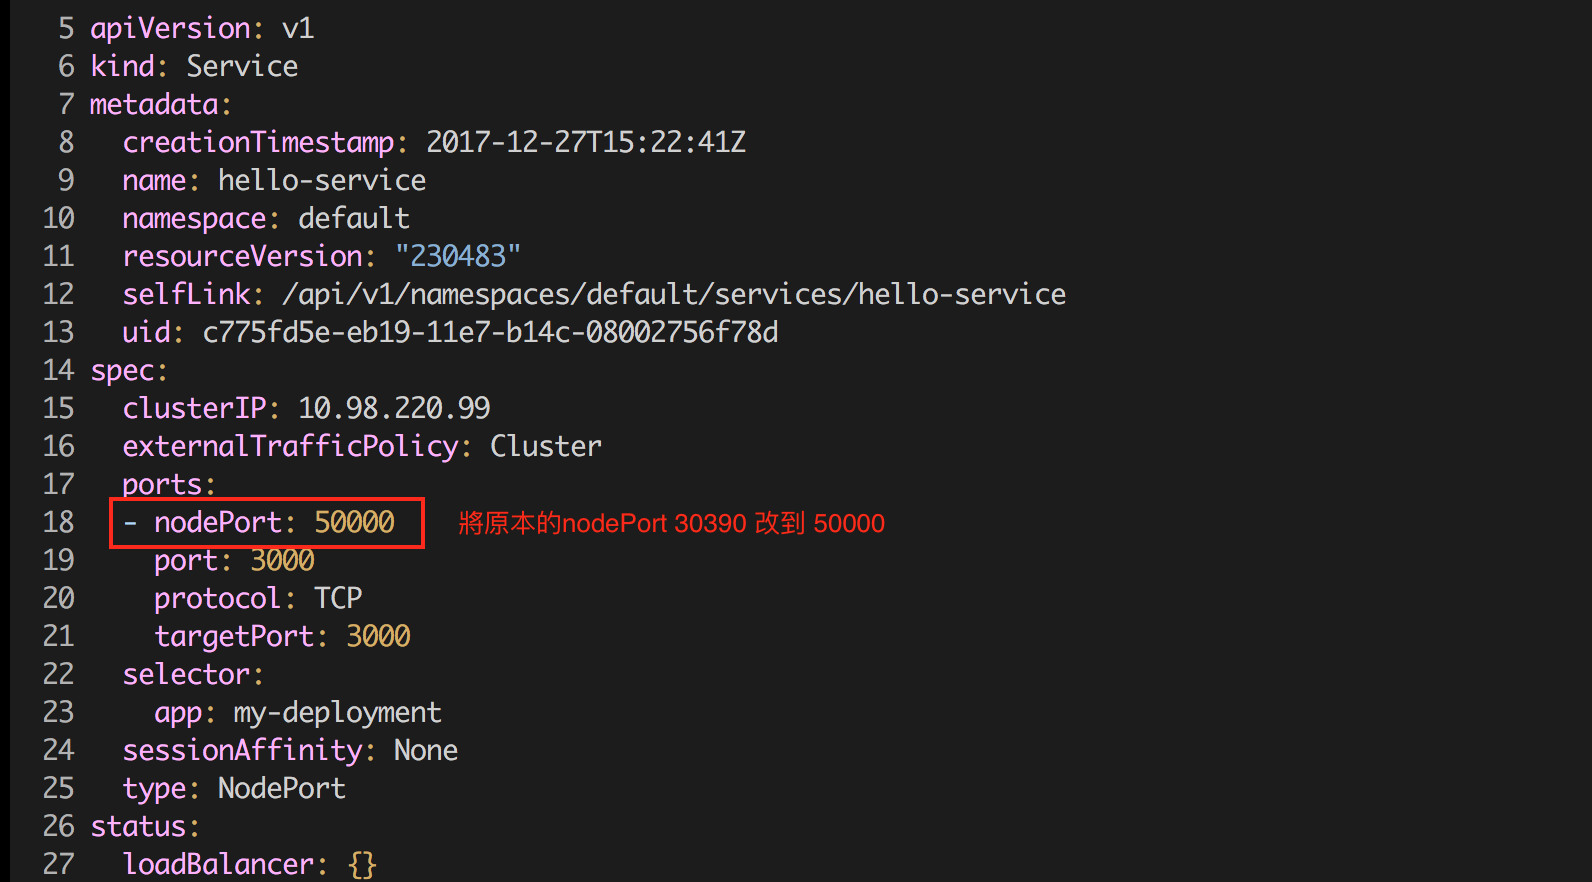
在Kubernetes預設的Service中,Service可以指定的nodePort只有3000~32767,如果我們需要修改可以指定的nodePort range,可以在 Node 一開始創建中指定,以 minikube 為例,當下次啟動minikube時我們可以加上--extra-config=apiserver.ServiceNodePortRange={PORT_RANGE}
$ minikube stop && minikube start --extra-config=apiserver.ServiceNodePortRange=1-50000
....
啟動之後,我們可以將原本的 hello-service 編輯

這時再重新看一下 hello-service 的狀態,可以發現 NodePort 已經變為 50000了。
$ kubectl edit svc/hello-service
service "hello-service" edited

$ kubectl get svc hello-service
NAME            TYPE       CLUSTER-IP     EXTERNAL-IP   PORT(S)          AGE
hello-service   NodePort   10.98.220.99   <none>        3000:50000/TCP   14m

$ minikube service hello-service --url
http://192.168.99.100:50000
今天的學習筆記中,分享了Kubernetes在實際場景中不可或缺的物件 - Service。但若是只能存取 Service 的 virtual ip 是無法勝任在實際場景中的應用,讀者不妨想像一下,如果今天有兩個服務,一個是 web app 另一個是 database ,個別用 Deployment 物件管理並且透過 Service 物件提供端口服務,當 web app 要連到 database 時,我們要如何在不修改設定檔的情況下找到database service動態產生的virtual ip 呢?在 [Day 17] Pod之間是如何找到彼此呢 - Service Discovery 的學習筆記中,我們將會介紹到如何透過 DNS 來幫助不同的應用服務發現彼此。
依舊歡迎大家給予建議與討論,如果能按個讚給些鼓勵也是很開心唷 : )

$ kubectl run -i --tty alpine --image=alpine --restart=Never -- sh [10:31:23]
Error from server (AlreadyExists): pods "alpine" already exists
you have to delete 'apline' pod first.
1/ use kubectl get pods -a to list all pods in kubernetes (with current namespace)
2/ then, type kubectl delete po/alpine to remove this pod from cluster.
創建一個NodePort,讓在 Kubernetes Cluster外但在同一個 Node 上的其他服務,可以透過這個 NodePort 訪問到 Kubernetes Cluster 內正在運行中的 Pods
這一點不大明白。甚麼是cluster外但同一個node上?謝
[路過的不專業回答]
如同系列一開始說的將Node想成是一台機器,那在這台機器上除了K8s cluster當然還有可能跑其他的程式、服務
創建一個NodePort,讓在 Kubernetes Cluster外但在同一個 Node 上的其他服務,可以透過這個 NodePort 訪問到 Kubernetes Cluster 內正在運行中的 Pods
這一點不大明白。甚麼是cluster外但同一個node上?謝