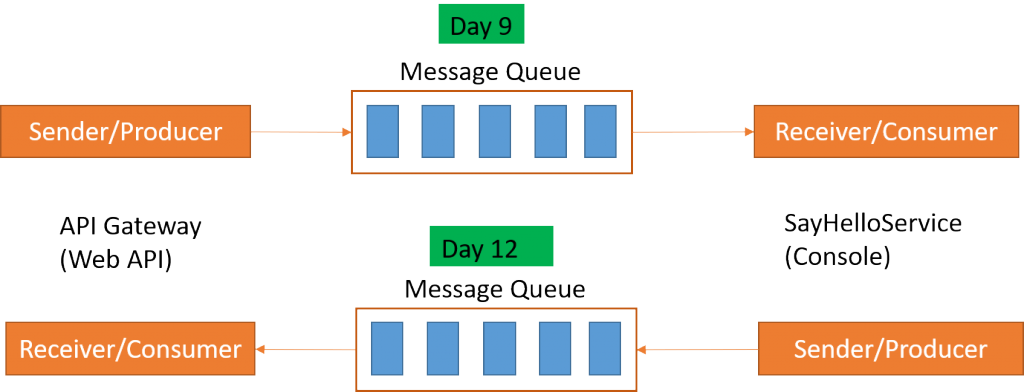
這篇是Day5+Day9的後續練習, 在Day5中利用rest同步通訊方式註冊服務到API Gateway,而在Day9中實現了使用者直接操作Web API,透過RabbitMQ在指定Console程式印出使用者輸入到Web API的資料。 今天要試著把Console程式(SayHelloService)利用RabbitMQ註冊服務到API gateway(Web API)
首先要注意的是在RabbitMQ官網上的c#範例都是以console為主,套用到Web API或是網頁的時候需要更改一些東西
先在API Gateway專案建立起一個RabbitMQListener.cs
using APIGateway.Controllers;
using RabbitMQ.Client;
using RabbitMQ.Client.Events;
using System.Text;

namespace APIGateway
{
    public static class RabbitMQListener
    {
        private static IConnection connection;
        private static IModel channel;

        public static void Start() {
            var factory = new ConnectionFactory() { HostName = "localhost" };
            connection = factory.CreateConnection();
            channel = connection.CreateModel();
            channel.QueueDeclare(
                    queue: "registry",
                    durable: false,
                    exclusive: false,
                    autoDelete: false,
                    arguments: null);

            var consumer = new EventingBasicConsumer(channel);

            consumer.Received += (model, ea) =>
            {
                var body = ea.Body;
                var message = Encoding.UTF8.GetString(body);
                ServiceRegistryController src = new ServiceRegistryController();
                src.PostAsync(message);
            };

            channel.BasicConsume(
                queue: "registry",
                autoAck: true,
                consumer: consumer);
        }

        public static void Stop() {
            channel.Close(500, "Channel closed");
            connection.Close();
        }
    }
}
要特別注意的是官網的教學課程會使用using來釋放資源,但那是Console程式,這邊我們需要把connection跟channel都設成static而且不使用using才能持續監聽RabbitMQ。
在APIGaeway/ServiceRegistryController.cs加入一個PostAsync方法供非同步通訊使用。
using System.Collections.Generic;
using System.Linq;
using Microsoft.AspNetCore.Mvc;
using APIGateway.Models;

namespace APIGateway.Controllers
{
    [Produces("application/json")]
    [Route("api/ServiceRegistry")]
    public class ServiceRegistryController : Controller {
        static List<MicroService> serviceList = new List<MicroService>() {
            new MicroService() { Name="API Gateway", Location="http://localhost:2324" }
        };
        // GET: api/ServiceRegistry
        [HttpGet]
        public IEnumerable<MicroService> Get() {
            return serviceList;
        }

        // POST: api/ServiceRegistry
        [HttpPost]
        public void Post([FromBody]MicroService service) {
            serviceList.Add(service);
        }

        public string PostAsync(string service) {
            serviceList.Add(new MicroService() { Name=service, Location="RabbitMQ" });
            return service;
        }

        // DELETE: api/ServiceRegistry/{serviceName}
        [HttpDelete("{serviceName}")]
        public void Delete(string serviceName)
        {
            serviceList.Remove(serviceList.First(s => s.Name == serviceName));
        }
    }
}
然後利用Day5的技巧在服務啟用時啟動consumer監聽,服務關閉的同時也關閉consumer避免資源沒被釋放
APIGateway/Startup.cs
using Microsoft.AspNetCore.Builder;
using Microsoft.AspNetCore.Hosting;
using Microsoft.Extensions.Configuration;
using Microsoft.Extensions.DependencyInjection;

namespace APIGateway
{
    public class Startup
    {
        public Startup(IConfiguration configuration)
        {
            Configuration = configuration;
        }

        public IConfiguration Configuration { get; }

        // This method gets called by the runtime. Use this method to add services to the container.
        public void ConfigureServices(IServiceCollection services)
        {
            services.AddMvc();
        }

        // This method gets called by the runtime. Use this method to configure the HTTP request pipeline.
        public void Configure(IApplicationBuilder app, IHostingEnvironment env, IApplicationLifetime appLifetime)
        {
            if (env.IsDevelopment())
            {
                app.UseDeveloperExceptionPage();
                app.UseBrowserLink();
            }
            else
            {
                app.UseExceptionHandler("/Home/Error");
            }

            app.UseStaticFiles();

            app.UseMvc(routes =>
            {
                routes.MapRoute(
                    name: "default",
                    template: "{controller=Home}/{action=Index}/{id?}");
            });

            appLifetime.ApplicationStarted.Register(OnStarted);
            appLifetime.ApplicationStopped.Register(OnStopped);

        }

        private void OnStopped() {
            RabbitMQListener.Stop();
        }

        private void OnStarted() {
            RabbitMQListener.Start();
        }
    }
}
下面是console程式SayHelloService/Program.cs
RegistryInAPIGateway()會publish訊息給RabbitMQ的registry隊列,
SubscribeToAPIGateway()會持續監聽來自RabbitMQ的hello隊列。
using RabbitMQ.Client;
using RabbitMQ.Client.Events;
using System;
using System.Text;

namespace SayHelloService
{
    class Program
    {
        static void Main(string[] args) {
            RegistryInAPIGateway();
            SubscribeToAPIGateway();
        }

        private static void SubscribeToAPIGateway() {
            var factory = new ConnectionFactory() { HostName = "localhost" };
            using (var connection = factory.CreateConnection())
            using (var channel = connection.CreateModel()) {
                channel.QueueDeclare(
                    queue: "hello",
                    durable: false,
                    exclusive: false,
                    autoDelete: false,
                    arguments: null);

                var consumer = new EventingBasicConsumer(channel);
                consumer.Received += (model, ea) =>
                {
                    var body = ea.Body;
                    var message = Encoding.UTF8.GetString(body);
                    Console.WriteLine($"Received: {message}");
                    Console.WriteLine($"Hello, {message}");
                };

                channel.BasicConsume(
                    queue: "hello",
                    autoAck: true,
                    consumer: consumer);

                Console.WriteLine("Pess any key to exit");
                Console.ReadLine();
            }
        }

        private static void RegistryInAPIGateway() {
            var factory = new ConnectionFactory() { HostName = "localhost" };

            using (var connection = factory.CreateConnection()) {
                using (var channel = connection.CreateModel()) {
                    channel.QueueDeclare(
                        queue: "registry",
                        exclusive: false,
                        autoDelete: false,
                        arguments: null
                        );

                    string message = "SayHelloService";
                    var body = Encoding.UTF8.GetBytes(message);

                    channel.BasicPublish(
                        exchange: "",
                        routingKey: "registry", basicProperties: null,
                        body: body);
                }
            }
        }
    }
}
利用RabbitMQ做非同步的服務註冊有一個好處是服務的啟動先後順序不重要,不像是使用rest的時候一定要API Gateway先啟動才能成功註冊,否則需要加入retry的機制。publish到RabbitMQ的訊息會一直等到有consumer確認接受後才會被移除。


 iThome鐵人賽