今天是Room的最後一篇,也是Test篇章的開始,要講的是Room的單元測試,包括DAO和Migration兩個部分。
個人覺得Room的測試機制很方便,在測試DAO時可以建立in-memory臨時資料庫,就不用怕動到App的資料;測試Migration時,藉由內建的匯出schema功能我們可以測試任意兩個版本的Migration是否成功。
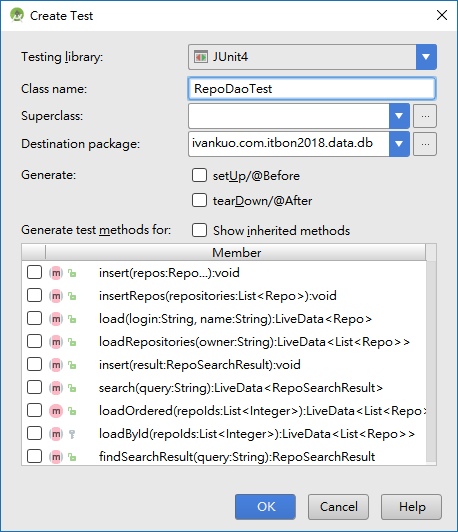
Android Studio快速建立test的方式:開啟要建立test的class並將游標移至任意處,按下Ctrl + Shift + T並選擇Create New Test就會出現視窗:
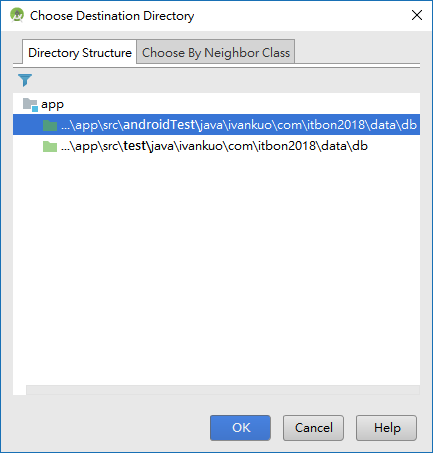
按下OK之後選擇要建立在哪個路徑中:
我們選擇androidTest,就會有RepoDaoTest出現在(androidTest)的package中。
DAO測試時我們使用Room的in-memory資料庫功能,這樣可以跟App原本的資料分開,不用怕測試影響到原資料,之後也不用清除測試資料。
in-memory資料庫的建立方式很簡單,於@Before使用inMemoryDatabaseBuilder建立。
@Before
public void setUp() throws Exception {
    db = Room.inMemoryDatabaseBuilder(InstrumentationRegistry.getContext(),
            GithubDb.class).build();
}
記得要在@After關閉in-memory資料庫連線。
@After
public void closeDb() throws Exception {
    db.close();
}
其他部分就用@Test寫要測試的功能,例如測試寫入和讀取的完整test case如下:
@RunWith(AndroidJUnit4.class)
public class RepoDaoTest {

    private GithubDb db;
    private Repo repo;

    @Before
    public void setUp() throws Exception {
        db = Room.inMemoryDatabaseBuilder(InstrumentationRegistry.getContext(),
                GithubDb.class).build();

        Owner owner = new Owner("foo", null, null);
        repo = new Repo(1, "foo", "foo/bar", "desc", owner, 50);
    }

    @After
    public void closeDb() throws Exception {
        db.close();
    }

    @Test
    public void insertAndLoad() throws InterruptedException {
        // Insert repo
        db.repoDao().insert(repo);
        // Query repo
        final Repo loaded = db.repoDao().load("foo", "foo");
        // Assert query result
        assertThat(loaded.owner.login, is("foo"));
        assertThat(loaded.name, is("foo"));
    }
}
其中repoDao().load是直接回傳一個Repo:
@Query("SELECT * FROM repo WHERE owner_login = :login AND name = :name")
public abstract Repo load(String login, String name);
如果Query結果是回傳LiveData的話:
@Query("SELECT * FROM repo WHERE owner_login = :login AND name = :name")
public abstract LiveData<Repo> load(String login, String name);
此時修改@Test用getValue()取得LiveData的value,
@Test
    public void insertAndLoad() throws InterruptedException {
        ...
        // Query repo
        final Repo loaded = db.repoDao().load("foo", "foo").getValue();
        // Assert query result
        assertThat(loaded.owner.login, is("foo"));
        ...
    }
這樣Test會失敗,因為Room搭配LiveData時是非同步處理,以及Room只在LiveData有observer時才會去取得它的value。
對此,Google寫了一個LiveDataTestUtil來處理,我們把它加在androidTest的package中。
public class LiveDataTestUtil {
    public static <T> T getValue(final LiveData<T> liveData) throws InterruptedException {
        final Object[] data = new Object[1];
        final CountDownLatch latch = new CountDownLatch(1);
        Observer<T> observer = new Observer<T>() {
            @Override
            public void onChanged(@Nullable T o) {
                data[0] = o;
                latch.countDown();
                liveData.removeObserver(this);
            }
        };
        liveData.observeForever(observer);
        latch.await(2, TimeUnit.SECONDS);
        //noinspection unchecked
        return (T) data[0];
    }
}
其中使用observeForever(observer)來持續observe LiveData,這會一直observe直到手動停止,因此當onChanged中收到value後就用removeObserver(this)來停止。
在@Test中,用LiveDataTestUtil的getValue(liveData)取得LiveData的value,就可以成功測試了。
@Test
public void insertAndLoad() throws InterruptedException {
    ...
    // Query repo
    final Repo loaded = getValue(db.repoDao().load("foo", "foo"));
    // Assert query result
    assertThat(loaded.owner.login, is("foo"));
    assertThat(loaded.name, is("foo"));
}
Room具有自動匯出schema的機制,以json文件保存每個版本的資訊,並依靠此文件測試每個版本更新是否正常。
在Module的build.gradle加入
defaultConfig {
   ...

    javaCompileOptions {
        annotationProcessorOptions {
            arguments = ["room.schemaLocation":
                                 "$projectDir/schemas".toString()]
        }
    }
}
android {
    ...

    defaultConfig {
        ...
    }

    sourceSets {
        androidTest.assets.srcDirs +=
                files("$projectDir/schemas".toString())
    }
}
接著重新build專案,就會看到專案資料夾中多了schema資料夾,內有json文件紀錄目前版本的schema資訊,將來每個新版本都會產生新的json文件。
加入dependencies,裡面包含MigrationTestHelper讓我們更方便寫Test case。
androidTestImplementation "android.arch.persistence.room:testing:1.0.0"
藉由MigrationTestHelper協助我們建立某個版本的資料庫和schema、關閉資料庫、執行migration並驗證。
幾個關鍵的地方如下,首先於@Rule建立MigrationTestHelper。
@Rule
public MigrationTestHelper testHelper =
        new MigrationTestHelper(InstrumentationRegistry.getInstrumentation(),
                GithubDb.class.getCanonicalName(),
                new FrameworkSQLiteOpenHelperFactory());
以testHelper建立版本1的資料庫
SupportSQLiteDatabase db = testHelper.createDatabase(TEST_DB_NAME, 1);
使用runMigrationsAndValidate測試MIGRATION_1_2,就可以驗證版本1升級到2是否正確。
db = testHelper.runMigrationsAndValidate(TEST_DB_NAME, 2, true, MIGRATION_1_2);
以上機制只會驗證schema是否正確,如果要驗證資料內容就要另外寫,流程類似:
@RunWith(AndroidJUnit4.class)
public class MigrationTest {

    private static final String TEST_DB_NAME = "migration-test";

    @Rule
    public MigrationTestHelper testHelper =
            new MigrationTestHelper(InstrumentationRegistry.getInstrumentation(),
                    GithubDb.class.getCanonicalName(),
                    new FrameworkSQLiteOpenHelperFactory());

    @Test
    public void migrate1To2() throws IOException {
        SupportSQLiteDatabase db = testHelper.createDatabase(TEST_DB_NAME, 1);

        // db has schema version 1. insert some data using SQL queries.
        // You cannot use DAO classes because they expect the latest schema.
        // TODO: insert data

        // Prepare for the next version.
        db.close();

        // Re-open the database with version 2 and provide
        // MIGRATION_1_2 as the migration process.
        db = testHelper.runMigrationsAndValidate(TEST_DB_NAME, 2, true, MIGRATION_1_2);

        // MigrationTestHelper automatically verifies the schema changes,
        // but you need to validate that the data was migrated properly.
        // TODO: valide data
    }
}
上面這樣就完成驗證schema,接著加入驗證資料的部分。
一個須注意的地方是MigrationTestHelper建立的舊版資料庫只能用下SQL的方式做CRUD,版本最新的資料庫才可以用DAO。
@RunWith(AndroidJUnit4.class)
public class MigrationTest {

    ...

    @Test
    public void migrate1To2() throws IOException, InterruptedException {
        SupportSQLiteDatabase db = testHelper.createDatabase(TEST_DB_NAME, 1);

        // db has schema version 1. insert some data using SQL queries.
        // You cannot use DAO classes because they expect the latest schema.
        insertRepo("foo_name", "foo_login", db);

        // Prepare for the next version.
        db.close();

        // Re-open the database with version 2 and provide
        // MIGRATION_1_2 as the migration process.
        db = testHelper.runMigrationsAndValidate(TEST_DB_NAME, 2, true, MIGRATION_1_2);

        // MigrationTestHelper automatically verifies the schema changes,
        // but you need to validate that the data was migrated properly.

        // Open the db with Room.
        GithubDb githubDb = getMigratedRoomDatabase();
        // Validate data.
        final Repo loaded = getValue(githubDb.repoDao().load("foo_login", "foo_name"));
        assertThat(loaded.owner.login, is("foo_login"));
        assertThat(loaded.name, is("foo_name"));
    }

    private void insertRepo(String name, String owner_login, SupportSQLiteDatabase db) {
        ContentValues values = new ContentValues();
        values.put("id", 1);
        values.put("name", name);
        values.put("stars", 50);
        values.put("owner_login", owner_login);

        db.insert("Repo", SQLiteDatabase.CONFLICT_REPLACE, values);
    }

    private GithubDb getMigratedRoomDatabase() {
        GithubDb database = Room.databaseBuilder(InstrumentationRegistry.getTargetContext(),
                GithubDb.class, TEST_DB_NAME)
                .addMigrations(MIGRATION_1_2)
                .build();
        // close the database and release any stream resources when the test finishes
        testHelper.closeWhenFinished(database);
        return database;
    }
}
insertRepo中使用SQLiteDatabase的方式新增資料,並在getMigratedRoomDatabase()取得最新版的Room資料庫,以便使用DAO來驗證資料。這樣就完成執行migration之後的schema和保留原有資料的測試了。
GitHub source code:
https://github.com/IvanBean/ITBon2018/tree/day17-room-test
Reference:
7 Steps To Room
Migrating Room databases
Testing Room migrations
PersistenceMigrationsSample
