
每日一句來源:Daily English
A pessimist sees the difficulty in every opportunity; an optimist sees the opportunity in every difficulty. -- 悲觀主義者在每個機會裡看到困難;樂觀主義者在每個困難中看到機會。
透過Storage Trigger我們可以再有檔案變動的時候針對檔案做操作,讓我們可以讓APP的邏輯變得更簡單,檔案系統更加穩定。
主要有以下兩種物件
| 名稱 | 說明 |
|---|---|
| functions.storage.object() | 當任何檔案有變動時會觸發該Trigger |
| functions.storage.bucket('bucketName').object() | 當我們有多個bucket(免費會員只能有一個)時,我們可以針對某一個bucket做監聽 |
呼叫.onChange方法,當資料有變動時自動會偵測到,如下:
export const generateThumbnail = functions.storage.object()
  .onChange(event => {
    console.log('!!!!!!!!!!!!!圖片轉換被啟動了');
  });
如此一來只要當檔案有變動的時候就會觸發事件了!
以下我們實做一個簡單的產生縮圖的方法:
@google-cloud/storage來對檔案做處理,child-process-promise來使用外部任務來執行google提供的縮圖ImageMagick功能製作縮圖 ,相關轉換的API可以看這裡
npm i @google-cloud/storage child-process-promise @types/google-cloud__storage
因為我們使用TypeScript如果有Type我們當然要使用,可以到這裡做查詢看有無Types,
要注意google-colud__storage有兩個_ 不知道原因為何XD
import 相關內容
import * as Storage from '@google-cloud/storage';
import * as cpp from 'child-process-promise';
import * as admin from 'firebase-admin';
import * as functions from 'firebase-functions';
import * as path from 'path';

import { storeTimeObject } from '../../libs/timestamp';

// 這是Storage的使用方法,
const gcs = Storage();
// 使用child-process-promise的spawn方法
const spawn = cpp.spawn;
// 當有任何檔案變動時觸發
export const generateThumbnail = functions.storage.object()
  .onChange(event => {
    console.log('!!!!!!!!!!!!!圖片轉換被啟動了');
    // 我們會把資料寫回資料庫,所以我們要使用admin.firestore建立files的Ref
    const filesRef = admin.firestore().collection('files');
Event的類型有以下可以使用
export interface Event<T> {
    eventId?: string;
    timestamp?: string;
    eventType?: string;
    resource?: string;
    params?: {
        [option: string]: any;
    };
    data: T;
}
我們實際看一個檔案上傳的結果如下,其中data是我們需要用的物件:
{
  "timestamp": "2018-01-06T08:20:29.775Z",
  "eventType": "providers/cloud.storage/eventTypes/object.change",
  "resource": "projects/_/buckets/my-firebase-first-app.appspot.com/objects/aaaa/1515226827500_14212676870_3b607cd325_o.jpg#1515226829775782",
  "data": {
    "kind": "storage#object",
    "resourceState": "exists", // 當前檔案的狀態 'exists' | 'not_exists'
    "id": "my-firebase-first-app.appspot.com/aaaa/1515226827500_14212676870_3b607cd325_o.jpg/1515226829775782",
    "selfLink": "https://www.googleapis.com/storage/v1/b/my-firebase-first-app.appspot.com/o/aaaa%2F1515226827500_14212676870_3b607cd325_o.jpg",
    "name": "aaaa/1515226827500_14212676870_3b607cd325_o.jpg", // 完整的檔案路徑,包含資料夾
    "bucket": "my-firebase-first-app.appspot.com",  //bucket name
    "generation": "1515226829775782",
    "metageneration": "1",
    "contentType": "image/jpeg", // 檔案類型
    "timeCreated": "2018-01-06T08:20:29.698Z",
    "updated": "2018-01-06T08:20:29.698Z",
    "storageClass": "STANDARD",
    "size": "1138883", // 檔案大小
    "md5Hash": "OTY4MTkwNTA5ZWZlOThlNGY2ODFkNWI2Zjg4ZjZlOTM=",
    "mediaLink": "https://www.googleapis.com/download/storage/v1/b/my-firebase-first-app.appspot.com/o/aaaa%2F1515226827500_14212676870_3b607cd325_o.jpg?generation=1515226829775782&alt=media",
    "contentDisposition": "inline; filename*=utf-8''1515226827500_14212676870_3b607cd325_o.jpg",
    "metadata": { // 我們設定的metadata,並且會包含一個download Token
      "test": "!!!!!!!!!!!!!!!",
      "firebaseStorageDownloadTokens": "820ecd33-d832-4012-a633-01d7d1478c7b"
    },
    "crc32c": "9/laHQ=="
  },
  "params": {}
}
了解了基本的物件後,我們繼續實做。
取得檔案的名子,與基本資料
    const object = event.data;
    const metadata = object.metadata;
    const filePath = object.name;
    const encodePath = encodeURIComponent(filePath); // encodePath 用於存資料庫使用,資料庫不能存有/的路徑
    const fileName = path.basename(filePath);
判斷物件的狀態,如果是刪除任務我們就把資料一併刪除
    if (object.resourceState === 'not_exists') {
      console.log('這是刪除事件');
      // 如果是刪除事件,把資料也刪掉
      return filesRef.doc(encodePath).delete()
        .catch(err => {
          console.log('資料不存在了!');
        });
    }
判斷檔案是否為圖片,我們只對圖案做處理
    if (!object.contentType.startsWith('image/')) {
      console.log('這不是圖片')
      return false;
    }
取得檔案相關參數
    const fileBucket = object.bucket
    const bucket = gcs.bucket(fileBucket);
    const tempFilePath = path.join('/tmp', fileName);
設定縮圖檔案的位置,這裡使用正規表示式,有了解詳細的朋友可以看這裡,產生的結果會式thumb_{原檔名}
const thumbFilePath = filePath.replace(/(\/)?([^\/]*)$/, '$1thumb_$2');
我們的邏輯是這樣的:
    // 下載原檔
    return bucket.file(filePath).download({
      destination: tempFilePath
    })
    .then(() => {
      // 下載完成後,我們執行spawn來呼叫Google Cloud提供的縮圖功能
      console.log('圖片下載完成,在', tempFilePath);
      return spawn('convert', [tempFilePath, '-thumbnail', '200x200',
        tempFilePath])
    }).then(() => {
      // 縮圖產生完成後,把縮圖透過bucket上傳到storage
      console.log('縮圖產生完成');

      return bucket.upload(tempFilePath, {
        destination: thumbFilePath
      });
    }).then(() => {
      const config = {
        action: 'read',
        // expires: '08-03-2491' // I don't want to expire
      }
      // get files download url
      return Promise.all([
        bucket.file(thumbFilePath).getSignedUrl(config),
        bucket.file(filePath).getSignedUrl(config)
      ])
    }).then(([thumbResult, originalResult]) => {
      const url = originalResult[0]; // 注意這裡回傳的是陣列
      const thumbnail = thumbResult[0]; // 注意這裡回傳的是陣列
      return filesRef.doc(encodePath)
        .set(storeTimeObject({
          path: filePath,
          contentType: object.contentType,
          creator: metadata.creator || 'system',
          updater: metadata.updater || 'system',
          url,
          thumbnail,
        }));
    }).catch((err) => {
      console.error(err);
    });
  });
到這裡我們算是實做完成了,但是有兩個問題
我們依序解決
return bucket.upload(tempFilePath, {
  destination: thumbFilePath,
  metadata: { // 這裡要注意,我們的metadata
    metadata: { // customMetada放這裡
      complete: true // 我們新增一個complete的屬性
    }
  }
});
if (metadata.complete) {
  console.log('這個檔案已經處理完成')
  return false;
}
如此一來我們就知道這個檔案是完成的了,不需要繼續產生縮圖
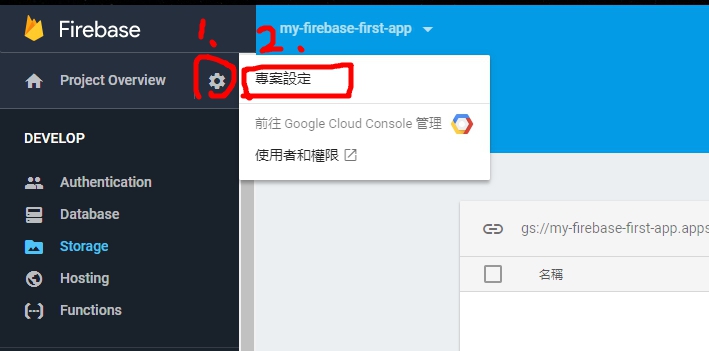
關於這個問題是權限的問題,我們到管理中心的地方,依序操作
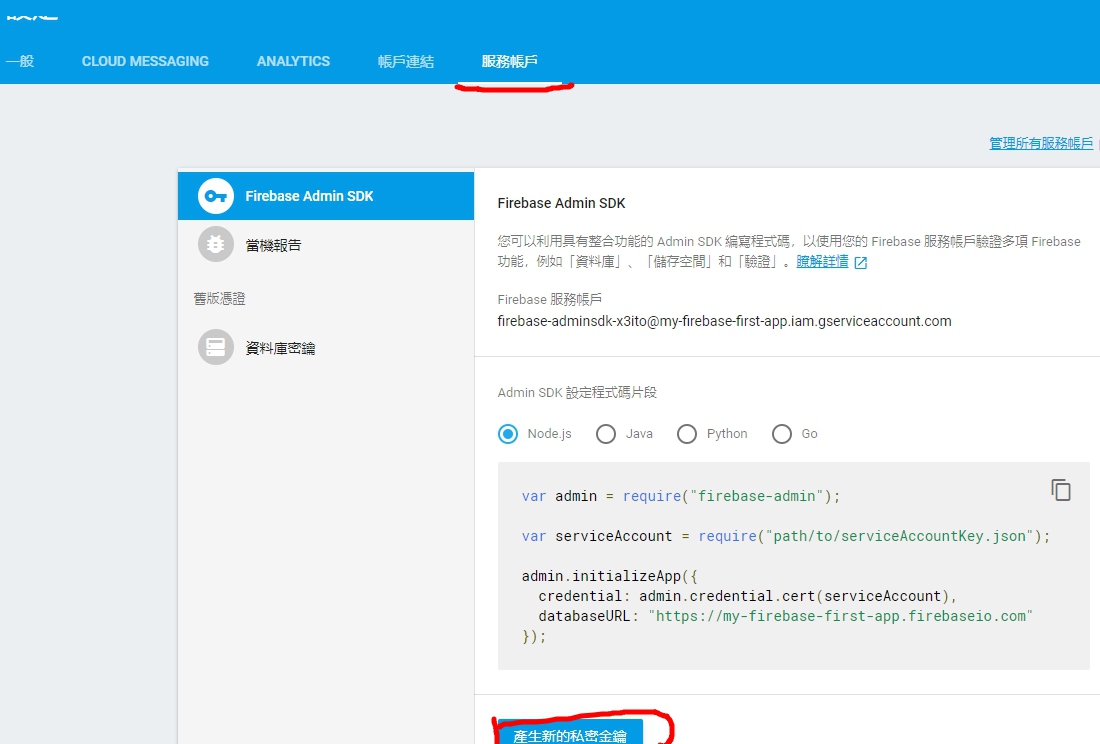
他會下載一個json檔案下來,我們把它放到專案資料夾裡面,
筆者是這麼放的
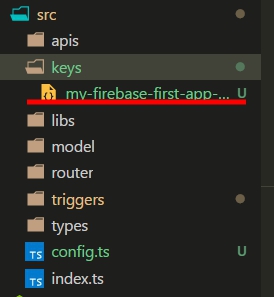
並且在src目錄底下建立一個config用來擺放先關的參數,檔案內容如下
import * as path from 'path';

export const CONFIG = {
    keyFilename: path.join(__dirname, 'keys', 'key檔案位置')
};
最後修改剛剛加入Storage的時候後面的參數
// 加上KeyFilename,把金鑰匙的位置給他
const gcs = Storage({ keyFilename: CONFIG.keyFilename });
const spawn = cpp.spawn;
加上後就能賦予取得網址的權限了。
最後在index.ts加上剛剛撰寫的方法
export const Trigger_generateThumbnail = generateThumbnail;
在deploy前,因為我們是使用typescript來實做,而deploy並不會把這個keys資料夾複製過去,所以我們還要修改一下,
筆者翻閱了一下firebase的functions的設定檔的config看來是沒有讓我們能複製檔案的功能,不過複製檔案也很簡單,我們就自己實做即可。
我們會使用到ncp來做深度的檔案複製,npm install ncp
在根目錄底下建立一個move.file.ts,
有興趣的朋友可以看我下面的code,不然也可以直接複製去使用即可,
基本上就是做簡單的檔案複製而已。
import * as path from 'path';
import * as ncp from 'ncp';

const moveUrl = [
  '/src/keys'
];

const destinationUrl = 'lib';

export class MoveFile {
  fromUrl = 'dist/index.js';

  constructor() {
    this.movefile();
  }

  movefile() {
    moveUrl.forEach((url) => {
      console.log(`copy "${path.join(url)}" => "${path.join(destinationUrl, url)}" ...`)
      ncp(path.join(__dirname, url), path.join(__dirname, destinationUrl, path.basename(url)), function (err) {
        if (err) {
          console.error('Move fail');
          console.error(err);
          return false;
        }
        console.error('Move success');
      });
    });
    console.log('Move Done!');
  }
}
module.exports = new MoveFile();
接著使用tsc編譯這個檔案tsc move.file.ts
再來在package.json加上deploy前的參數,我們在tsc後面要執行我們自己的move.file方法
"scripts": {
  "build": "rimraf lib && tslint -p tslint.json && tsc && node move.file",
  ...
}
接著就可以deploy試試看了!npm run deploy
我們打開firebase的管理介面
在Storage的地方上傳檔案,上傳後重新整理一下畫面(firebase的介面不會自己更新functions產生的檔案),會發現縮圖已經產生了,這時我們再到database的firestore會發現資料也被建立了!
接著我們一樣到檔案介面把檔案刪除,會發現我們的資料也會被一併刪除了~
筆者建議大家在刪除上可以使用資料刪除的trigger就好,因為刪除檔案的行為我們通常會事先刪除資料再去刪除檔案的,這裡只是做一下展示。
當然如果你想兩邊都寫也是沒問題的,只是要注意判斷不要讓他們無限迴圈了~
| 名稱 | 網址 |
|---|---|
| functions | https://github.com/ZouYouShun/Angular-firebase-ironman-functions/tree/day17_functions_storage |
今天我們介紹了storage的trigger,整體算是非常的好用,我們可以透過上傳一個檔案觸發很多想做的事情,讓他自己去做,雖說好用但是因為如果我們有循環撰寫檔案的行為,要特別小心使用,不然會造成很多不必要的functions call,另外就是在未付費的狀況下,我們不能使用多個bucket,因此監聽是對整個storage的,無法針對特定的資料夾或是檔案,這會造成不必要的觸發及判斷,要享有完整個功能還是得付錢的(廢話嗎XD),不過還是相當powerful!筆者很喜歡這類的trigger,再也不用擔心資料在檔案不再的狀況了,多餘的檔案不會存在了!
雖然一切都很不錯,但目前在debug上面還是很不方便,必須deploy上去,看console才能比較容易做測試,官方有建議使用gsutil來測試上傳,但是筆者覺得還是不太方便,也或許是自己不太熟悉的關係,有興趣的朋友可以試試看。
https://cloud.google.com/storage/docs/gsutil
https://firebase.google.com/docs/functions/gcp-storage-events?authuser=0
https://www.youtube.com/watch?v=pDLpEn3PbmE&index=4&list=PLl-K7zZEsYLkPZHe41m4jfAxUi0JjLgSM
https://www.youtube.com/watch?v=3lzEgwiSs-M&index=5&list=PLl-K7zZEsYLkPZHe41m4jfAxUi0JjLgSM

