在設計資料庫時要考慮到資料的安全性,假使資料庫被駭所有的使用者密碼都被看光光,所以當我們寫入資料庫前要先將用戶密碼加密才是正確的做法,而使用的加密方法是使用 bcrypt 這個套件,他是目前星星數最多且持續維護中的專案,裡面有提供同步和非同步的加密方式。
今天要繼續實作的程式是延續 [Day-28] (實作)使用 joi 驗證POST資料 的專案繼續實作,想跟著今天的實作可以先下載下面的整包程式,記得要先 yarn install 將整個依賴的軟體安裝回來。
程式碼:https://github.com/andy6804tw/RESTful_API_start_kit/releases/tag/V11.0.0
bcrypt 能夠將一個字串做雜湊加密,其中有個參數叫 saltRounds 是在密碼學中的加鹽(salt),加鹽的意思是在要加密的字串中加特定的字符,打亂原始的字符串,使其生成的散列結果產生變化,其參數越高加鹽次數多越安全相對的加密時間就越長。
yarn add bcrypt
這邊提供兩種寫法,一個同步另一個非同步,首先引入 bcrypt 再分別建立下面四個變數。
  const bcrypt = require('bcrypt');

  const saltRounds = 10;
  const myPassword = 'password1';
  const testPassword = 'password2';
  const myHash ='$2a$10$fok18OT0R/cWoR0a.VsjjuuYZV.XrfdYd5CpDWrYkhi1F0i8ABp6e'; // myPassword加密後結果(驗證用)
  // 加密
  bcrypt.hash(myPassword, saltRounds).then(function (hash) {
    // Store hash in your password DB.
    console.log(hash);
  });

  // 驗證密碼
  bcrypt.compare(myPassword, myHash).then(function (res) {
    console.log(res); // true
  });
  bcrypt.compare(testPassword, myHash).then(function (res) {
    console.log(res); // false
  });
  // 加密
  const hash = bcrypt.hashSync(myPassword, saltRounds);
  console.log(hash);

  // 驗證密碼
  console.log(bcrypt.compareSync(myPassword, myHash)); // true
  console.log(bcrypt.compareSync(testPassword, myHash)); // false
上面已經將整個 bcrypt 加密過程與原理介紹完了,先在要開始實做將 bcrypt 加入 User POST 中。
yarn add bcrypt
打開 user.controller.js 修改 userPost,取得新增用戶的參數原本寫法是直接 req.body 將整個 JSON資料存入 insertValues 後直接送往 user.module 寫入 User 資料庫,那現在要修改 insertValues 的寫法,由於要將 user_password 加密,所以我們要先將密碼撈取出來加密後再方回去 insertValues,然而其餘變數就不變。
// user.controller.js
import bcrypt from 'bcrypt';

...略

/* User  POST 新增 */
const userPost = (req, res) => {
  // 取得新增參數
  const insertValues = {
    user_name: req.body.user_name,
    user_mail: req.body.user_mail,
    user_password: bcrypt.hashSync(req.body.user_password, 10) // 密碼加密
  };
  userModule.createUser(insertValues).then((result) => {
    res.send(result); // 成功回傳result結果
  }).catch((err) => { return res.send(err); }); // 失敗回傳錯誤訊息
};

...略
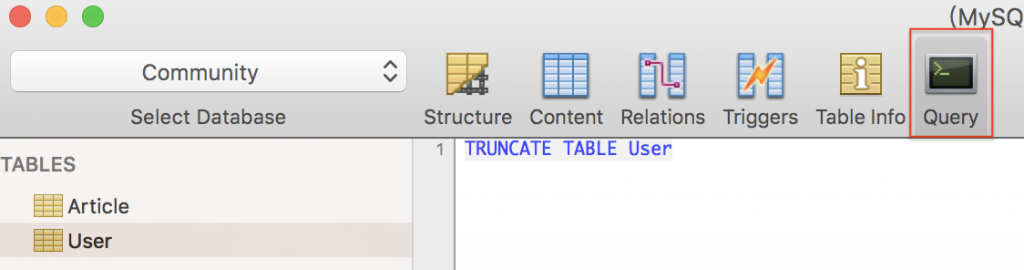
這邊先將原本的 User 資料表清空,保持裡面所有密碼都是加密的,打開你自己使用資料庫 GUI 軟體找到 query 欄位, 並執行刪除語法將 User 資料表整個清空。
TRUNCATE TABLE User
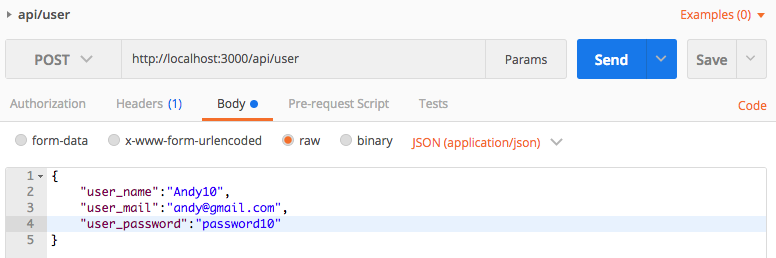
將程式碼 yarn build 再 yarn start 後開啟 Postman 在網址列輸入 localhost:3000/api/user 並選擇 POST 請求方式,接下來是要放入 POST 的內容,Body > raw > 選擇 JSON(application/json),將所有要新增的資料寫成 JSON 格式在下面空白處如下圖,最後再點選 Send 送出。
{
	"user_name":"Andy10",
	"user_mail":"andy@gmail.com",
	"user_password":"password10"
}

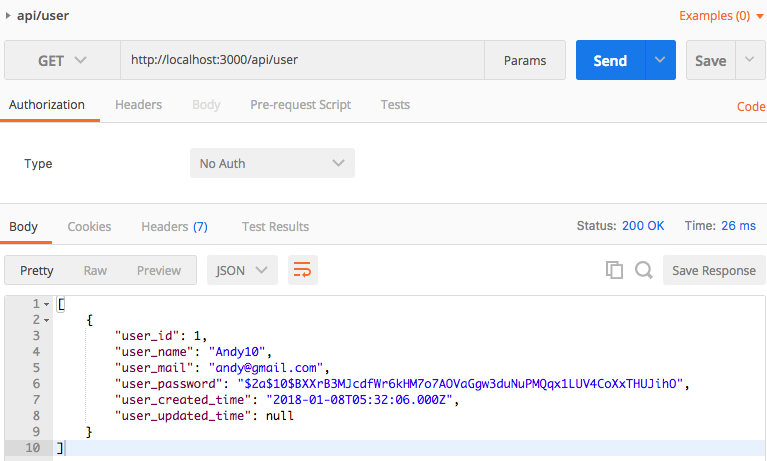
在 Postman 的網址列輸入 localhost:3000/api/user 並選擇 GET 請求方式,最後再點選 Send 送出。你會發現密碼真的被加密成功了!
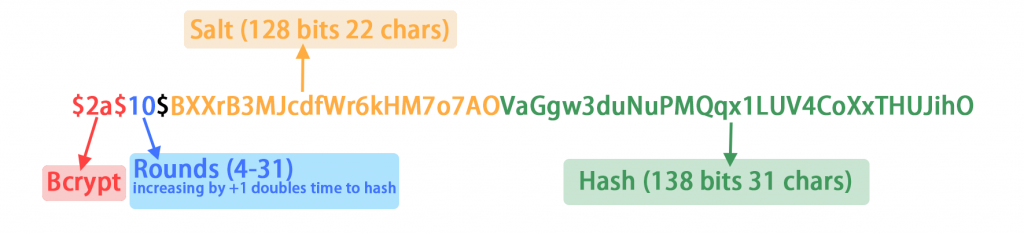
加密後的 bcrypt 分為四個部分:
範例程式碼:https://github.com/andy6804tw/RESTful_API_start_kit/releases/tag/V12.0.0
文章同時發表於:https://andy6804tw.github.io/2018/01/08/user-bcrypt/
不多說了我要來趕期末報告了