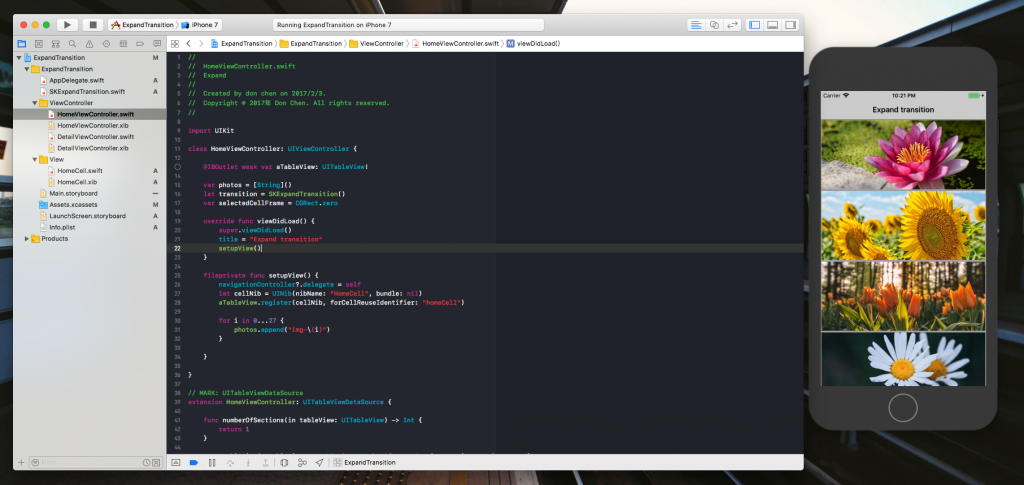
在畫面上通過 UITableView 展現一系列的花朵,當使用者點某一個 Cell 時,跳轉到另外一個 ViewController 顯示對應的大圖。

這次我們要自定義 UINavigationController 的轉場動畫,通過實現 UINavigationControllerDelegate 方法,我們在這裡提交自己的 transition.
extension HomeViewController: UINavigationControllerDelegate {
    func navigationController(_ navigationController: UINavigationController, animationControllerFor operation: UINavigationControllerOperation, from fromVC: UIViewController, to toVC: UIViewController) -> UIViewControllerAnimatedTransitioning? {

        if operation == UINavigationControllerOperation.push {
            transition.operation = UINavigationControllerOperation.push
            transition.duration = 3
            transition.selectedFrame = self.selectedCellFrame
            return transition
        }

        if operation == UINavigationControllerOperation.pop {
            transition.operation = UINavigationControllerOperation.pop
            transition.duration = 3

            return transition
        }

        return nil
    }
}

建立 SKExpandTransition 繼承於 NSObject, UIViewControllerAnimatedTransitioning 並實 Protocol 規定的兩個方法
// 轉場時間
func transitionDuration(using transitionContext: UIViewControllerContextTransitioning?) -> TimeInterval

// 具體的轉場動畫
func animateTransition(using transitionContext: UIViewControllerContextTransitioning)
首先我們會根據 push 或者 pop 去抓取我們需要的圖片
var snapShot = UIImage()
let bounds = CGRect(x: 0, y: 0, width: (sourceView?.bounds.size.width)!, height: (sourceView?.bounds.size.height)!)

if operation == .push {
    // 抓一張SourceView的圖(HomeViewController)
    UIGraphicsBeginImageContextWithOptions((sourceView?.bounds.size)!, true, 1)
    sourceView?.drawHierarchy(in: bounds, afterScreenUpdates: false)
    snapShot = UIGraphicsGetImageFromCurrentImageContext()!
    UIGraphicsEndImageContext()

    // SnapShot的圖
    let tempImageRef = snapShot.cgImage!

    // selectedFrame是使用者所點選cell的屬性frame
    let topHeight = selectedFrame.origin.y

    let imageViewTopFrame = CGRect(x: 0, y: 0, width: bounds.width, height: topHeight)
    let imageViewBottomFrame = CGRect(x: 0,
                                      y: topHeight,
                                      width: bounds.width,
                                      height: bounds.height - selectedFrame.origin.y)

    let topImageRef = tempImageRef.cropping(to: imageViewTopFrame)
    let bottomImageRef = tempImageRef.cropping(to: imageViewBottomFrame)

    // 上半部的圖片
    if topImageRef != nil {
        imageViewTop = UIImageView(image: UIImage(cgImage: topImageRef!, scale: snapShot.scale, orientation: UIImageOrientation.up))
        imageViewTop?.frame = imageViewTopFrame
    }

    if (bottomImageRef != nil) {
        // 下半部的圖片
        imageViewBottom = UIImageView(image: UIImage(cgImage: bottomImageRef!, scale: snapShot.scale, orientation: UIImageOrientation.up))
        imageViewBottom!.frame = imageViewBottomFrame
    }

}
然後根據 Push 或 Pop 做對應的動畫效果( 展開 / 合併)
destinationView?.alpha = 0
sourceView?.alpha = 0

let backgroundView = UIView(frame: bounds)
backgroundView.backgroundColor = UIColor.black

// animation
if self.operation == .push {
    container.addSubview(backgroundView)
    container.addSubview(destinationView!)
    container.addSubview(self.imageViewTop!)
    container.addSubview(self.imageViewBottom!)

    UIView.animate(withDuration: transitionDuration(using: transitionContext), animations: { () -> Void in
        self.imageViewTop!.frame = CGRect(x: 0,
                                          y: -self.imageViewTop!.frame.height,
                                          width: self.imageViewTop!.frame.width,
                                          height: self.imageViewTop!.frame.height)

        self.imageViewBottom!.frame = CGRect(x: 0,
                                             y: bounds.height,
                                             width: self.imageViewBottom!.frame.width,
                                             height: self.imageViewBottom!.frame.height)

        destinationView?.alpha = 1

    }, completion: { (finish) -> Void in
        self.imageViewTop?.removeFromSuperview()
        self.imageViewBottom?.removeFromSuperview()

        transitionContext.completeTransition(true)
    })

} else {
    sourceView?.alpha = 1

    container.addSubview(backgroundView)
    container.addSubview(sourceView!)
    container.addSubview(destinationView!)
    container.addSubview(imageViewTop!)
    container.addSubview(imageViewBottom!)

    UIView.animate(withDuration: transitionDuration(using: transitionContext), animations: { () -> Void in
        self.imageViewTop!.frame = CGRect(x: 0,
                                          y: 0,
                                          width: self.imageViewTop!.frame.width,
                                          height: self.imageViewTop!.frame.height)

        self.imageViewBottom!.frame = CGRect(x: 0,
                                             y: bounds.height - self.imageViewBottom!.frame.height,
                                             width: self.imageViewBottom!.frame.width,
                                             height: self.imageViewBottom!.frame.height)


        sourceView?.alpha = 0

    }, completion: { (finish) -> Void in
        self.imageViewTop?.removeFromSuperview()
        self.imageViewBottom?.removeFromSuperview()

        destinationView?.alpha = 1
        transitionContext.completeTransition(true)
    })

}

backgroundView 沒手動移除好像會一直疊加
我以為通知轉場動畫結束以後 transition container 的內容會自動被回收掉。
粉絲大人也是通過 debug view Hierarchy 看出來的嗎?~
有沒有解決方案? QQ
一樣在completion裡面移除就OK了吧
sourceView不會疊加我猜應該是因為pop完就nil了
阿...原來是我漏寫了...