記得上 Github 拉專案來自己玩玩看: https://github.com/MOSapeizer/vue-ecommerce
也可以發 pull request 給我
既然產品頁已經做完了,
我們稍微整理一下,當初在設計的時候沒做好的地方
首先我們看一下 LandingPage 這個名字
對我來說他的功能只有呈現文案而已
但我們在文案裡面,也放了產品選擇的區塊
另外我們在實作的時候也很明顯的,是兩塊獨立的資料結構
這樣代表我可以很輕鬆的拆成兩個 Components

再來就是分離測試
分離完之後,我們要找個地方組起來
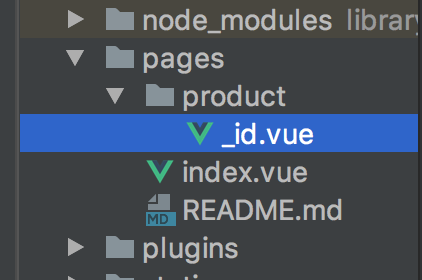
Nuxt 這邊就很方便,我們可以用資料夾的結構來對應 vue router
這邊用 _id.vue 的原因,是我們的產品頁需要一個 productId
譬如說 http://localhost:3000/product/1234
那在 pages 裡的 vue component 要怎麼拿到這個 1234 呢?
nuxt 有提供一個 asynData 的 callback
我們在 _id.vue 裡面使用它就可以
export default {
    name: 'product',
    components: {
      LandingPage,
      ProductSelection
    },
    // 拿到 Vue Router
    asyncData ({route}) {
      return { productId: route.params.id }
    }
}
我們在這個 page 還要組 landing page 的文案和產品選擇區塊
<template>
  <div class="container p-0">
    <landing-page></landing-page>
    <product-selection></product-selection>
  </div>
</template>
組好之後,我直覺缺少了一些東西
既然我們 productId 是變數,要從 server 撈資料
也就是說,我們要把 api 來的資料塞給 child component
像是這樣
async asyncData ({route}) {
    const model = await axios.get(`/model/${route.params.id}`)
    return {model}
}
<landing-page :html="model.information"></landing-page>
<product-selection
        :title="model.title"
        :types="model.types"
        :products="model.products">
</product-selection>
為了達成這個想法,我們首先要 改測試!!
原本的資料是放 data
我們要改成 propsData, 像是底下這樣
wrapper = mount(LandingPage, {propsData: model})
wrapper = shallow(ProductSelection, {propsData: model})
然後看測試爆炸,但測試碼我們一行都不用動
修正實作讓測試通過
props: {
  title: {
    type: String,
    default: '產品標題'
  },
  types: {
    type: Array,
    required: true
  },
  products: {
    type: Array,
    required: true
  }
},
好,landingPage那個 component我就不列了,意思一樣
唯一我改動的地方就是變數的名稱,從 information 改叫 html
因為這對我來說更符合內容
OK, refactor 完之後我們又可以放心的繼續下去了
