
這一篇有跟大家介紹了Service Worker的應用,
今天想帶一下Webpack,強大的打包工具。
我會希望我的前端,能夠用到Webpack + Servicec Worker + Typescript。
1.建立專案
用Vue官方提供的 Webpack Template來建來專案 vue init webpack demo
下圖中,我是把其他eslint等相關的應用都先不納入專案,方便我們實作。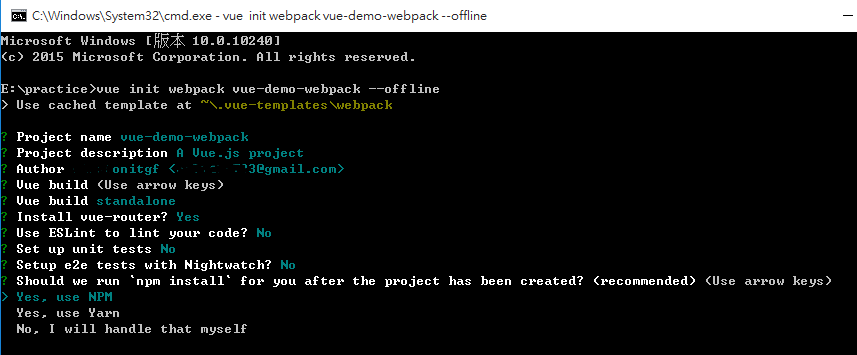
2.安裝套件
安装vue的官方套件npm i vue-class-component vue-property-decorator --save
ts-loader typescript 必须安装。因為官方的樣本Webpack還沒升到4,所以ts-loader只相容3.5.0npm i ts-loader@3.5.0 typescript -D
vue-class-component:强化 Vue 组件,使用 TypeScript/装饰器 增强 Vue 组件
vue-property-decorator:在 vue-class-component 上增强更多的结合 Vue 特性的装饰器
ts-loader:TypeScript 为 Webpack 提供了 ts-loader,其实就是为了让webpack识别 .ts .tsx文件
3.配置 webpack
首先找到 ./build/webpack.base.conf.js,
修改以下代碼,並把對應的檔案也同步改檔名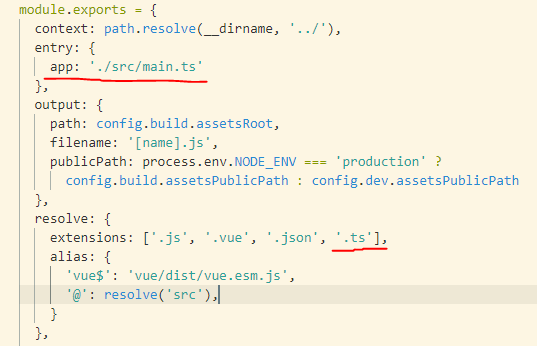
在rules的地方新增ts-loader
module: {
    rules: [
    ...,
      {
        test: /\.(woff2?|eot|ttf|otf)(\?.*)?$/,
        loader: 'url-loader',
        options: {
          limit: 10000,
          name: utils.assetsPath('fonts/[name].[hash:7].[ext]')
        }
      },
      // 从這裡開始
      {
        test: /\.ts$/,
        exclude: /node_modules|vue\/src/,
        loader: "ts-loader",
        options: {
          appendTsSuffixTo: [/\.vue$/]
        }
      }
      // 結束
    ]
  },
4.讓TS認識Vue
新增vue-shim.d.ts於src底下 (src/vue-shim.d.ts)意思是告诉 TypeScript *.vue 的文件可以交给 vue 模塊来處理程式中如果有import到vue檔案,需加上.vue,原因一樣是因為TS不認識
補上程式碼
declare module "*.vue" {
  import Vue from "vue";
  export default Vue;
}
5.修改vue文件
將script中的寫法換成以下代碼,當中lang=ts是告訴webpack這段是ts代碼HelloWorld.vueApp.vue
<script lang="ts">
import Vue from 'vue'
import Component from 'vue-class-component'

@Component({})
export default class App extends Vue {
}
</script>
6.npm run dev
測試是否成功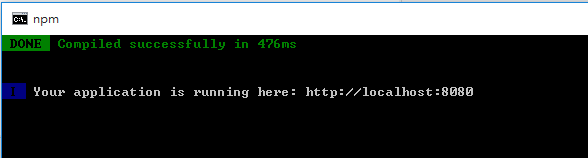
7.加入service worker
找到webpack.dev.conf.js或webpack.prod.conf.js
並在最上方引入workbox模組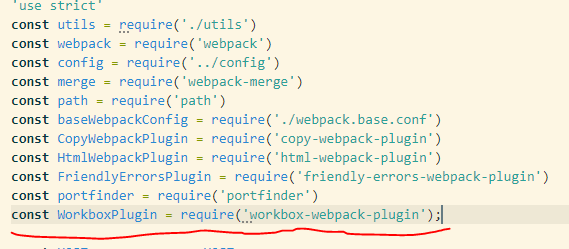
在plugin宣告區塊引入WorkboxPlugin,如下代碼
plugins: [
    new WorkboxPlugin.GenerateSW({
      // these options encourage the ServiceWorkers to get in there fast
      // and not allow any straggling "old" SWs to hang around
      clientsClaim: true,
      skipWaiting: true
    }),

    ...

    ]
修改main.ts 於文件最下方,將service worker註冊進去
if ('serviceWorker' in navigator) {
  window.addEventListener('load', () => {
    navigator.serviceWorker.register('/service-worker.js').then(registration => {
      console.log('SW registered: ', registration);
    }).catch(registrationError => {
      console.log('SW registration failed: ', registrationError);
    });
  });
}
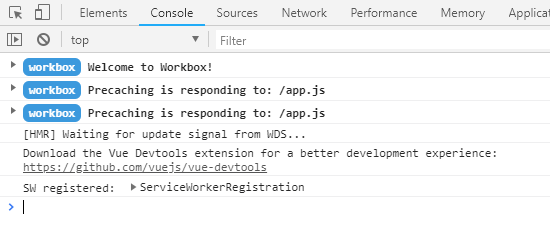
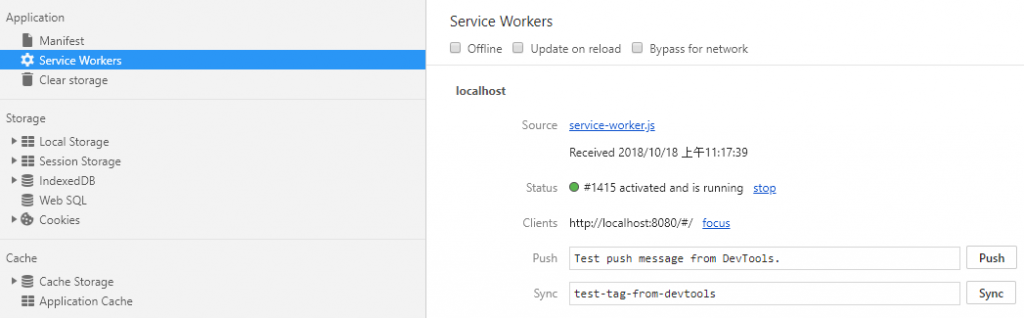
8.測試結果 npm run dev
切記localhost & https 才能安裝service worker
- 小結語
在做上述的過程中,其實發現自已很多東西還是不懂,所以又花了時間,
把webpack,serivce worker官方的教學整個再做了一次,
也真的很推薦大家不要急著就把東西生出來,而不管當中用了什麼小技巧,
也不知道來龍去脈的就把自已的專案套了自已也不知道怎麼改的東西。
後續會在把這次專案的細節部份,加一些功能補強,讓這個專案完整一點。

 iThome鐵人賽