上一篇學習了如何建立typescript & webpack & service worker的專案。
今天繼續實作如果將service worker變成ts,並用一些基本的生命週期,
以及如何用vue router進行lazyloading。
也可參考webpack官方npm install workbox-webpack-plugin -D
補充下列程式碼在plugin宣告中,把workbox引用進來,讓webpack產生service-worker.js
const path = require('path');
  const HtmlWebpackPlugin = require('html-webpack-plugin');
  const CleanWebpackPlugin = require('clean-webpack-plugin');
+ const WorkboxPlugin = require('workbox-webpack-plugin');

  module.exports = {
    entry: {
      app: './src/index.js',
      print: './src/print.js'
    },
  plugins: [
    new CleanWebpackPlugin(['dist']),
    new HtmlWebpackPlugin({
+     title: 'Progressive Web Application'
+   }),
+   new WorkboxPlugin.GenerateSW({
+     // these options encourage the ServiceWorkers to get in there fast
+     // and not allow any straggling "old" SWs to hang around
+     clientsClaim: true,
+     skipWaiting: true
+   })
  ],
    output: {
      filename: '[name].bundle.js',
      path: path.resolve(__dirname, 'dist')
    }
  };
安裝模組:npm i register-service-worker
在src底下建立檔案,並把hook事件加入
import { register } from "register-service-worker";

// 如果是正式版,在進行註冊service worker的動作
if (process.env.NODE_ENV === 'production') {
  register(`${process.env.BASE_URL}service-worker.js`, {
    ready() {
      console.log(
        "App is being served from cache by a service worker.\n" +
          "For more details, visit https://goo.gl/AFskqB"
      );
    },
    cached() {
      console.log("Content has been cached for offline use.");
    },
    updated() {
      if (confirm("已有新版,是否更新")) {
        location.reload();
      }
      console.log("New content is available; please refresh.");
    },
    offline() {
      console.log(
        "No internet connection found. App is running in offline mode."
      );
    },
    error(error) {
      console.error("Error during service worker registration:", error);
    }
  });
}
import App from "./App.vue";
import router from "./router";
// 這邊引用
import "./registerServiceWorker";
Vue.config.productionTip = false;

/* eslint-disable no-new */
new Vue({
  el: "#app",
  router,
  components: { App },
  template: "<App/>"
});
<template>
  <div>
    how are you!!!
  </div>
</template>
component: () => import("../components/About.vue")
vue 官方提供了該語法,以便在打包的時後,知道要額外拆開一包js檔,
如此可以達到lazyload的效果。
export default new Router({
  routes: [
    {
      path: "/",
      name: "HelloWorld",
      component: HelloWorld
    },
    // 開始
    {
      path: "/about",
      name: "about",
      // route level code-splitting
      // this generates a separate chunk (about.[hash].js) for this route
      // which is lazy-loaded when the route is visited.
      component: () =>
        import(/* webpackChunkName: "about" */ "../components/About.vue")
    }
    // 結束
  ]
});
剛剛router設定完成,在app.vue中設置一下trigger
<template>
<div id="app">
    // 這邊開始
    <router-link to="/">Home</router-link> |
    <router-link to="/about">About</router-link>
    // 結束
    <img src="./assets/logo.png">
    <router-view />
</div>
</template>
先前已經做了service worker了,這邊就只測試lazyloading。
npm run dev 將專案啟動
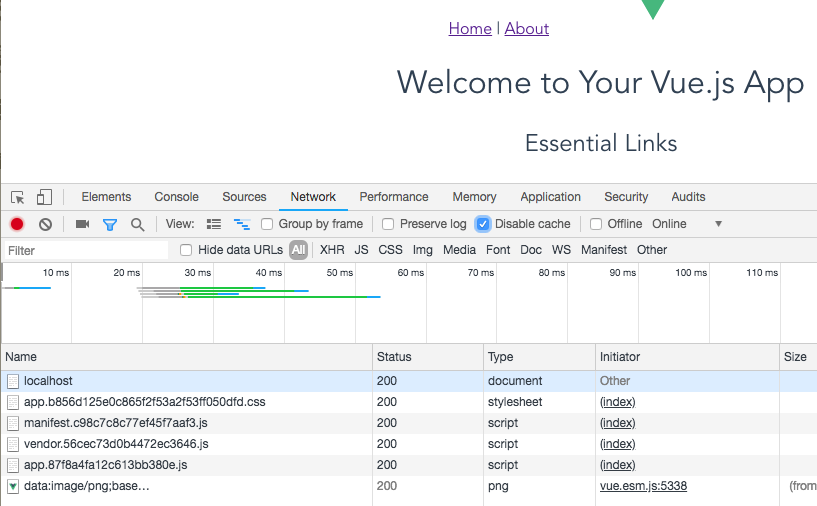
點選about的頁面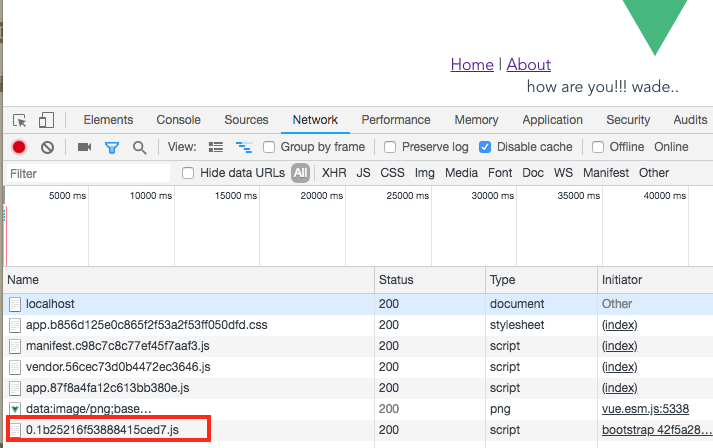
可以發現多了一個js檔被下載下來,代表成功。
專案做到這邊,底層也應該算差不多了,也該進入到vue的實作了。


 iThome鐵人賽