上次介紹LBP特徵主要是由鄰近像素取得特徵,而HOG則是取得梯度直方圖特徵,兩者的想法其實有點相像,這次主要參考[1]介紹一般的HOG原理並實作。
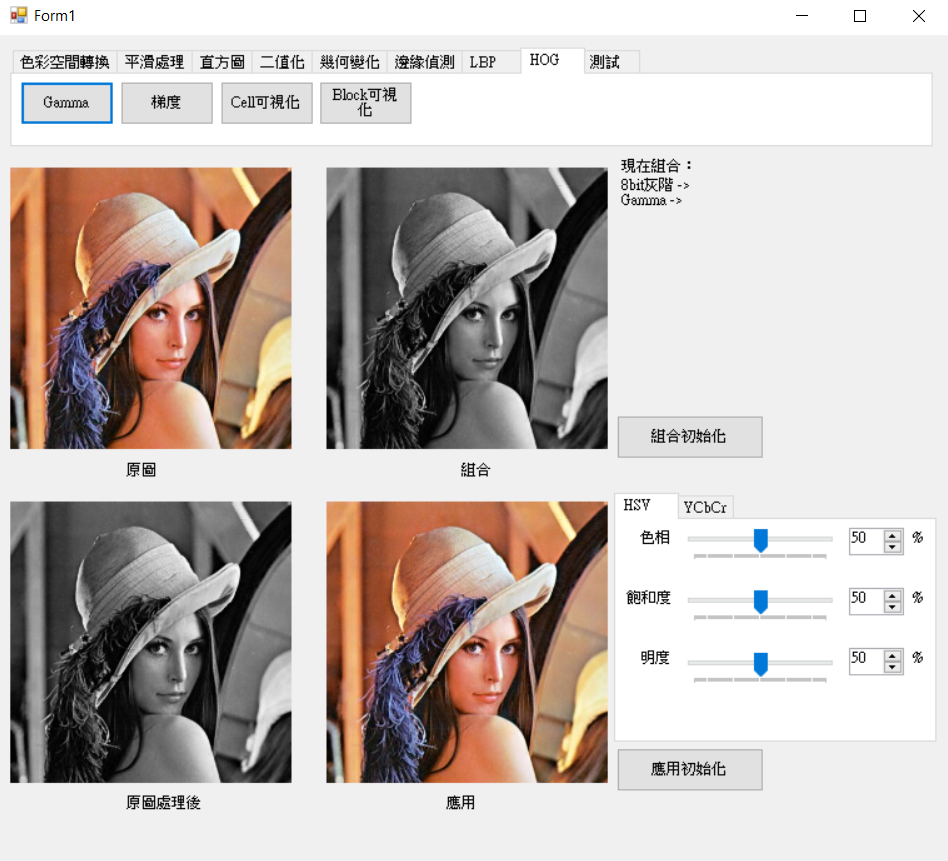
在做HOG之前為了得到更明顯的特徵因此會先將圖像歸一化,而這裡的歸一化主要調整亮度,所使用的方法為Gamma轉換,在[2]提到Gamma轉換為非線性轉換較符合人類眼睛,裡面也舉了一個範例將原先亮度高的衣服調整為亮度低的,然而就可以觀察到較細微的部分,以下就開始實作。
Gamma表,減少計算量。Gamma像素。void Library::Gamma8bit(C_UCHAE* src, UCHAE* pur
, C_UINT32 width, C_UINT32 height
, C_DOUBLE gamma)
{
// 1. get gamma table
UCHAE gammaLUT[256];
for (UINT32 index = 0; index < 256; index++)
{
double pix = (index + 0.5) / 256.0; //歸一化
pix = pow(pix, gamma);
gammaLUT[index] = static_cast<UCHAE>((pix * 256 - 0.5)); //反歸一化
}
// 2. set gamma pixel
UCHAE* purEnd = pur + width * height;
while (pur < purEnd)
{
*pur = gammaLUT[*src];
pur++;
src++;
}
}
Gamma=1.5
inline C_UINT32 HOG::FixWidth(C_UINT32& width) const
{
	return static_cast<UINT32>(ceil(static_cast<float>(width) / _cellX) * _cellX);
}

inline C_UINT32 HOG::FixHeight(C_UINT32& height) const
{
	return static_cast<UINT32>(ceil(static_cast<float>(height) / _cellY) * _cellY);
}

inline C_UINT32 HOG::CellXSize(C_UINT32& width) const
{
	return static_cast<UINT32>(ceil(static_cast<float>(width) / _cellX));
}

inline C_UINT32 HOG::CellYSize(C_UINT32& height) const
{
	return static_cast<UINT32>(ceil(static_cast<float>(height) / _cellY));
}

inline C_UINT32 HOG::BlockXSize(C_UINT32& cellXSize) const
{
	return cellXSize - _blockX + 1;
}

inline C_UINT32 HOG::BlockYSize(C_UINT32& cellYSize) const
{
	return cellYSize - _blockX + 1;
}
inline C_UINT32 HOG::BlockHisSize() const
{
	return _blockX * _blockY * _bin;
}

C_UINT32 HOG::CellHisTotalSize(C_UINT32& width, C_UINT32& height) const
{
	return CellXSize(width)
		* CellYSize(height)
		* _bin;
}

C_UINT32 HOG::BlockHisTotalSize(C_UINT32& width, C_UINT32& height) const
{
	return BlockXSize(CellXSize(width))
		* BlockYSize(CellYSize(height))
		* BlockHisSize();
}
HOG梯度水平與垂直這裡只取左右或上下兩個元素的差來當特徵,梯度主要使用L2正規化計算,角度則是一樣用atan計算,下圖為計算公式。這裡取出L2計算出來的梯度作為可視化。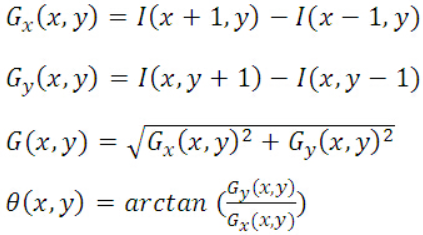
圖來源[2]
這裡將梯度搬出來設一個函數,因後面也會使用到,所以GradienView主要是完成第三步。
void HOG::Gradient(C_UCHAE* src
	, C_UINT32 width, C_UINT32 height
	, double* amplitudes, double* angles)
{
	// 1. padding
	C_DOUBLE angle = 180.0 / MNDT::PI;
	C_UINT32 padWidth = width + 2;
	C_UINT32 padHeight = height + 2;
	UCHAE* padData = new UCHAE[padWidth * padHeight];

	MNDT::ImagePadding8bit(src, padData, width, height, 1);

	Image padImage(padData, padWidth, padHeight, MNDT::ImageType::GRAY_8BIT);

	// 2. calculate hog of gradient
	for (UINT32 row = 1; row < padHeight - 1; row++)
	{
		for (UINT32 col = 1; col < padWidth - 1; col++)
		{
			C_FLOAT Gx = static_cast<float>(padImage.image[row][col + 1])
				- static_cast<float>(padImage.image[row][col - 1]);

			C_FLOAT Gy = static_cast<float>(padImage.image[row + 1][col])
				- static_cast<float>(padImage.image[row - 1][col]);

			*angles = abs(atan2(Gy, Gx) * angle);
			*amplitudes = sqrt(Gx * Gx + Gy * Gy);

			angles++;
			amplitudes++;
		}
	}

	delete[] padData;
	padData = nullptr;
}

void HOG::GradienView(C_UCHAE* src, UCHAE* pur
	, C_UINT32 width, C_UINT32 height)
{
	C_UINT32 size = width * height;
	double* amplitudes = new double[size];
	double* angles = new double[size];

	Gradient(src, width, height
		, amplitudes, angles);

	delete[] angles;
	angles = nullptr;

	UCHAE* endPur = pur + size;
	double* amplitudesPointer = amplitudes;

	while (pur < endPur)
	{
		*pur = static_cast<UCHAE>(*amplitudesPointer);

		pur++;
		amplitudesPointer++;
	}

	delete[] amplitudes;
	amplitudes = nullptr;
}
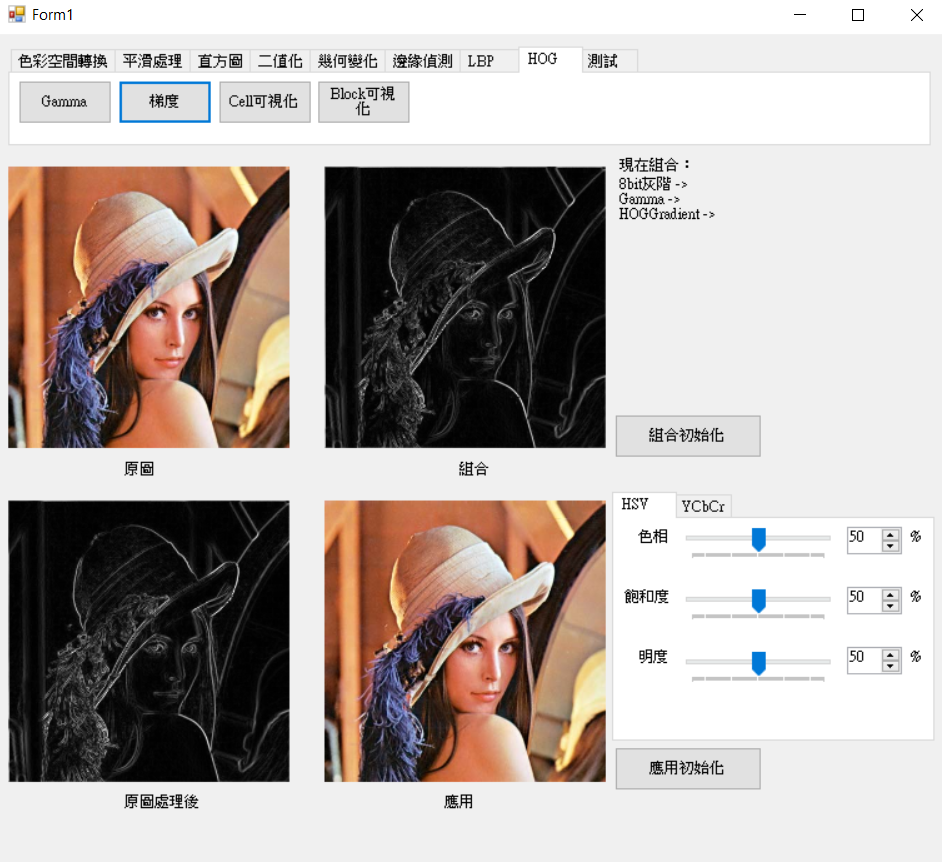
cell主要是將圖片依照cell寬度和高度將圖片分割,若原始圖片無法整除cell則先將圖片大小調整至可整除,再計算梯度直方圖後在正規化(計算步伐X為cellX,Y為cellY)。而繪圖主要將直方圖設為圓心已360度分為bin個方向,在依照比例畫出即可。
void HOG::HOGCellView(C_UCHAE* src, UCHAE* pur
	, C_UINT32 width, C_UINT32 height)
{
	C_UINT32 cellHisTotalSize = CellHisTotalSize(width, height);
	float* histogram = new float[cellHisTotalSize]{ 0.0f };

	// step 1.2.3
	CellHistogram(src, width, height
		, histogram);

	// 4. normalization
	HistogramNorm(histogram
		, cellHisTotalSize, _bin
		, 1);

	// 5. draw
	HOGDrawCell(pur
		, width, height
		, histogram);

	delete[] histogram;
	histogram = nullptr;
}

void HOG::CellHistogram(C_UCHAE* src, C_UINT32 width, C_UINT32 height
	, float* histogram)
{
	// 1. fix size
	UCHAE* resizeData = nullptr;

	ReSize(src, &resizeData, width, height);


	// 2. get gradient
	C_UINT32 reWidth = FixWidth(width);
	C_UINT32 reHeight = FixHeight(height);
	C_UINT32 size = reWidth * reHeight;
	double* amplitudes = new double[size];
	double* angles = new double[size];

	Gradient(resizeData, reWidth, reHeight
		, amplitudes, angles);

	delete[] amplitudes;
	amplitudes = nullptr;

	if (resizeData != src)
	{
		delete[] resizeData;
		resizeData = nullptr;
	}


	// 3. calculate histogram
	for (UINT32 row = 0; row < reHeight; row += _cellY)
	{
		for (UINT32 col = 0; col < reWidth; col += _cellX)
		{
			CalcCellHistogram(angles, reWidth
				, histogram
				, col, row
				, col + _cellX, row + _cellY);
			histogram += _bin;
		}
	}

	delete[] angles;
	angles = nullptr;

}

void HOG::CalcCellHistogram(C_DOUBLE* angles, C_UINT32 width
	, float* histogram
	, C_UINT32 sWidth, C_UINT32 sHeight
	, C_UINT32 eWidth, C_UINT32 eHeight)
{
	// bin is 9
	C_DOUBLE space = 20.0;

	for (UINT32 row = sHeight; row < eHeight; row++)
	{
		C_UINT32 rowIndex = row * width;

		for (UINT32 col = sWidth; col < eWidth; col++)
		{
			int32_t binIndex = static_cast<int32_t>(ceil(angles[rowIndex + col] / space)) - 1;

			binIndex = binIndex < 0 ? 0 : binIndex;
			histogram[binIndex]++;
		}
	}
}

void HOG::HOGDrawCell(UCHAE* pur
	, C_UINT32 width, C_UINT32 height
	, float* cellHistogram)
{
	C_UINT32 reWidth = FixWidth(width);
	C_UINT32 reHeight = FixHeight(height);
	C_UINT32 cellXSize = CellXSize(reWidth);
	C_UINT32 cellYSize = CellYSize(reHeight);
	C_UINT32 offsetX = _cellX >> 1;
	C_UINT32 offsetY = _cellY >> 1;
	Image purImgae(pur, reWidth, reHeight, MNDT::ImageType::GRAY_8BIT);

	for (UINT32 row = 0; row < cellYSize; row++)
	{
		C_UINT32 centerY = row * _cellY + offsetY - 1;

		for (UINT32 col = 0; col < cellXSize; col++)
		{
			C_UINT32 centerX = col * _cellX + offsetX - 1;
			Point centerPoint(centerX, centerY);

			for (UINT32 index = 0; index < _bin; index++)
			{
				C_FLOAT x = centerX + static_cast<float>(offsetX * cellHistogram[index] * MNDT::FixValue(cos(2.0 * MNDT::PI * index / _bin)));
				C_FLOAT y = centerY + static_cast<float>(offsetY * cellHistogram[index] * MNDT::FixValue(sin(2.0 * MNDT::PI * index / _bin)));
				if (x < 0)
				{
					int i = 0;
				}
				Point binPoint(static_cast<UINT32>(x), static_cast<UINT32>(y));

				MNDT::DrawLine8bit(purImgae, centerPoint, binPoint);
			}
			cellHistogram += _bin;
		}
	}
}
cell大小16*16。
block則是依照cell寬度和高度去計算切割的數量,將blockX * blockY塊的cell的直方圖串再一起做正規化(計算步伐為1)。而繪製可視化則是使用block直方圖計算每一個cell的平均數量在使用上述的函數HOGDrawCell畫出。
cell直方圖。cell直方圖資料依據blockX * blockY直方圖複製到block直方圖。block直方圖計算每個cell的總和和出現次數。cell的平均。BlockHistogram以步伐1走訪cell,連結每個cell為一個block。CalcBlockHistogram將block範圍內每一個cell直方圖連結再一起。HOGViewSum累計一個block內的cell值和數量,索引值為依照計算block的方式推導。HOGViewAvg使用cell直方圖的值和數量計算的平均。void HOG::HOGBlockView(C_UCHAE* src, UCHAE* pur
, C_UINT32 width, C_UINT32 height)
{
float* blockHistogram = new float[BlockHisTotalSize(width, height)];
// step 1.2.3.4
BlockHistogram(src, width, height
, blockHistogram);
C_UINT32 reWidth = FixWidth(width);
C_UINT32 reHeight = FixHeight(height);
C_UINT32 cellXSize = CellXSize(reWidth);
C_UINT32 cellYSize = CellYSize(reHeight);
C_UINT32 cellWidth = _bin * cellXSize;
C_UINT32 blockHisSize = BlockHisSize();
C_UINT32 blockXSize = BlockXSize(cellXSize);
C_UINT32 blockYSize = BlockYSize(cellYSize);
C_UINT32 cellHisTotalSize = CellHisTotalSize(width, height);
C_FLOAT* blockHistogramPointer = blockHistogram;
float* cellHistogram = new float[cellHisTotalSize] { 0.0f };
UINT32* cellHisCount = new UINT32[cellHisTotalSize]{ 0 };
// 5. calculate the block histogram to cell histogram
for (UINT32 row = 0; row < blockYSize; row++)
{
for (UINT32 col = 0; col < blockXSize; col++)
{
HOGViewSum(blockHistogramPointer, cellWidth
, cellHistogram, cellHisCount
, col, row
, col + _blockX, row + _blockY);
blockHistogramPointer += blockHisSize;
}
}
delete[] blockHistogram;
blockHistogram = nullptr;
// 6. calculate average of the cell histogram
HOGViewAvg(cellHistogram, cellHisCount
, cellHisTotalSize);
delete[] cellHisCount;
cellHisCount = nullptr;
// 7. calculate normalization of the cell histogram
HistogramNorm(cellHistogram
, cellHisTotalSize, _bin
, 1);
// 8. draw for the cell histogram
HOGDrawCell(pur
, width, height
, cellHistogram);
delete[] cellHistogram;
cellHistogram = nullptr;
}
void HOG::BlockHistogram(C_UCHAE* src, C_UINT32 width, C_UINT32 height
, float* histogram)
{
C_UINT32 reWidth = FixWidth(width);
C_UINT32 reHeight = FixHeight(height);
C_UINT32 cellXSize = CellXSize(reWidth);
C_UINT32 cellYSize = CellYSize(reHeight);
float* cellHistogram = new float[CellHisTotalSize(reWidth, reHeight)]{ 0 };
// step 1.2.3
CellHistogram(src, width, height
, cellHistogram);
// 4. copy the cell histogram to the block histogram
C_UINT32 cellWidth = _bin * cellXSize;
C_UINT32 blockHisSize = BlockHisSize();
C_UINT32 blockXSize = BlockXSize(cellXSize);
C_UINT32 blockYSize = BlockYSize(cellYSize);
for (UINT32 row = 0; row < blockYSize; row++)
{
for (UINT32 col = 0; col < blockXSize; col++)
{
CalcBlockHistogram(cellHistogram, cellWidth
, histogram
, col, row
, col + _blockX, row + _blockY);
//MNDT::SetNormalizedHistogram8bit(histogram, blockHisSize, MNDT::Normalized::L2);
histogram += blockHisSize;
}
}
delete[] cellHistogram;
cellHistogram = nullptr;
}
void HOG::CalcBlockHistogram(C_FLOAT* cellHistogram, C_UINT32 cellWidth
, float* histogram
, C_UINT32 sCellX, C_UINT32 sCellY
, C_UINT32 eCellX, C_UINT32 eCellY)
{
C_UINT32 copySize = _bin * sizeof(float);
for (UINT32 row = sCellY; row < eCellY; row++)
{
C_UINT32 rowIndex = row * cellWidth;
for (UINT32 col = sCellX; col < eCellX; col++)
{
C_UINT32 index = rowIndex + col * _bin;
memcpy(histogram, cellHistogram + index, copySize);
histogram += _bin;
}
}
}
void HOG::HOGViewSum(C_FLOAT* blockHistogram, C_UINT32 cellXSize
, float* cellHistogram
, UINT32* cellHisCount
, C_UINT32 sCellX, C_UINT32 sCellY
, C_UINT32 eCellX, C_UINT32 eCellY)
{
for (UINT32 row = sCellX; row < eCellX; row++)
{
C_UINT32 rowIndex = row * cellXSize;
for (UINT32 col = sCellY; col < eCellY; col++)
{
C_UINT32 index = rowIndex + col * _bin;
for (UINT32 binIndex = 0; binIndex < _bin; binIndex++)
{
*(cellHistogram + index + binIndex) += *(blockHistogram + binIndex);
*(cellHisCount + index + binIndex) += 1;
}
blockHistogram += _bin;
}
}
}
void HOG::HOGViewAvg(float* cellHistogram, C_UINT32* cellHisCount
, C_UINT32 cellTotalSize)
{
C_FLOAT* cellHistogramEnd = cellHistogram + cellTotalSize;
while (cellHistogram < cellHistogramEnd)
{
*cellHistogram /= *cellHisCount;
cellHistogram++;
cellHisCount++;
}
}
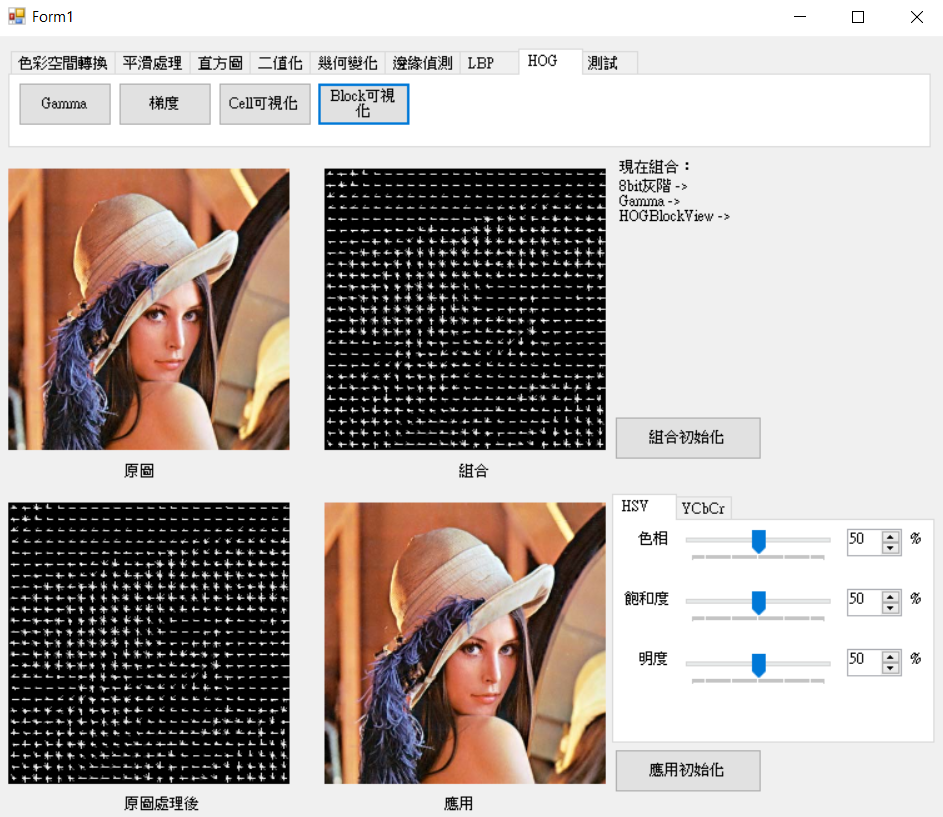
參數cell:88,block:22。
訓練用特徵只需將上述要求到block直方圖並且將資料使用SetNormalizedHistogram8bit做L2正規化,而使用HOG比較要注意的地方為,輸入的訓練圖像盡量大小必須一致,這樣所得到的直方圖數量才會相等。
這次主要介紹這兩種特徵,其實還有許多特徵方法,但其實做法都大同小異,比較不同的算法應該是Haar特徵,原本有打算要做但基於有好多東西要去學習所以特徵先暫時介紹到這裡,若有問題或錯誤歡迎提問。
[1]hujingshuang(2015).【特征检测】HOG特征算法 from: https://blog.csdn.net/hujingshuang/article/details/47337707 (2018.11.23)
[2]CSDN博客(2014). Gamma校正的理解 from: https://read01.com/zh-tw/xDD062.html#.W_gaH2gzZPY (2018.11.23)
 Kevin
Kevin

 iThome鐵人賽