之前有在用Django寫一些小網站,現在暑假想說再來複習一下之前買的這本書
於是我就把它寫成一系列的文章,也方便查語法
而且因為這本書大概是2014年出的,如今Django也已經出到2.多版
有些內容也變得不再支援或適用,而且語法或許也改變了
所以我會以最新版的Python和Django來修正這本書的內容跟程式碼
在menu.html中
<body>
    <p>您現在的位置在{{ path }}</p>
    {% for r in restaurants %}
        <h2>{{ r.name }}</h2>
        {% if r.food_set.all %}
            <p>本餐廳共有{{ r.food_set.all|length }}道菜</p>
            <table>
                <tr>
                    <th>菜名</th>
                    <th>價格</th>
                    <th>註解</th>
                    <th>辣不辣</th>
                </tr>
            {% for food in r.food_set.all %}
                <tr>
                    <td> {{ food.name }} </td>
                    <td> {{ food.price }} </td>
                    <td> {{ food.comment }} </td>
                    <td> {% if food.is_spicy %} 辣 {% else %} 不辣 {% endif %} </td>
                </tr>
            {% endfor %}
            </table>
        {% else %}
            <p>本餐廳啥都沒賣</p>
        {% endif %}
    {% endfor %}
</body>
views.py
from django.shortcuts import render_to_response
from restaurants.models import Restaurant, Food

def menu(request):
    path = request.path
    restaurants = Restaurant.objects.all()
    return render_to_response('menu.html', locals())
結果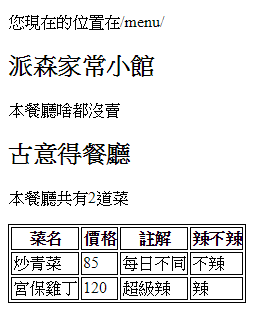
整理一下其他用法
屬性方法 | 說明 | example(屬性值或方法回傳值)
------------- | -------------
request.path | 扣除網域名稱的請求路徑(開頭會有一個反斜線) | /menu/
request.get_host() | 主機名稱(網域名稱) | 127.0.0.1 or www.restaurants.com
request.get_full_path() | 請求路徑+查詢字符(可能是來自於get方法) | /menu/?r_id=1
request.is_secure() | 是否通過https協定來訪問 | True
views.py
from django.shortcuts import render_to_response
from restaurants.models import Restaurant, Food
from django.http import HttpResponse

def menu(request):
    path = request.path
    restaurants = Restaurant.objects.all()
    return render_to_response('menu.html', locals())

def meta(request):
    values = request.META.items()
    html = []
    for k, v in values:
        html.append('<tr><td>{0}</td><td>{1}</td></tr>'.format(k, v))
    return HttpResponse('<table>{0}</table>'.format('\n'.join(html)))
urls.py
from django.contrib import admin
from django.urls import path
from restaurants.views import menu, meta

urlpatterns = [
    path('admin/', admin.site.urls),
    path('menu/', menu),
    path('meta/', meta),
]
GET和POST是Http裡面最重要的兩個方法,這兩個方法負責提交使用者表單的數據,簡單來說,兩者在表現上的差別在:GET方法會透過在請求路徑後面添增查詢字符來提交數據,而POST方法是隱性地傳送數據的鍵值對,比如說我們在請求的時候,需要一個參數id
| 方法 | 範例URL |
|---|---|
| GET | www.restaurants.com/restaurant/?id=1 |
| POST | www.restaurants.com/restaurant |
| 這使得POST方法更適合拿來做資訊需隱密的請求,而GET方法則能漂亮的提供一個查詢相同頁面的URL(每次使用這個URL總是能獲得一個id=1的頁面,POST方法可能就不行了),另外我們也會覺得GET方法適合用來取得數據和對應的頁面,POST方法適合利用提交數據去更動資料庫 |
這兩個方法所提交的數據都會以鍵值對的方式儲存於request物件中,分別存於request.GET和request.POST
接下來我們要寫一個歡迎頁面
urls.py
from django.contrib import admin
from django.urls import path
from restaurants.views import menu, welcome

urlpatterns = [
    path('admin/', admin.site.urls),
    path('menu/', menu),
    path('welcome/', welcome),
]
mysite/templates/welcome.html
這次寫在project層級下的templates
<!DOCTYPE html>
<html lang="en">
    <head>
        <meta charset="UTF-8">
        <title> Welcome </title>
    </head>
    <body>
        <form action="/welcome/" method="get">
            <label for="user_name">您的名字</label>
            <input id="user_name" type="text" name="user_name">
            <input type="submit" value="進入網站">
        </form>
    </body>
</html>
在表單中,我們使用了GET方法,這表示我們提交表單後,表單內容中的鍵值對會形成查詢字符付在請求頁面的後面
action的值填入一個url pattern,再次透過urls.py裡的對應表來呼叫視圖函式
views.py
from django.shortcuts import render_to_response
from restaurants.models import Restaurant, Food
from django.http import HttpResponse


def menu(request):
    path = request.path
    restaurants = Restaurant.objects.all()
    return render_to_response('menu.html', locals())


def welcome(request):
    if 'user_name' in request.GET and request.GET['user_name'] != '':
        return HttpResponse('Welcome!~' + request.GET['user_name'])
    else:
        return render_to_response('welcome.html', locals())
利用'user_name' in request.GET來測試表單是否有被提交
如果有的話就回應一個歡迎頁面
如果沒有的話就回到原本的頁面
網頁在這裡呼叫welcome函式時的狀態有兩種,一種是提交過表單了,一種是未提交表單(可能來自超連結或使用者自行輸入的URL)
對於未提交的,我們需要回應表單頁面,已經有提交的我們要回應提交後的訊息,而判斷的標準就在於檢查request.GET
當表單遇到這種來源與去向相同的時候,我們可以讓action屬性為空
<!DOCTYPE html>
<html lang="en">
    <head>
        <meta charset="UTF-8">
        <title> Welcome </title>
    </head>
    <body>
        <form action="" method="get">
            <label for="user_name">您的名字</label>
            <input id="user_name" type="text" name="user_name">
            <input type="submit" value="進入網站">
        </form>
    </body>
</html>
urls.py
from django.contrib import admin
from django.urls import path
from restaurants.views import menu, welcome, list_restaurants

urlpatterns = [
    path('admin/', admin.site.urls),
    path('menu/', menu),
    path('welcome/', welcome),
    path('restaurants_list/', list_restaurants),
]
在views.py中加入
def list_restaurants(request):
    restaurants = Restaurant.objects.all()
    return render_to_response('restaurants_list.html', locals())
mysite/restaurants/templates/restaurants_list.html
<!DOCTYPE html>
<html lang="en">
    <head>
        <meta charset="UTF-8">
        <title> Restaurants</title>
        <style>
            table, th, td{
                border: 1px solid black;
            }
        </style>
    </head>
    <body>
        <h2>餐廳列表</h2>
        <table>
            <tr>
                <th>店名</th>
                <th>電話</th>
                <th>地址</th>
            </tr>
            {% for r in restaurants %}
                <tr>
                    <td> {{ r.name }} </td>
                    <td> {{ r.phone_number }} </td>
                    <td> {{ r.address }} </td>
                </tr>
            {% endfor %}
        </table>
    </body>
</html>
結果
menu.html
<!doctype html>
<html>
    <head>
        <title> Menu </title>
        <meta charset='UTF-8'>
        <style>
            table, th, td{
                border: 1px solid black;
            }
        </style>
    </head>
    <body>
        <h2>{{ restaurant.name }}的Menu</h2>
        {% if restaurant.food_set.all %}
            <p>本餐廳共有{{ restaurant.food_set.all|length }}道菜</p>
            <table>
                <tr>
                    <th>菜名</th>
                    <th>價格</th>
                    <th>註解</th>
                    <th>辣不辣</th>
                </tr>
            {% for food in restaurant.food_set.all %}
                <tr>
                    <td> {{ food.name }} </td>
                    <td> {{ food.price }} </td>
                    <td> {{ food.comment }} </td>
                    <td> {% if food.is_spicy %} 辣 {% else %} 不辣 {% endif %} </td>
                </tr>
            {% endfor %}
            </table>
        {% else %}
            <p>本餐廳啥都沒賣</p>
        {% endif %}
    </body>
</html>
修改views.py中的menu函式
這邊先故意暫時寫死一個id=2的餐廳來示範
def menu(request):
    restaurant = Restaurant.objects.get(id=2)
    return render_to_response('menu.html', locals())
結果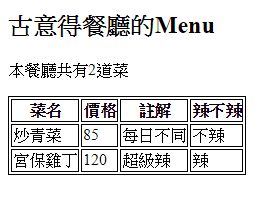
接著我們要做一個由餐廳列表連結至menu的功能
方法一: 使用表單
restaurants_list.html
<!DOCTYPE html>
<html lang="en">
    <head>
        <meta charset="UTF-8">
        <title> Restaurants </title>
        <style>
            table, th, td{
                border: 1px solid black;
            }
        </style>
    </head>
    <body>
        <h2>餐廳列表</h2>
        <form action="/menu/" method="get">
        <table>
            <tr>
                <th>選取</th>
                <th>店名</th>
                <th>電話</th>
                <th>地址</th>
            </tr>
            {% for r in restaurants %}
                <tr>
                    <td> <input type="radio" name="id" value="{{r.id}}"> </td>
                    <td> {{ r.name }} </td>
                    <td> {{ r.phone_number }} </td>
                    <td> {{ r.address }} </td>
                </tr>
            {% endfor %}
        </table>
        <input type="submit" value="觀看menu">
        </form>
    </body>
</html>
views.py
from django.shortcuts import render_to_response
from restaurants.models import Restaurant, Food
from django.http import HttpResponse, HttpResponseRedirect


def menu(request):
    if 'id' in request.GET and request.GET['id'] != '':
        restaurant = Restaurant.objects.get(id=request.GET['id'])
        return render_to_response('menu.html', locals())
    else:
        return HttpResponseRedirect("/restaurants_list/")

def welcome(request):
    if 'user_name' in request.GET and request.GET['user_name'] != '':
        return HttpResponse('Welcome!~' + request.GET['user_name'])
    else:
        return render_to_response('welcome.html', locals())

def list_restaurants(request):
    restaurants = Restaurant.objects.all()
    return render_to_response('restaurants_list.html', locals())
我們使用的是radio按鈕輸入欄位,這是一個用於單選的表單元件,我們設定他的name="id"而value="{{r.id}}",這讓我們選出餐廳之後可以在request.GET中找到鍵值對:
request.GET['id'] => {{r.id}}
           -------   --------
          來自於name  來自於value
這讓餐廳r的radio按鈕剛好會送出對應的參數r.id
如果表單未被提交則將頁面重導至url pattern /restaurants_list/所對應的視圖函式
結果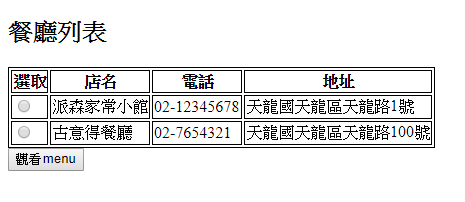
方法二: 使用連結與get查詢字符
如果不使用表單的話可以這麼做
在restaurants_list.html中
<body>
    <h2>餐廳列表</h2>
    <table>
        <tr>
            <th>選取</th>
            <th>店名</th>
            <th>電話</th>
            <th>地址</th>
        </tr>
        {% for r in restaurants %}
            <tr>
                <td> <a href="/menu/?id={{r.id}}"> menu </a></td> <!--改成這行-->
                <td> {{ r.name }} </td>
                <td> {{ r.phone_number }} </td>
                <td> {{ r.address }} </td>
            </tr>
        {% endfor %}
    </table>
</body>
a標籤的href屬性就跟action一樣,可以是url pattern
結果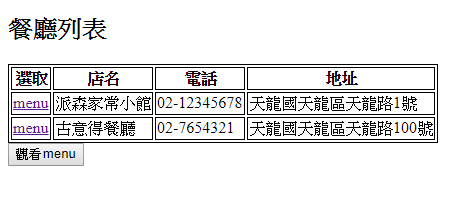
方法三: 使用連結與URL參數
在restaurants_list.html中
<body>
    <h2>餐廳列表</h2>
    <table>
        <tr>
            <th>選取</th>
            <th>店名</th>
            <th>電話</th>
            <th>地址</th>
        </tr>
        {% for r in restaurants %}
            <tr>
                <td> <a href="/menu/{{r.id}}"> menu </a></td> <!--改成這行-->
                <td> {{ r.name }} </td>
                <td> {{ r.phone_number }} </td>
                <td> {{ r.address }} </td>
            </tr>
        {% endfor %}
    </table>
</body>
urls.py
from django.contrib import admin
from django.urls import path, re_path
from restaurants.views import menu, welcome, list_restaurants

urlpatterns = [
    path('admin/', admin.site.urls),
    re_path(r'menu/(\d{1,5})', menu),
    path('welcome/', welcome),
    path('restaurants_list/', list_restaurants),
]
在views.py中
def menu(request, id):
    if id:
        restaurant = Restaurant.objects.get(id=id)
        return render_to_response('menu.html', locals())
    else:
        return HttpResponseRedirect("/restaurants_list/")
接下來示範POST方法
urls.py
from django.contrib import admin
from django.urls import path, re_path
from restaurants.views import menu, welcome, list_restaurants, comment

urlpatterns = [
    path('admin/', admin.site.urls),
    re_path(r'menu/(\d{1,5})', menu),
    path('welcome/', welcome),
    path('restaurants_list/', list_restaurants),
    re_path(r'comment/(\d{1,5})', comment),
]
在restaurants_list.html中
<body>
        <h2>餐廳列表</h2>
        <table>
            <tr>
                <th>選取</th>
                <th>店名</th>
                <th>電話</th>
                <th>地址</th>
                <th>評價</th> <!--加入這行-->
            </tr>
            {% for r in restaurants %}
                <tr>
                    <td> <a href="/menu/{{r.id}}"> menu </a></td>
                    <td> {{ r.name }} </td>
                    <td> {{ r.phone_number }} </td>
                    <td> {{ r.address }} </td>
                    <td> <a href="/comment/{{r.id}}/"> comment </a> </td> <!--加入這行-->
                </tr>
            {% endfor %}
        </table>
    </body>
設定模型
在models.py中加入
class Comment(models.Model):
    content = models.CharField(max_length=200)
    visitor = models.CharField(max_length=20)
    email = models.EmailField(max_length=20)
    date_time = models.DateTimeField()
    restaurant = models.ForeignKey(Restaurant, on_delete=models.CASCADE)
mysite/restaurants/templates/comments.html
<!DOCTYPE html>
<html lang="en">
<head>
<meta charset="UTF-8">
<title> Comments </title>
</head>
<body>
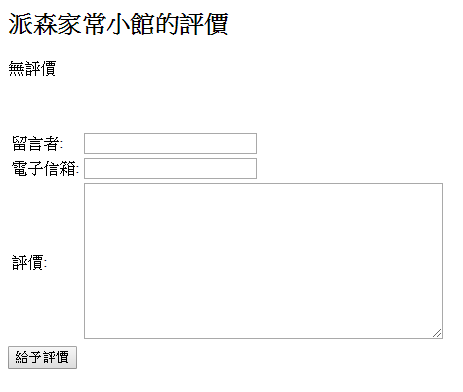
<h2>{{ r.name }}的評價</h2>
{% if r.comment_set.all %}
<p>目前共有{{ r.comment_set.all|length }}條評價</p>
<table>
<tr>
<th>留言者</th>
<th>時間</th>
<th>評價</th>
</tr>
{% for c in r.comment_set.all %}
<tr>
<td> {{ c.visitor }} </td>
<td> {{ c.date_time | date:"F j, Y" }} </td>
<td> {{ c.content }} </td>
</tr>
{% endfor %}
</table>
{% else %}
<p>無評價</p>
{% endif %}
<br/><br/>
<form action="" method="post">
<table>
<tr>
<td> <label for="visitor">留言者:</label> </td>
<td> <input id="visitor" type="text" name="visitor"> </td>
</tr>
<tr>
<td> <label for="email">電子信箱:</label> </td>
<td> <input id="email" type="text" name="email"> </td>
</tr>
<tr>
<td> <label for="content">評價:</label> </td>
<td>
<textarea id="content" rows="10" cols="48" name="content"></textarea>
</td>
</tr>
</table>
<input type="submit" value="給予評價">
</form>
</body>
</html>
views.py
from django.shortcuts import render_to_response
from restaurants.models import Restaurant, Food, Comment
from django.http import HttpResponse, HttpResponseRedirect
from django.utils import timezone

def comment(request, id):
    if id:
        r = Restaurant.objects.get(id=id)
    else:
        return HttpResponseRedirect("/restaurants_list/")
    if request.POST:
        visitor = request.POST['visitor']
        content = request.POST['content']
        email = request.POST['email']
        date_time = timezone.localtime(timezone.now()) # 擷取現在時間
        Comment.objects.create(visitor=visitor, email=email, content=content, date_time=date_time, restaurant=r)
    return render_to_response('comments.html', locals())

def menu(request, id):
    if id:
        restaurant = Restaurant.objects.get(id=id)
        return render_to_response('menu.html', locals())
    else:
        return HttpResponseRedirect("/restaurants_list/")

def welcome(request):
    if 'user_name' in request.GET and request.GET['user_name'] != '':
        return HttpResponse('Welcome!~' + request.GET['user_name'])
    else:
        return render_to_response('welcome.html', locals())

def list_restaurants(request):
    restaurants = Restaurant.objects.all()
    return render_to_response('restaurants_list.html', locals())
我們先檢查了id參數有沒有拿到,如果沒有就重導回餐廳列表
再來檢查表單有沒有被提交過,如果有,就利用request.POST擷取表單欄位內容並且利用Comment模型產生一個新物件(一筆新資料),最後一樣呼叫comments.html模版來回應
把Comment模型註冊上admin
admin.py
from restaurants.models import Restaurant, Food, Comment
...
admin.site.register(Comment)
接著建立資料表及同步資料庫
python manage.py check
python manage.py makemigrations restaurants
python manage.py migrate restaurants
結果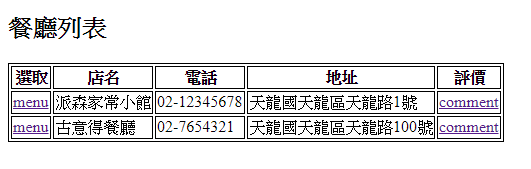
但是輸入留言並提交表單後,卻出現錯誤
這是因為Django幫我們啟動了CSRF攻擊的防護
CSRF(cross-site request forgery)是惡意的跨站請求或偽裝使用者的攻擊
攻擊者會欺騙用戶的瀏覽器去訪問一個認證過的網站並且執行一些惡意的操作
由於用戶的瀏覽器已經被該網站認證過了,所以該網站會放心的讓這些操作被執行
即便這些操作並非該網站要求的或是不是用戶自願的
所以伺服器需要有一些保護措施
常見的防護手段就是使用一個伺服器產生的亂數token,夾帶在送給用戶端的表單中
當用戶端送回表單時,伺服器檢查這個token是不是自己發出,便可以防止攻擊
因為在settings.py中的MIDDLEWARE有預設的'django.middleware.csrf.CsrfViewMiddleware'
所以Django會要求CSRF token認證
在comments.html中的表單加入{% csrf_token %}
...
    <form action="" method="post"> {% csrf_token %}
...
為了讓這個token能被加入
修改views.py
from django.shortcuts import render
def comment(request, id):
    if id:
        r = Restaurant.objects.get(id=id)
    else:
        return HttpResponseRedirect("/restaurants_list/")
    if request.POST:
        visitor = request.POST['visitor']
        content = request.POST['content']
        email = request.POST['email']
        date_time = timezone.localtime(timezone.now()) # 擷取現在時間
        Comment.objects.create(visitor=visitor, email=email, content=content, date_time=date_time, restaurant=r)
    return render(request, 'comments.html', locals())
這樣才能傳遞request
不然render_to_response不吃request參數
這樣POST方法就能正常運行囉
結果,大功告成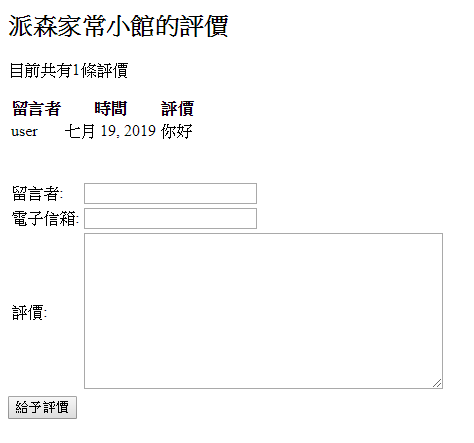
 Citrus

 iThome鐵人賽