
還記得昨天在串API的時候,有特別提到Google Translate API在Go client library沒有v3beta1的版本。秉持著練習golang的精神,看到v3beta1有RESTful API,就花了點時間來串一下。
我這邊參考的是Using the command line的內容,使用CURL的方式呼叫,並把他改寫成Go req (http client)這類型的RESTful API call。仔細想想,要解決的問題有兩個:1. Get Access token、2. 呼叫restful api。
參考資料:https://godoc.org/golang.org/x/oauth2/google#example-JWTConfigFromJSON
我這邊先建立一個auth模組,並把credential json file傳入到裡面的ServiceAccountfunc,然後回傳一個tokenstruct,
package auth

import (
  "io/ioutil"

  "golang.org/x/oauth2"
  "golang.org/x/oauth2/google"
)

func ServiceAccount(credentialFile string) (*oauth2.Token, error) {
  b, err := ioutil.ReadFile(credentialFile)
  if err != nil {
    return nil, err
  }
  config, _ := google.JWTConfigFromJSON(b, "https://www.googleapis.com/auth/cloud-translation")

  token, err := config.TokenSource(oauth2.NoContext).Token()
  if err != nil {
    return nil, err
  }

  return token, nil
}
這樣就有AccessToken了,再來看看CURL該怎麼呼叫
curl -X POST \
-H "Authorization: Bearer TOKEN" \
-H "Content-Type: application/json; charset=utf-8" \
-d @request.json \
https://translation.googleapis.com/v3beta1/projects/PROJECT_ID:translateText
而request.json則是 {"sourceLanguageCode": "en", "targetLanguageCode": "ru", "contents": ["Dr. Watson, come here!", "Bring me some coffee!"]}
翻譯的時候會打一隻POST到 https://translation.googleapis.com/v3beta1/projects/PROJECT_ID:translateText,帶著sourceLanguage、targetLanguageCode、contents,再呼叫的時候需要額外的PROJECT_ID,我這邊選擇用環境變數帶進去。
好,有這些知識以後,我們開始來寫呼叫的方法,直接寫在translation模組裡。
func TranslateTextV3Beta1(text []string) error {
  token, _ := auth.ServiceAccount("./authentication.json")

  header := req.Header{
    "Accept":        "application/json",
    "Content-Type":  "application/json; charset=utf-8",
    "Authorization": "Bearer " + token.AccessToken,
  }

  body := struct {
    SourceLanguageCode string   `json:"sourceLanguageCode"`
    TargetLanguageCode string   `json:"targetLanguageCode"`
    Contents           []string `json:"contents"`
  }{
    SourceLanguageCode: "en",
    TargetLanguageCode: "zh-TW",
    Contents:           text,
  }
  json_string, _ := json.Marshal(body)

  param := req.BodyJSON(json_string)

  r, err := req.Post(
    fmt.Sprintf("https://translation.googleapis.com/v3beta1/projects/%s:translateText", os.Getenv("PROJECT_ID")),
    header,
    param,
  )
  if err != nil {
    log.Fatal(err)
  }
  log.Printf("%+v", r) // print info (try it, you may surprise)

  return nil
}
這有幾個重點:
ServiceAccount得到tokenheader把AccessToken帶入param
os.Getenv取得PROJECT_ID,並帶入header、params
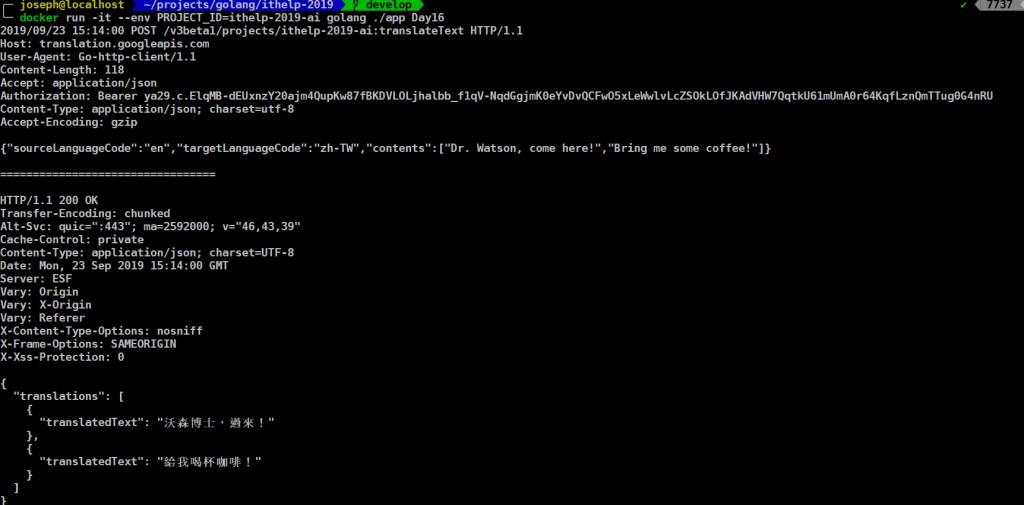
r。那來看看output吧:
docker以
docker run -it --env PROJECT_ID=ithelp-2019-ai golang ./app Day16執行
過程中第一次建立Struct並轉換成JSON、第一次使用req之類的http client,讓我對Golang的語法又更熟悉了一些。
詳細github可以看這邊:https://github.com/josephMG/ithelp-2019/tree/Day-16
OK,今天就到這邊,謝謝大家的觀看。

 iThome鐵人賽