在之前的文章中,依序提到建立新的專案、資料列表、服務、路由等技術說明,但是,都是用預設的app-component來說明,在這篇文章中,就要建立新的component。來建立不同的網頁。
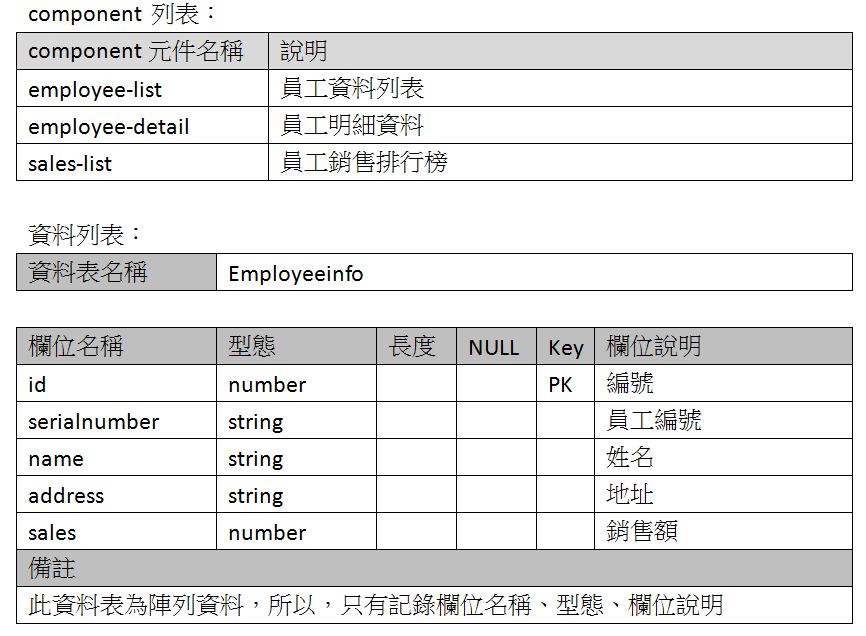
大家可以想像一個component,就是一個網頁,也可以是一個網頁的某一部份,看大家要如何設計及整合。目前,規劃有三個component,分別為員工資料列表、員工明細資料、員工銷售排行榜。我們就做個簡單的SA說明,來列出component列表、相關資料設定等資料,如下表所示:
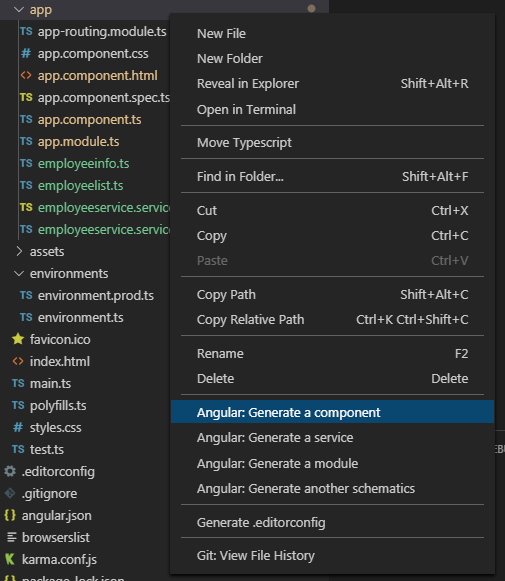
接下來,就是要建立元件(component)。可以用Visual Studio Code的介面來建立,或是在Dos命令列,切換到要建立目錄中,再下指令來建立即可。在Visual Studio Code,在app目錄,按滑鼠的左鍵,就會出現子視窗,選取「Angular: Generate a component」。如下圖所示:
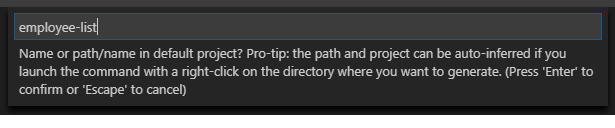
輸入元件(component)的名稱,例如:「employee-list」。按enter,到下一步,就用預設值即可。
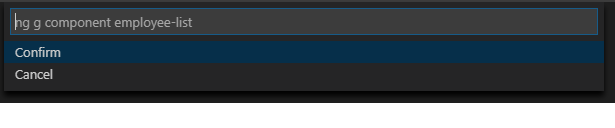
最後,就會出現執行的指令,按下「Confirm」就會自動產生。也可以將這個指令,在Dos命令列,直接下,也可以。
產生出來的程式碼,如下所示:
import { Component, OnInit } from '@angular/core';

@Component({
  selector: 'app-employee-list',
  templateUrl: './employee-list.component.html',
  styleUrls: ['./employee-list.component.css']
})
export class EmployeeListComponent implements OnInit {

  constructor() { }

  ngOnInit() {
  }

}
接下來,將之前的程式碼。更新到新的component,程式碼如下:
employee-list.component.ts
import { Component, OnInit } from '@angular/core';

// 引用資料類
import { Employeeinfo } from './../employeeinfo';
// 載入Service
import { EmployeeserviceService } from './../employeeservice.service';

@Component({
  selector: 'app-employee-list',
  templateUrl: './employee-list.component.html',
  styleUrls: ['./employee-list.component.css']
})
export class EmployeeListComponent implements OnInit {

  employeelists: Employeeinfo[];

  // 建構子
  constructor(private employeeService: EmployeeserviceService) {}

  // 初始化
  ngOnInit() {
    this.getEmployees();
  }

  getEmployees(): void {
    this.employeelists = this.employeeService.getEmployee();
  }
}
注意的地方是在import 資料類別、服務時,因為component是在新的目錄,所以路徑也要做改變。
employee-list.component.html
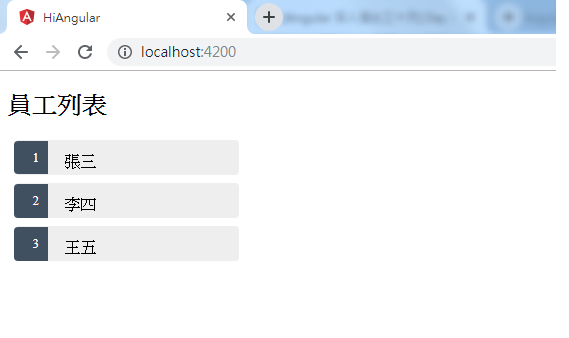
<h2>員工列表</h2>
<ul class="employees">
  <li *ngFor="let employeeinfo of employeelists">
      <span class="badge">{{employeeinfo.id}}</span> {{employeeinfo.name}}
  </li>
</ul>
employee-list.component.css
.employees {
  margin: 0 0 2em 0;
  list-style-type: none;
  padding: 0;
  width: 15em;
}
.employees li {
  position: relative;
  cursor: pointer;
  background-color: #EEE;
  margin: .5em;
  padding: .3em 0;
  height: 1.6em;
  border-radius: 4px;
}

.employees li:hover {
  color: #607D8B;
  background-color: #DDD;
  left: .1em;
}

.employees a {
  color: #333;
  text-decoration: none;
  position: relative;
  display: block;
  width: 250px;
}

.employees a:hover {
  color:#607D8B;
}

.employees .badge {
  display: inline-block;
  font-size: small;
  color: white;
  padding: 0.8em 0.7em 0 0.7em;
  background-color:#405061;
  line-height: 1em;
  position: relative;
  left: -1px;
  top: -4px;
  height: 1.8em;
  min-width: 16px;
  text-align: right;
  margin-right: .8em;
  border-radius: 4px 0 0 4px;
}
最後,也要之前寫的範例,清除程式碼:
app-component.ts
import { Component, OnInit } from '@angular/core';

@Component({
  selector: 'app-root',
  templateUrl: './app.component.html',
  styleUrls: ['./app.component.css']
})
export class AppComponent implements OnInit {

  // 建構子
  constructor() {}

  // 初始化
  ngOnInit() {

  }
}
注意:就清除程式碼,為初始的模式。
app-component.html
<app-employee-list></app-employee-list>
<router-outlet></router-outlet>
注意:也是清除所有的HTML碼,增加的component元件的區塊。
網頁執行結果 :


 iThome鐵人賽