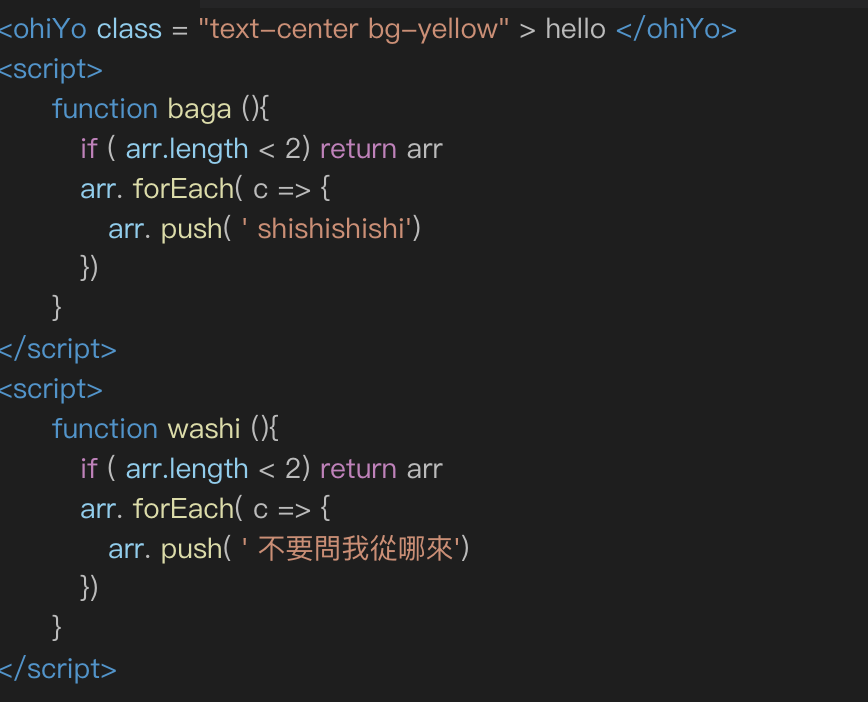
今天要做的對話腳本結果
基本上,即時連線的機制已經做出來了,就算看起來像在亂寫,後面大部分就是在做一些小設計,讓聊天室偽裝的更像vscode
以目前寫好的狀態來說,就是一行一行的對話顯示出來,毫無偽裝!就是赤裸的聊天,所以就要來設計如何偽裝
還記得上一篇,送出對話資料,有多寫一個資料叫codeClass嗎?這就是我們要用來記錄每個對話要用什麼樣的腳本來做顯示
username: 帶入暱稱
說了好多話喔:帶入對話
其他都是預設好的腳本,如果有什麼有趣的提議,也可以留言告訴我XD
function username(arr) {
  if (arr.length < 2) return arr
  ary.forEach(c => {
    arr.push('說了好多話喔')
  })
}
function username(str) {
  let re = /^[0-9]*$/
  return str.match(re)+ '說了好多話喔'
}
<username>
    <p>好多話要說</p>
</username>

<username class='msg_input_area'>
    <input placeholder="說了好多話喔" id="msg_input_area" >
</username>
// 滿滿ㄉ話
/* 也是滿滿的話 */
為了不要讓chat的檔案變的太亂,不好閱讀,我們把設計好的腳本做成component,本篇就做一個function跟一個html的版本
到components資料夾開兩支vue檔,一個叫codeClassFunc,一個叫codeClassHtml
另外在scss變數檔裡增加一些文字顏色,文字顏色用成functional css的概念來做,這邊這樣用的主要原因,就是要實現各種顏色的文字,個別寫實在是太麻煩
$chatInfo: #83cef0;
$blue: #3d95cf;
$chatComment: #5a9c4c;
$chatText: #7a7a7a;
$orange: #d58c71;
$yellow: #dbdda4;
$pink: #ca7dbd;

.text-orange {
  color: $orange;
}
.text-yellow {
  color: $yellow;
}
.text-pink {
  color: $pink;
}
.text-green {
  color: $chatComment;
}
.text-blue {
  color: $blue;
}
.text-lightblue {
  color: $chatInfo;
}
.text-gray {
  color: $chatText;
}
// 處理縮排
.text-indent {
  &_1 {
    text-indent: 2em;
  }
  &_2 {
    text-indent: 3em;
  }
  &_3 {
    text-indent: 4em;
  }
}
<template>
  <div class="cp_code_class_html">
    <span class="text-blue">
      <{{ name }}
        </span>
        <span
        class="text-lightblue"
      >class
    </span>
    =
    <span class="text-orange">"text-center bg-yellow"</span>
    >
    {{ text }}
    <span class="text-blue"></{{ name }}></span>
  </div>
</template>

// props會接到上層給的資料
<script>
  export default {
    name: 'codeClassHtml',
    props: {
      name: {
        type: String,
        default: 'div'
      },
      text: {
        type: String,
        default: ''
      }
    }
  }
</script>
<template>
  <div class="cp_code_class_func">
    <span class="text-blue">
      <{{'script'}}>
    </span>
    <div class="cont">
      <div class="text-indent_1">
        <span class="text-blue">{{'function'}} </span>
        <span class="text-yellow">{{name}} </span>
        <span>(){</span>
      </div>
      <div class="text-indent_2">
        <p>
          <span class="text-pink">if </span>(
          <span class="text-lightblue">{{ 'arr.length ' }}</span>
          {{'< 2)'}}
          <span class="text-pink">return </span>arr
        </p>
        <div class="">
          <span class="text-lightblue">arr</span>.
          <span class="text-yellow">forEach</span>( c => {
        </div>
        <div class="text-indent_3">
          <span class="text-lightblue">arr</span>.
          <span class="text-yellow">push</span>(
          <span class="text-orange">'
            {{text}}'</span>)
        </div>
        <div>})</div>
      </div>
      <div class="stext-indent_1">
        }
      </div>
    </div>

    <span class="text-blue">
      <{{'/script'}}>
    </span>
  </div>
</template>
// script同前一段也是要接props值
總之看起來很複雜的templete只是因為要把每段文字用特定顏色,所以看起來很複雜
特別說一下其中這段
<span class="text-blue">
  <{{'script'}}>
</span>
<{{'script'}}>這段會這樣寫只要是因為直接寫<script>會被判斷為程式語法,所以拆開來處理,一般用雙花括{{ }}是用來塞程式碼,所以也可以直接塞單引號包文字進去
最後呢,要把pages > chat裡原本v-for的對話改成用腳本顯示,這裡會用到<component :is="" /></component>這個東西
一般我們引入component的方法:
<script>
import codeClassHtml from '~/components/codeClassHtml'
export default {
    components: {
      codeClassHtml
    }
}
</script>
<templete>
    <div>
        <codeClassHtml />
    </div>
</templete>
不過這邊因為要因應每次對話不同的設定來決定要用哪種腳本,所以改成用component is的方法
以上一段來說,templete會改成
<templete>
    <div>
        <component :is="'codeClassHtml'" />
    </div>
</templete>
這樣就是告訴他說 我要用哪一個引入的component~
另外一提,我在這段用<component :is="'codeClassHtml'" />其實是跟<component :is="'codeClassHtml'" /></component>是一樣的,我記得是guildline有建議如果這個tag中間沒有要放入什麼東西,就讓他自己關閉自己(?)
其他tag也可以這樣用,例如用CSS做漢堡icon,中間有三個橫槓,我習慣上就會放三個span在裡面,而span裡面也不會包任何東西(tag上的其他屬性沒有影響),就可以讓他自行關閉
<div class="nav_icon">
    <span />
    <span />
    <span />
</div>
回來pages > chat改v-for內容,並且把:is綁定每個對話的codeClass(可以看前一篇設計的對話資料格式有保留這個欄位)
<div
  v-for="chat in channels.now.msg"
  :key="chat.key + chat.text"
>
  <component
    :is="chat.codeClass"
    :text="chat.text"
    :name="chat.name"
  />
</div>
:text是綁定資料傳給component,讓component裡面可以使用這個資料,剛剛前面codeClassFunc跟codeClassHtml有設定**props**去接資料,
:text="chat.text"
:props接到的變數名稱="傳入的參數"
剛開始我也常記不住:name="name"哪個是哪個XD,前面的name是子層用的變數名稱,後面的name是這層的變數
如果是:abc="name"
那子層的props就要改成
props: {
  abc: { // 會接到上層的name
    type: String,
    default: ''
  }
},
props也有懶惰的寫法
props: ['abc',...]
懶惰的寫法就是不會去幫你驗證傳過來的資料有沒有符合規則,好習慣還是上面的寫法,它可以幫助debug喔~另外還有require屬性
props: {
  abc: {
    type: String, // 驗證資料型態
    default: '', // 沒傳來的時候預設資料
    require: true // 一定要傳資料過來,沒傳就報錯
  }
},
如果嫌每次寫太麻煩,也可以裝VueType
因為我還沒有寫到選取腳本的部分,要看到結果的話可以先在聊天室放入預設的資料看結果~
