前一天,我們透過 https://lnmp.org/ 網站提供的一件安裝包,安裝了以下(主要)軟體:
N:Nginx 網頁伺服器
M:MySQL 8.0.13 資料庫伺服器
P:PHP 7.3.6 網頁動態語言
A:Apache 2.4.39 網頁伺服器
[doraemon@centos7-cli ~]$ nginx -v nginx version: nginx/1.16.1 [doraemon@centos7-cli ~]$ mysql -V mysql Ver 8.0.13 for Linux on x86_64 (Source distribution) [doraemon@centos7-cli ~]$ php --version PHP 7.3.9 (cli) (built: Oct 6 2019 00:16:51) ( ZTS ) Copyright (c) 1997-2018 The PHP Group Zend Engine v3.3.9, Copyright (c) 1998-2018 Zend Technologies [doraemon@centos7-cli ~]$ /usr/local/apache/bin/httpd -v Server version: Apache/2.4.41 (Unix) Server built: Oct 6 2019 00:13:02
接下來,就來看看此安裝包為此系統做了什麼變動?
首先,SELinux 被關掉了
[doraemon@centos7-cli ~]$ getenforce
Disabled
[doraemon@centos7-cli ~]$ cat /etc/selinux/config

# This file controls the state of SELinux on the system.
# SELINUX= can take one of these three values:
#     enforcing - SELinux security policy is enforced.
#     permissive - SELinux prints warnings instead of enforcing.
#     disabled - No SELinux policy is loaded.
SELINUX=disabled
# SELINUXTYPE= can take one of three values:
#     targeted - Targeted processes are protected,
#     minimum - Modification of targeted policy. Only selected processes are protected.
#     mls - Multi Level Security protection.
SELINUXTYPE=targeted
預設防火牆由 firewalld 換成了 iptables
[doraemon@centos7-cli ~]$ systemctl status firewalld
● firewalld.service - firewalld - dynamic firewall daemon
   Loaded: loaded (/usr/lib/systemd/system/firewalld.service; disabled; vendor preset: enabled)
   Active: inactive (dead)
     Docs: man:firewalld(1)
[doraemon@centos7-cli ~]$ systemctl status iptables
● iptables.service - IPv4 firewall with iptables
   Loaded: loaded (/usr/lib/systemd/system/iptables.service; enabled; vendor preset: disabled)
   Active: active (exited) since Sun 2019-10-06 10:22:11 CST; 1h 12min ago
  Process: 818 ExecStart=/usr/libexec/iptables/iptables.init start (code=exited, status=0/SUCCESS)
 Main PID: 818 (code=exited, status=0/SUCCESS)
   CGroup: /system.slice/iptables.service

Oct 06 10:22:11 centos7-cli.lab.example.com systemd[1]: Starting IPv4 firewall with iptables...
Oct 06 10:22:11 centos7-cli.lab.example.com iptables.init[818]: iptables: Applying firewall rules: [  OK  ]
Oct 06 10:22:11 centos7-cli.lab.example.com systemd[1]: Started IPv4 firewall with iptables.
[doraemon@centos7-cli ~]$ systemctl status ip6tables
● ip6tables.service - IPv6 firewall with ip6tables
   Loaded: loaded (/usr/lib/systemd/system/ip6tables.service; disabled; vendor preset: disabled)
   Active: inactive (dead)
與透過 yum/rpm 安裝的方式,相關設定檔的路徑相比較:
Apache 的主要設定檔 /etc/httpd/conf/httpd.conf 被換到 /usr/local/apache/conf/httpd.conf。
Apache Virtual Host 設定檔存放目錄從 /etc/httpd/conf.d/ 被換到 /usr/local/apache/conf/vhost/。
Apache 網站預設的存放路徑從 /var/www/html/ 被改到 /home/wwwroot/default/。
其餘重要設定檔與目錄的說明,請詳見 https://lnmp.org/faq/lnmp-software-list.html 網頁。
除了 https://lnmp.org/ 所推出的 LNMP 一件安裝包之外,對岸的 OneinStack (https://oneinstack.com) 也是頗為知名。除了可安裝 Apache/Nginx、MySQL/MariaDB、PHP 外,還可以安裝 MongoDB、PostgreSQL、Tomcat 等。另外,在 Windows 平台上常用來裝 Apache、MySQL、PHP 的軟體套件 XAMPP (https://www.apachefriends.org ) ,它一樣也是有 Linux 版本可以使用;另一套 Bitnami (https://bitnami.com ) 可供的選擇更多,除了有提供安裝套件的方式外,甚至還提供虛擬機器、Docker 的方式可供利用。
添加 Virtual Host
[doraemon@centos7-cli ~]$ sudo lnmp vhost add
[sudo] password for doraemon:
+-------------------------------------------+
|    Manager for LNMP, Written by Licess    |
+-------------------------------------------+
|              <https://lnmp.org>             |
+-------------------------------------------+
Please enter domain(example: www.lnmp.org): www.lab.example.com
 Your domain: www.lab.example.com
Enter more domain name(example: lnmp.org *.lnmp.org): lab.example.com
 domain list: lab.example.com
Please enter the directory for the domain: www.lab.example.com
Default directory: /home/wwwroot/www.lab.example.com:
Virtual Host Directory: /home/wwwroot/www.lab.example.com
Allow access log? (y/n) n
Disable access log.
Please enter Administrator Email Address: admin@lab.example.com
Server Administrator <Email:admin@lab.example.com>
Create database and MySQL user with same name (y/n) y
Enter current root password of Database (Password will not shown):
ERROR 1045 (28000): Access denied for user 'root'@'localhost' (using password: YES)
Enter current root password of Database (Password will not shown):
OK, MySQL root password correct.
Enter database name: wordpress
Your will create a database and MySQL user with same name: wordpress
Please enter password for mysql user wordpress: wordpress
Your password: wordpress
Add SSL Certificate (y/n) y
1: Use your own SSL Certificate and Key
2: Use Let's Encrypt to create SSL Certificate and Key
Enter 1 or 2: 2
It will be processed automatically.

Press any key to start create virtul host...

Create Virtul Host directory......
set permissions of Virtual Host directory......
Test Nginx configure file......
nginx: the configuration file /usr/local/nginx/conf/nginx.conf syntax is ok
nginx: configuration file /usr/local/nginx/conf/nginx.conf test is successful

Reload Nginx......
Test Apache configure file...
test apache configure... Syntax OK
 done
Restart Apache...
graceful apache...  done
Add database Sucessfully.
--2019-10-06 20:58:36--  <https://soft.vpser.net/lib/acme.sh/latest.tar.gz>
Resolving soft.vpser.net (soft.vpser.net)... 104.238.161.196, 2600:3c01::f03c:91ff:fe92:1a06
Connecting to soft.vpser.net (soft.vpser.net)|104.238.161.196|:443... connected.
HTTP request sent, awaiting response... 200 OK
Length: 165502 (162K) [application/octet-stream]
Saving to: ‘latest.tar.gz’

100%[===========================================================================>] 165,502      814KB/s   in 0.2s

2019-10-06 20:58:38 (814 KB/s) - ‘latest.tar.gz’ saved [165502/165502]

[Sun Oct  6 20:58:38 CST 2019] It is recommended to install socat first.
[Sun Oct  6 20:58:38 CST 2019] We use socat for standalone server if you use standalone mode.
[Sun Oct  6 20:58:38 CST 2019] If you don't use standalone mode, just ignore this warning.
[Sun Oct  6 20:58:38 CST 2019] Installing to /usr/local/acme.sh
[Sun Oct  6 20:58:38 CST 2019] Installed to /usr/local/acme.sh/acme.sh
[Sun Oct  6 20:58:38 CST 2019] Installing alias to '/root/.bashrc'
[Sun Oct  6 20:58:38 CST 2019] OK, Close and reopen your terminal to start using acme.sh
[Sun Oct  6 20:58:38 CST 2019] Installing alias to '/root/.cshrc'
[Sun Oct  6 20:58:38 CST 2019] Installing alias to '/root/.tcshrc'
[Sun Oct  6 20:58:38 CST 2019] Installing cron job
no crontab for root
no crontab for root
[Sun Oct  6 20:58:38 CST 2019] Good, bash is found, so change the shebang to use bash as preferred.
[Sun Oct  6 20:58:39 CST 2019] OK
Redirecting to /bin/systemctl restart crond.service
Note: Forwarding request to 'systemctl enable crond.service'.
Starting create SSL Certificate use Let's Encrypt...
It seems that you are using sudo, please read this link first:
<https://github.com/Neilpang/acme.sh/wiki/sudo>
Let's Encrypt SSL Certificate create failed!
================================================
Virtualhost infomation:
Your domain: www.lab.example.com
Home Directory: /home/wwwroot/www.lab.example.com
Enable log: no
Database username: wordpress
Database userpassword: wordpress
Database Name: wordpress
Create ftp account: no
Enable SSL: yes
  =>Let's Encrypt
================================================
看起來是因為使用一般使用者以 sudo 執行特殊權限的關係導致建立 Let's Encrypt SSL 憑證失敗。
繼續下載並且解壓縮 WordPress 安裝包
[doraemon@centos7-cli ~]$ cd /home/wwwroot/www.lab.example.com/
[doraemon@centos7-cli www.lab.example.com]$ sudo wget <https://tw.wordpress.org/wordpress-5.2.3-zh_TW.tar.gz>
[doraemon@centos7-cli www.lab.example.com]$ sudo tar -zxvf wordpress-5.2.3-zh_TW.tar.gz
[doraemon@centos7-cli www.lab.example.com]$ sudo cp -r ./wordpress/* /home/wwwroot/www.lab.example.com/
[doraemon@centos7-cli www.lab.example.com]$ sudo chown -R www:www /home/wwwroot/*ls -alZ /home/wwwroot/www.lab.example.com
[doraemon@centos7-cli www.lab.example.com]$ sudo rm -rf wordpress/* wordpress-5.2.3-zh_TW.tar.gz
[doraemon@centos7-cli www.lab.example.com]$ sudo lnmp restart
+-------------------------------------------+
|    Manager for LNMP, Written by Licess    |
+-------------------------------------------+
|              <https://lnmp.org>             |
+-------------------------------------------+
Stoping LNMPA...
Stoping nginx...  done
Shutting down MySQL.. SUCCESS!
stop apache...  done
Starting LNMPA...
Starting nginx...  done
Starting MySQL.. SUCCESS!
start apache...  done
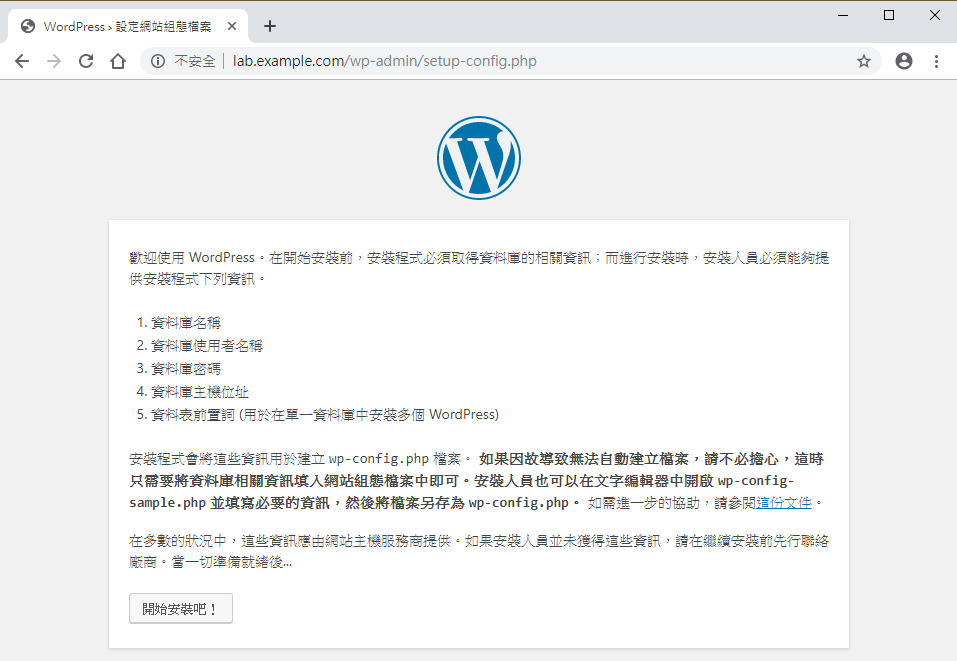
開啟瀏覽器,網址列輸入 http://www.lab.example.com ,就可以看到 WordPress 設定畫面了。
參考網頁:https://www.newlearner.site/2018/11/03/wordpress-lnmp.html