
這邊有有看到一個不錯的主題
就是進入最愛餐廳裡面時
在讀取資料時出現了假的方塊畫面
這個跟FaceBook資料未出來的時候一模一樣
看來Uber eat有仿照這種效果
在前幾秒會有短暫的出現
等待資料下載完畢以後顯示正確的tableView
來看看 Uber eat 的效果

尚未有資料的View這邊單獨拉出去一個UIView
因為這是會很常使用的
每個資料讀取的地方都可以呼叫
獨立後可避免程式碼重複撰寫
裡面新增一個tableView
如果你要顯示其他UI可自行替換
import UIKit
class JBNoContentView: UIView,UITableViewDelegate,UITableViewDataSource {
    override init(frame: CGRect) {
        super.init(frame: frame)
        addSubview(self.tableView)
    }

    required init?(coder: NSCoder) {
        fatalError("init(coder:) has not been implemented")
    }

    lazy var tableView: UITableView = {
        let tableView = UITableView()
        tableView.frame = CGRect(x: 0, y:  0, width: KScreenWidth - 0*2, height: KScreenHeight - kTabBarHeight)
        tableView.delegate = self
        tableView.dataSource = self
        tableView.register(UINib(nibName:"NoContentCell", bundle:nil),
                          forCellReuseIdentifier:"NoContentCell")

        return tableView
   }()

    func tableView(_ tableView: UITableView, numberOfRowsInSection section: Int) -> Int {
        return 5
    }

    func tableView(_ tableView: UITableView, heightForRowAt indexPath: IndexPath) -> CGFloat {
        return 100
    }


    func tableView(_ tableView: UITableView, cellForRowAt indexPath: IndexPath) -> UITableViewCell {
        let cell:NoContentCell = tableView.dequeueReusableCell(withIdentifier: "NoContentCell")
        as! NoContentCell

        return cell
    }
}
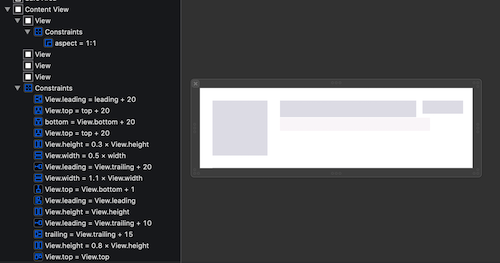
Cell部分這邊我設計了仿FB效果
都是方塊樣式
感覺讓使用者資料會有東西跑出來在特定區域
至於要不要顯示NoContentView部分
我新增在BaseViewController讓所有子類別都可以做新增或刪除
func showNoContentView() {
    self.view.addSubview(self.noContentView)
}

func hideNoContentView() {
    noContentView.removeFromSuperview()
}

lazy var noContentView: JBNoContentView = {
    let noContentView = JBNoContentView()
    noContentView.frame = CGRect.init(x:override func viewWillAppear(_ animated: Bool) {
        super.viewWillAppear(animated)
        navigationController?.setNavigationBarHidden(false, animated: animated)
        self.tabBarController?.tabBar.isHidden = true
    } 0, y: kSafeTopPadding + kNavBarHeight, width: KScreenWidth, height: KScreenHeight)
    noContentView.backgroundColor = UIColor.red
    return noContentView
}()
這是會員頁面的其中一個index row
裡面的設計是顯示navigationBar + 隱藏下方tabBar
override func viewWillAppear(_ animated: Bool) {
    super.viewWillAppear(animated)
    navigationController?.setNavigationBarHidden(false, animated: animated)
    self.tabBarController?.tabBar.isHidden = true
}
上方按鈕左右都做客製化
重新定義上面的字
navigationItem.leftBarButtonItem = UIBarButtonItem(title: "←  您的最愛餐廳", style: .plain, target: self, action: #selector(self.clickLeftBarButton))
navigationItem.leftBarButtonItem?.tintColor = UIColor.black

navigationItem.rightBarButtonItem = UIBarButtonItem(title: "編輯", style: .plain, target: self, action: #selector(self.clickRightBarButton))
navigationItem.rightBarButtonItem?.tintColor = UIColor.init(red: 41.0/255.0, green: 127.0/255.0, blue: 41.0/255.0, alpha: 1.0)
viewDidLoad 因為沒api
我們要做假動畫
需要1秒過後開始隱藏 NoContentView
這裏有兩個方式
設定時間後1秒後就會執行隱藏的動作無漸變動畫
let deadlineTime = DispatchTime.now() + .seconds(1)
DispatchQueue.main.asyncAfter(deadline: deadlineTime) {
    self.hideNoContentView()
}
UIView.animate是上次有使用過的可以漸變UI好用的動畫
self.noContentView.alpha = 1.0
UIView.animate(withDuration: 1, animations: {
    self.noContentView.alpha = 0.0
    self.tableView.alpha = 1.0
}, completion:{(finished) in
    self.hideNoContentView()
})
再把剩餘tableView新增進去
全貌應該會是這樣
override func viewDidLoad() {
    super.viewDidLoad()
    self.view.backgroundColor = UIColor.white
    self.view.addSubview(self.tableView)
    self.showNoContentView()
    self.noContentView.alpha = 1.0
    UIView.animate(withDuration: 1, animations: {
        self.noContentView.alpha = 0.0
        self.tableView.alpha = 1.0
    }, completion:{(finished) in
        self.hideNoContentView()
    })

    navigationItem.leftBarButtonItem = UIBarButtonItem(title: "←  您的最愛餐廳", style: .plain, target: self, action: #selector(self.clickLeftBarButton))
    navigationItem.leftBarButtonItem?.tintColor = UIColor.black

    navigationItem.rightBarButtonItem = UIBarButtonItem(title: "編輯", style: .plain, target: self, action: #selector(self.clickRightBarButton))
    navigationItem.rightBarButtonItem?.tintColor = UIColor.init(red: 41.0/255.0, green: 127.0/255.0, blue: 41.0/255.0, alpha: 1.0)
}
tableView.alpha 一開始給他 0.0
後面會漸變出現
剛好可以銜接 NoContentView 漸變消失
lazy var tableView: UITableView = {
    var tableView = UITableView.init(frame: CGRect(x: 0, y: 0, width: KScreenWidth, height: KScreenHeight - kSafeTopPadding), style: .grouped)

    tableView.delegate = self
    tableView.dataSource = self
    tableView.register(UINib(nibName:"FavoriteRestaurantCell", bundle:nil),
                      forCellReuseIdentifier:"FavoriteRestaurantCell")
    tableView.backgroundColor = UIColor.init(red: 1.0, green: 1.0, blue: 1.0, alpha: 0.9)
    tableView.alpha = 0.0
    return tableView
}()
我在最愛餐廳cell設計
可參考以下設置
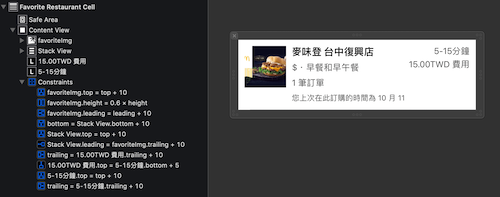
tableView cell高度給他130感覺最合適
並且把剛剛的客製化cell新增進來
// MARK: - tableview
func tableView(_ tableView: UITableView, numberOfRowsInSection section: Int) -> Int {
    return 3
}

// 設置 cell 的高度
func tableView(_ tableView: UITableView, heightForRowAt indexPath: IndexPath) -> CGFloat {
   return 130
}

func numberOfSections(in tableView: UITableView) -> Int {
   return 3
}

func tableView(_ tableView: UITableView, cellForRowAt indexPath: IndexPath) -> UITableViewCell {
   let cell:FavoriteRestaurantCell = tableView.dequeueReusableCell(withIdentifier: "FavoriteRestaurantCell")
       as! FavoriteRestaurantCell

   return cell
}

func tableView(_ tableView: UITableView, heightForHeaderInSection section: Int) -> CGFloat {
    return 10
}

func tableView(_ tableView: UITableView, viewForHeaderInSection section: Int) -> UIView? {
    let headerView = UIView()
headerView.backgroundColor = UIColor.init(red: 0.0, green: 0.0, blue: 0.0, alpha: 0.1)
    return headerView

}


func tableView(_ tableView: UITableView, viewForFooterInSection section: Int) -> UIView? {
   return UIView()
}

func tableView(_ tableView: UITableView, heightForFooterInSection section: Int) -> CGFloat {
   return 0
}
全部設置完成後就可以執行看看了


