
上一篇已經完成 UISegmentedControl + UIPageViewController
兩個運用到的就是訂單頁面
用來看過去所點的餐點
可左右滑動
或是使用上方按鈕切換
來看看原Uber eat效果
圖片
先把上一篇的UISegmentedControl + UIPageViewController 新增進來
詳細可以去看我上一篇
[Day 26] Swift UISegmentedControl + UIPageViewController 左右滑動切換ViewController
這裡多兩個UIViewController
就是裡面的 過去訂單與即將推出
var pageViewControl = UIPageViewController()
var segmentedControl = UISegmentedControl()
var viewControllerArr = Array<UIViewController>()
var selectedIndex: Int = 0
var newController = UIViewController()
var orderController = UIViewController()
這裡面簡單新增兩個按鈕"過去的訂單","即將推出"
segmentedControl = UISegmentedControl(items: ["過去的訂單","即將推出"])
segmentedControl.backgroundColor = UIColor.white
segmentedControl.frame = CGRect.init(x: 0, y: kSafeTopPadding, width: self.view.frame.width, height: 44)
segmentedControl.addTarget(self, action: #selector(segmentedChange), for: .valueChanged)
self.navigationController?.view.addSubview(segmentedControl)
先新增UIPageViewController的基底addChild+addSubview
pageViewControl = UIPageViewController(transitionStyle: .scroll, navigationOrientation: .horizontal, options: nil)
pageViewControl.view.frame = CGRect.init(x: 0, y: kSafeTopPadding + kNavBarHeight, width: self.view.frame.width, height: KScreenHeight - kSafeTopPadding - kNavBarHeight)
pageViewControl.delegate = self
pageViewControl.dataSource = self
pageViewControl.isEditing = true
self.addChild(pageViewControl)
self.view.addSubview(pageViewControl.view)
過去訂單 需要顯示過去所有的餐廳
所以我們來新增一個collectionView + 客製化Cell
// 過去訂單
orderController.view.tag = 0
orderController.view.addSubview(self.collectionView)
viewControllerArr.append(orderController)
lazy var collectionView: UICollectionView = {
    let layout = UICollectionViewFlowLayout()
    layout.sectionInset = UIEdgeInsets(top: 10, left: 5, bottom: 10, right: 5)
    layout.minimumLineSpacing = 5
    layout.scrollDirection = .vertical
    let collectionView = UICollectionView(frame: CGRect(x: 10, y: 0, width: KScreenWidth - 10*2, height: KScreenHeight - kSafeTopPadding - kNavBarHeight ),collectionViewLayout: layout)
    collectionView.backgroundColor = UIColor.white
    collectionView.register(UINib(nibName:"OrderCell", bundle:nil),
                            forCellWithReuseIdentifier:"OrderCell")

    collectionView.delegate = self
    collectionView.dataSource = self

    return collectionView
}()
collectionView 裡面的 cell
我們這邊幫他客製化一個
原始APP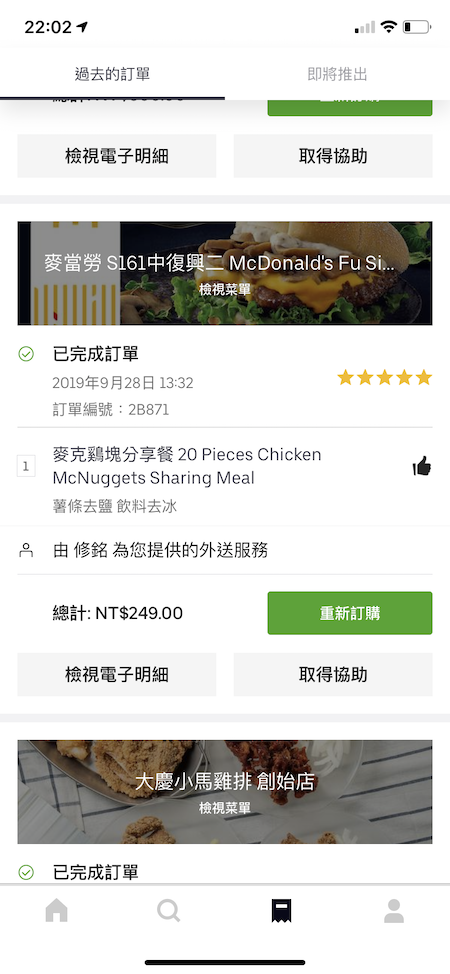
我們客製化的Cell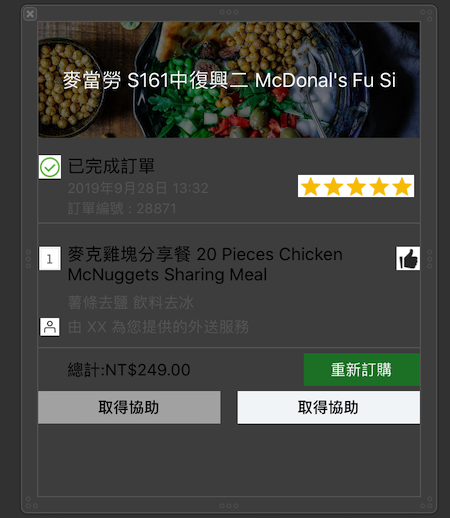
過去訂單 的View就差不多了
即將推出 比較簡單
顯示一些圖片跟文字而已
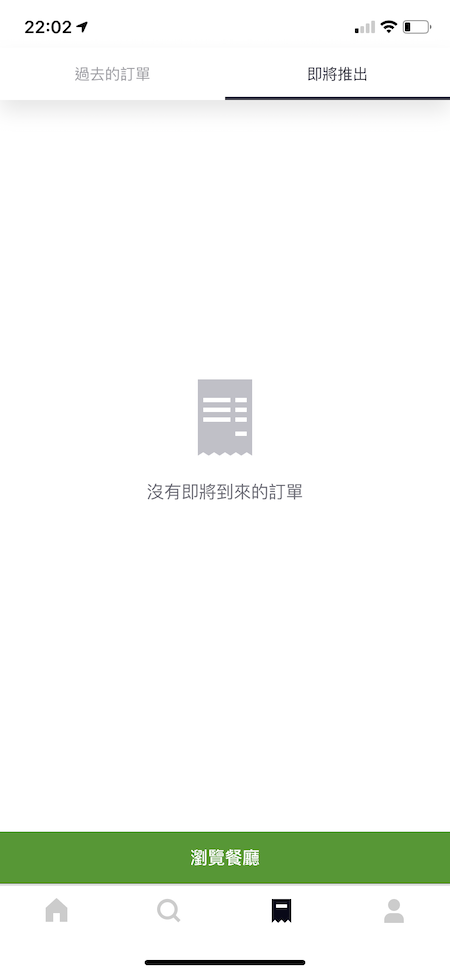
// 即將推出
newController.view.tag = 1

let searchBtn = UIButton()
searchBtn.frame = CGRect.init(x: 0, y: KScreenHeight - kSafeTopPadding - kSafeBottomPadding - kStatusBarHeight - kNavBarHeight - 50, width: KScreenWidth, height: 50)
searchBtn.backgroundColor = UIColor.init(red: 0.3, green: 0.6, blue: 0.3, alpha: 1.0)
searchBtn.setTitle("瀏覽餐廳", for: .normal)
newController.view.addSubview(searchBtn)

let iconImage = UIImageView()
iconImage.frame = CGRect.init(x: newController.view.center.x - 70/2, y: 250, width: 70, height: 70)
iconImage.image = UIImage.init(named: "searchIcon")
iconImage.contentMode = .scaleAspectFit
newController.view.addSubview(iconImage)

let textLabel = UILabel()
textLabel.frame = CGRect.init(x: 0, y: iconImage.frame.maxY + 10, width: KScreenWidth, height: 30)
textLabel.text = "沒有即將到來的訂單"
textLabel.textColor = UIColor.init(red: 0.0, green: 0.0, blue: 0.0, alpha: 0.6)
textLabel.textAlignment = .center
newController.view.addSubview(textLabel)
viewControllerArr.append(newController)
最後別忘記把首頁設置完畢
pageViewControl.setViewControllers([viewControllerArr[0]], direction: .forward, animated: false)
ViewDidLoad差不多就是這樣
這裡上一篇有詳細說明
沒有不一樣的部分
程式碼簡易帶過
func pageViewController(_ pageViewController: UIPageViewController, viewControllerBefore viewController: UIViewController) -> UIViewController? {

    selectedIndex = viewController.view.tag
    segmentedControl.selectedSegmentIndex = selectedIndex
    let pageIndex = viewController.view.tag - 1
    if pageIndex < 0 {
        return nil
    }
    return viewControllerArr[pageIndex]
}

func pageViewController(_ pageViewController: UIPageViewController, viewControllerAfter viewController: UIViewController) -> UIViewController? {

    selectedIndex = viewController.view.tag
    segmentedControl.selectedSegmentIndex = selectedIndex
    let pageIndex = viewController.view.tag + 1
    if pageIndex > 1 {
        return nil
    }
    return viewControllerArr[pageIndex]
}
segmentedControl 上一篇也有詳細說明
這裡簡易以程式帶過
@objc func segmentedChange(sender: UISegmentedControl) {
    // index
    print(sender.selectedSegmentIndex)
    // 文字
    print(sender.titleForSegment(at: sender.selectedSegmentIndex)!)
    pageViewControl.setViewControllers([viewControllerArr[sender.selectedSegmentIndex]], direction: .forward, animated: true)
}
最後collectionView 將cell新增
並且設置高度
這些之前的篇章也有詳細說明
// MARK: - CollectionView

func collectionView(_ collectionView: UICollectionView, layout collectionViewLayout: UICollectionViewLayout, sizeForItemAt indexPath: IndexPath) -> CGSize {
    var cellSize = CGSize()
    cellSize.width = KScreenWidth - 10*2
    cellSize.height = 350
    return cellSize
}


func collectionView(_ collectionView: UICollectionView, numberOfItemsInSection section: Int) -> Int {
    return 5
}


func collectionView(_ collectionView: UICollectionView, cellForItemAt indexPath: IndexPath) -> UICollectionViewCell {
    let cell:OrderCell = collectionView.dequeueReusableCell(withReuseIdentifier: "OrderCell", for: indexPath)
        as! OrderCell
    return cell
}

func numberOfSectionsInCollectionView(
    collectionView: UICollectionView) -> Int {
    return 1
}

func collectionView(_ collectionView: UICollectionView, didSelectItemAt indexPath: IndexPath) {
    print("你選擇了第 \(indexPath.section + 1) 組的")
    print("第 \(indexPath.item) ")
    print("第 \(indexPath.row) ")
}
如果有無法執行或是錯誤的
記得檢查一下delegate有無設置
class OrderViewController: JGBaseViewController,UIPageViewControllerDelegate,UIPageViewControllerDataSource,UICollectionViewDelegate,UICollectionViewDataSource,UICollectionViewDelegateFlowLayout {
全部設置完畢後就可以執行看看了
Demo
完成 差不多就是這樣
上方按鈕樣式改變是因為 iOS13的樣式
下次可以試試看研究UISegmentedControl style
