今天要介紹的是使用 Entity Framework Core 讀取 Azure 上的 MySQL 資料庫。
這篇會使用 App Service 內建的 MySQL In App 功能,優點是免費,且和 App Service 共用資源,有 1G 的儲存空間可以使用,用來架設 Side Project 是不錯的選擇,不過限制蠻多的,不建議在正式環境中使用。
Entity Framework 是微軟主推的 ORM 框架,Core 則是 .NET Core 版本的意思。
以前比較常用 Dapper,那時候對 Entity 有很多誤解,一直不敢使用,直到 .NET Core 3.0 出來,才下定決心跳下去,經過研究後發現 EF 功能強大,新增修改刪除不用說,簡單的查詢用 LINQ 也更方便,難怪現在很多大神都推 Dapper 和 EF 並用。
EF 是我錯怪你惹~~~ o(〒﹏〒)o
接下來這兩篇會將 資料庫 + 爬蟲 + Line Bot 結合,完成一個小功能。
想做這個是因為一直以來只有瀏覽總數可以看,不能更即時的了解文章的瀏覽數變化,還會好奇想看別人的,最好是像電影一樣,早上起來有祕書送上報表,各種數據動畫呈現在眼前這樣,當然我也想過這些瀏覽數,可能都是爬蟲程式 ╰( ̄▽ ̄)╭
這篇內容會接續之前介紹的東西,想了解完整過程的讀者可以先看。
[Day02] 使用 C# 建立 LINE Bot 聊天機器人 - LineMessagingApi
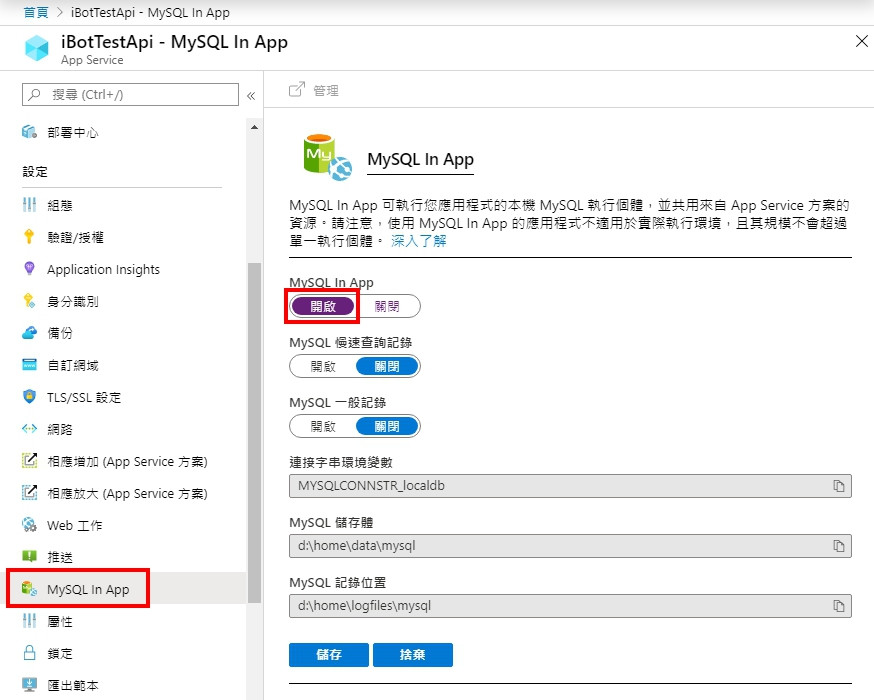
到 App Service 功能頁,開啟 MySQL In App。
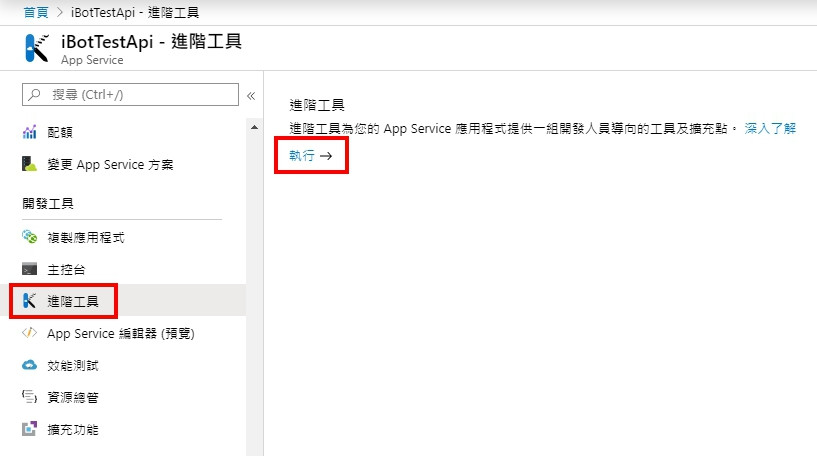
開啟 Kudu 工具。
找到 MySQL 的連線資訊,程式中會用到。
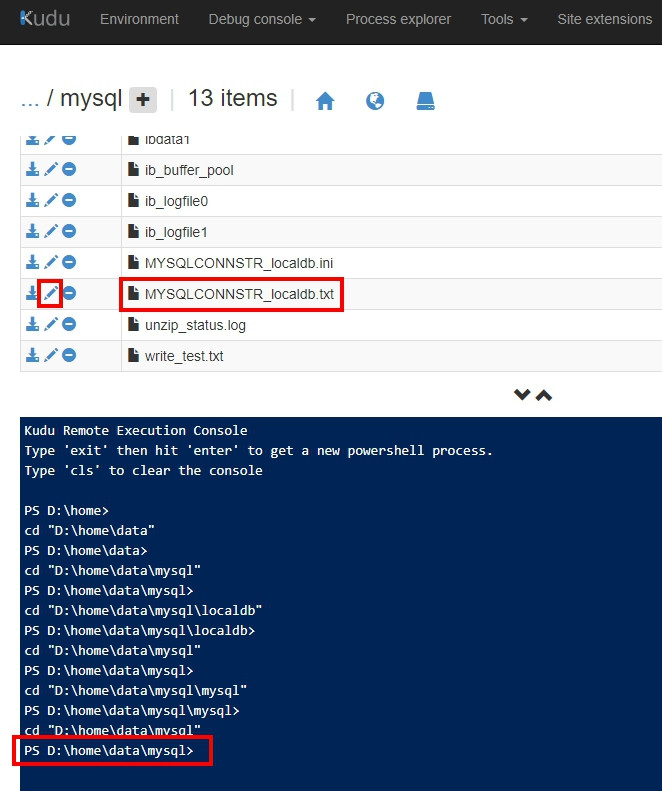
看到的格式應該是長這樣
Database=localdb;Data Source=127.0.0.1:12345;User Id=azure;Password={密碼}
依據上面的需求規劃資料表。
需要一張資料表儲存所有訂閱的網址,爬蟲會根據這張表去爬取資料。
ITHome
| 欄位 | 型態 | 描述 |
|---|---|---|
| Id | int auto | 流水號 |
| Url | string | 網址 |
| Name | string | 姓名 |
| Account | string | 帳號 |
接下來需要一張表儲存主頁下方的所有文章網址和標題。
ITHomeArticle
| 欄位 | 型態 | 描述 |
|---|---|---|
| Id | int auto | 流水號 |
| ITHomeId | int | ITHomeId |
| Url | string | 網址 |
| Title | string | 標題 |
這張表用於儲存每篇文章的瀏覽數,因為每天會爬一次,所以需要從 ITHomeArticle 內獨立出來。
ArticleViewCount
| 欄位 | 型態 | 描述 |
|---|---|---|
| Id | int auto | 流水號 |
| ITHomeArticleId | int | ITHomeArticleId |
| ViewCount | int | 瀏覽數 |
| Datetime | datetime | 日期 |
最後一張表用來記錄使用者的 LineId 和 ITHomeId,表示訂閱了誰。
Subscribe
| 欄位 | 型態 | 描述 |
|---|---|---|
| Id | int auto | 流水號 |
| UserId | string | Line 的識別碼 |
| ITHomeId | int | ITHomeId |
從上方的 管理 按紐可以進入管理介面。
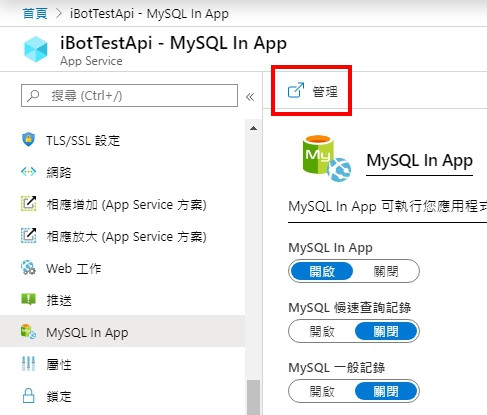
新增資料庫並選擇 utf8_general_ci 定序。
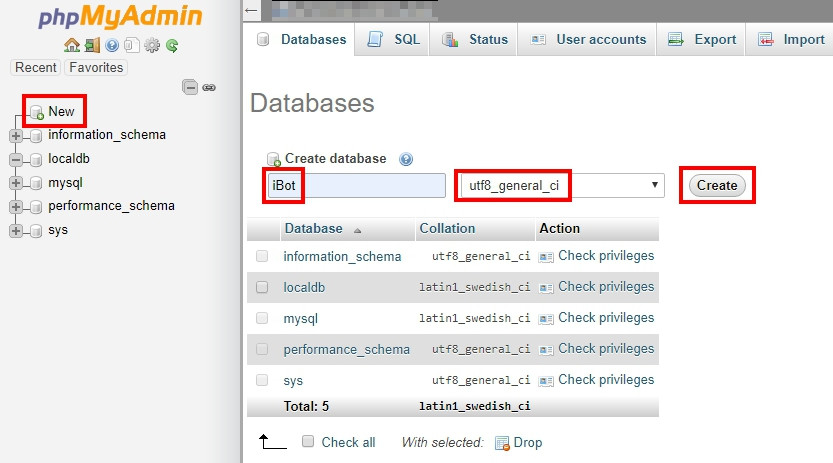
建立資料表就不細講,直接看結果。


如果操作過程中看到下方錯誤,不用緊張,這是因為 MySQL 的資源被回收。
免費方案的 App Service 沒辦法啟用 always on,只要 20 分鐘沒有人使用網站,資源就會被回收,而 MySQL 因為依附在 App Service 上,也一起被回收。
這時只要想辦法觸發一下網站就可以恢復。
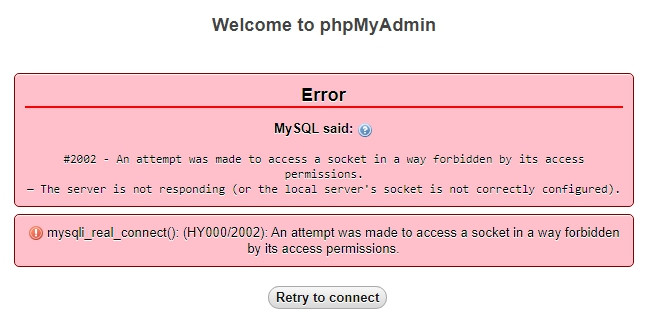
mysqli_real_connect(): (HY000/2002): An attempt was made to access a socket in a way forbidden by its access permissions.
#2002 - An attempt was made to access a socket in a way forbidden by its access permissions.
— The server is not responding (or the local server's socket is not correctly configured).
這個問題我 Google 了三天三夜才找到原因,幫大家清除障礙,各種坑踩好踩滿。
這裡會從 [Day02] 建立的專案接著開始。
需要安裝的套件 (Nuget):
iBotTest
iBot.EF
※補充: 目前 MySQL 還不支援 3.0 以上的 EF,要注意一下版本。
開啟 appsettings.json 加入連線字串,Azure 上的格式無法在 .NET 使用,
需要改變一下。
Database=localdb;Data Source=127.0.0.1:12345;User Id=azure;Password={密碼}
改成
Server=127.0.0.1; Port=12345; Database=iBotTest; Uid=azure; Pwd={密碼}; Character Set=utf8
完整的 appsettings.json
{
  "Logging": {
    "LogLevel": {
      "Default": "Information",
      "Microsoft": "Warning",
      "Microsoft.Hosting.Lifetime": "Information"
    }
  },
  "AllowedHosts": "*",
  "ConnectionStrings": {
    "SQLConnectionString": "Server=127.0.0.1; Port={換成你的PORT}; Database=iBot; Uid=azure; Pwd={換成你的密碼}; Character Set=utf8"
  },
  "LineBot": {
    "channelSecret": "xxx",
    "accessToken": "xxx"
  }
}
接下來就要進入 Entity Framework 設定的部分,主要分為五個步驟:
為什麼不將程式寫在原專案?
這邊是為了下一篇鋪的梗,因為想讓原專案和下一篇的爬蟲共用 EF 程式,所以獨立出去。
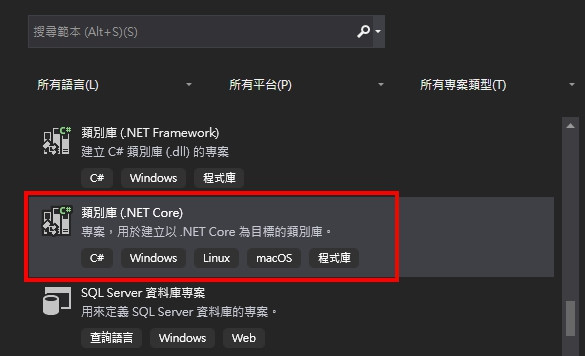
在原方案下新增 iBot.EF 專案,類型選擇 類別庫(.NET Core)。
在新專案新增 Models 資料夾,並建立相應的 Model 類別。
這邊分享一下,平時開發 MsSQL 的習慣,EF 雖然主推 Code First,就是先寫 Model 在透過下指令的方式,讓程式去產生資料表結構,不過我不習慣這樣種做法,我喜歡直接在 SQL Management 新增資料表,然後使用 LINQPad 產生 C# 類別,有在使用 Dapper 的大大,應該也是這樣做。
有興趣的讀者可以參考這篇:
Dapper - 使用 LINQPad 快速產生相對映 SQL Command 查詢結果的類別
正式上線後也是,我會自己寫更新語法,而不是透過下指令的方式讓 Entity Framework 自動更新正式端,當然這都是我自己的個人習慣,僅供參考。
不過這次是 Azure 上的 MySQL,我就不知道可以用什麼工具來產生 Model 類別了,只好乖乖自己手動新增。 Σ(・ω・`|||)
public class ITHome
{
    public int Id { get; set; }
    /// <summary>
    /// 網址
    /// </summary>
    public string Url { get; set; }
    /// <summary>
    /// 姓名
    /// </summary>
    public string Name { get; set; }
    /// <summary>
    /// 帳號
    /// </summary>
    public string Account { get; set; }

    public virtual ICollection<ITHomeArticle> ITHomeArticles { get; set; }

    public virtual ICollection<Subscribe> Subscribes { get; set; }
}
public class ITHomeArticle
{
    public int Id { get; set; }
    public int ITHomeId { get; set; }
    /// <summary>
    /// 網址
    /// </summary>
    public string Url { get; set; }
    /// <summary>
    /// 標題
    /// </summary>
    public string Title { get; set; }

    public virtual ITHome ITHome { get; set; }
    public virtual ICollection<ArticleViewCount> ArticleViewCounts { get; set; }
}
public class ArticleViewCount
{
    public int Id { get; set; }
    public int ITHomeArticleId { get; set; }
    /// <summary>
    /// 瀏覽數
    /// </summary>
    public int ViewCount { get; set; }
    /// <summary>
    /// 日期
    /// </summary>
    public DateTime DateTime { get; set; }

    public virtual ITHomeArticle ITHomeArticle { get; set; }
}
public class Subscribe
{
    public int Id { get; set; }
    /// <summary>
    /// 使用者的 Line 識別碼
    /// </summary>
    public string UserId { get; set; }
    public int ITHomeId { get; set; }

    public virtual ITHome ITHome { get; set; }
}
類別中宣告 virtual 的屬性是用來幹嘛的?
EF 中宣告為 virtual 的屬性稱為 導覽屬性,用來表示資料表之間的關係,例如: 一對一、一對多、多對多,因為資料庫那邊我沒有設真正的關聯,所以這邊的關係是邏輯上的,主要用在 LINQ 可以使用 .Include() 方法,將導覽屬性一起查詢出來,可以產生相關的 JOIN 語法。
//EF 會產生 ITHomes JOIN ITHomeArticles 的語法
var iTHomeList = db.ITHomes.Include(it => it.ITHomeArticles);
為什麼用 Fluent API?
EF 設定屬性有兩種方式,一種是 Fluent API,另一種是 Attribute,這裡不用後者是因為想保持 Model 的乾淨,也是個人喜好。
Attribute 寫法
[Key]   //指定主索引
public int Id { get; set; }
接著介紹幾種 Fluent API 常用的方法。
entity.ToTable("ITHome");
entity.HasKey(p => p.Id);
entity.HasOne(p => p.ITHome).WithMany(p => p.Subscribes)
    .HasForeignKey(p => p.ITHomeId);
entity.HasMany(p => p.ITHomeArticles).WithOne(p => p.ITHome)
    .HasForeignKey(p => p.ITHomeId);
一對多、多對一,只需要設定一邊就好,例如 ITHome 和 ITHomeArticles,只需要在 ITHomeArticle 設定 HasOne 就好,另一邊不用設定。
如果想用 Alternate Keys (替代鍵) 做關聯,可以使用 HasPrincipalKey(),例如: School 主索引是 Id 欄位,但 Students 卻用 School 的其它欄位做關聯。
entity.HasOne(p => p.School).WithMany(p => p.Students)
    .HasForeignKey(p => p.SchoolCode).HasPrincipalKey(p => p.Code);
如果想使用多個欄位做關聯,可以使用匿名物件組合複合鍵。
entity.HasOne(p => p.User).WithMany(p => p.Subjects)
    .HasForeignKey(p => new { p.A, p.B });
還有很多的屬性可以設定,不過我基本上只會設定這幾項,這幾項設定完後 EF 大部分的功能都可以正常使用。
新增 CoreMapper.cs,會將設定相關的程式寫在這裡。
完整程式
public class CoreMapper
{
    public void Map(EntityTypeBuilder<ITHome> entity)
    {
        entity.ToTable("ITHome");
        entity.HasKey(p => p.Id);

        entity.HasMany(p => p.ITHomeArticles).WithOne(p => p.ITHome)
            .HasForeignKey(p => p.ITHomeId);
    }

    public void Map(EntityTypeBuilder<ITHomeArticle> entity)
    {
        entity.ToTable("ITHomeArticle");
        entity.HasKey(p => p.Id);
    }

    public void Map(EntityTypeBuilder<ArticleViewCount> entity)
    {
        entity.ToTable("ArticleViewCount");
        entity.HasKey(p => p.Id);

        entity.HasOne(p => p.ITHomeArticle).WithMany(p => p.ArticleViewCounts)
            .HasForeignKey(p => p.ITHomeArticleId);
    }

    public void Map(EntityTypeBuilder<Subscribe> entity)
    {
        entity.ToTable("Subscribe");
        entity.HasKey(p => p.Id);

        entity.HasOne(p => p.ITHome).WithMany(p => p.Subscribes)
            .HasForeignKey(p => p.ITHomeId);
    }
}
DbContext 是 EF 的核心,可以把它想像成一個虛擬資料庫,裡面有很多資料表,所有的 LINQ 呼叫都會透過它。
只需要將我們建立的 CoreDbContext 繼承 DbContext,並將所有的 Model 和 Mapping 加入,就能得到它所有的功能。
完整的 CoreDbContext.cs
public class CoreDbContext : DbContext
{
    public CoreDbContext(DbContextOptions<CoreDbContext> options)
        : base(options)
    {
    }

    public DbSet<ITHome> ITHomes { get; set; }
    public DbSet<ITHomeArticle> ITHomeArticles { get; set; }
    public DbSet<ArticleViewCount> ArticleViewCounts { get; set; }
    public DbSet<Subscribe> Subscribes { get; set; }

    protected override void OnModelCreating(ModelBuilder modelBuilder)
    {
        var mapper = new CoreMapper();

        modelBuilder.Entity<ITHome>(entity => mapper.Map(entity));
        modelBuilder.Entity<ITHomeArticle>(entity => mapper.Map(entity));
        modelBuilder.Entity<ArticleViewCount>(entity => mapper.Map(entity));
        modelBuilder.Entity<Subscribe>(entity => mapper.Map(entity));
    }
}
最後一步了,開啟原專案的 Startup.cs 加入以下程式就完成了。
這段程式的意思是,在 DI 註冊我們的 CoreDbContext,使用 MySQL 資料庫 .UseMySQL(),並指定連線字串為 SQLConnectionString。
services.AddDbContext<CoreDbContext>(options =>
{
    options.UseMySQL(Configuration.GetConnectionString("SQLConnectionString"));
});
完整的 Startup.cs
public class Startup
{
    public Startup(IConfiguration configuration)
    {
        Configuration = configuration;
    }

    public IConfiguration Configuration { get; }


    public void ConfigureServices(IServiceCollection services)
    {
        services.AddDbContext<CoreDbContext>(options =>
        {
            options.UseMySQL(Configuration.GetConnectionString("SQLConnectionString"));
        });

        services.AddSingleton<LineBotConfig, LineBotConfig>((s) => new LineBotConfig
        {
            channelSecret = Configuration["LineBot:channelSecret"],
            accessToken = Configuration["LineBot:accessToken"]
        });

        services.AddHttpContextAccessor();
        services.AddRazorPages();
    }

    public void Configure(IApplicationBuilder app, IWebHostEnvironment env)
    {
        if (env.IsDevelopment())
        {
            app.UseDeveloperExceptionPage();
        }

        app.UseRouting();

        app.UseEndpoints(endpoints =>
        {
            endpoints.MapControllerRoute(
                name: "api",
                pattern: "api/{controller=Home}/{action=Index}/{id?}");
            endpoints.MapRazorPages();
        });
    }
}
目前的 iBot.EF 目錄
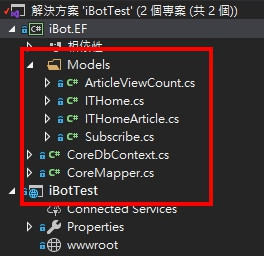
到這裡 EF 已經設定完成,接著介紹如何在 Controller 內使用。
開啟 LineBotController.cs,在建構式中新增 CoreDbContext 參數,取得 DI 產生的實體。
使用 DI 的好處是,DI 可以幫我們控制 CoreDbContext 的生命週期,一個 Request 內只會產生一次實體,並在 Request 結束後自動釋放資源,如果我們自己 new 則不可控。
...
private readonly CoreDbContext _db;

public LineBotController(
    ...
    CoreDbContext db)
{
    ...
    _db = db;
}
接著再將 CoreDbContext 傳入 LineBotApp.cs。
var lineBotApp = new LineBotApp(lineMessagingClient, _db);
await lineBotApp.RunAsync(events);
完整的 LineBotController.cs
[Route("api/linebot")]
public class LineBotController : Controller
{
    private readonly IHttpContextAccessor _httpContextAccessor;
    private readonly HttpContext _httpContext;
    private readonly LineBotConfig _lineBotConfig;
    private readonly ILogger _logger;
    private readonly CoreDbContext _db;

    public LineBotController(IServiceProvider serviceProvider,
        LineBotConfig lineBotConfig,
        ILogger<LineBotController> logger,
        CoreDbContext db)
    {
        _httpContextAccessor = serviceProvider.GetRequiredService<IHttpContextAccessor>();
        _httpContext = _httpContextAccessor.HttpContext;
        _lineBotConfig = lineBotConfig;
        _logger = logger;
        _db = db;
    }

    [HttpPost("run")]
    public async Task<IActionResult> Post()
    {
        try
        {
            var events = await _httpContext.Request.GetWebhookEventsAsync(_lineBotConfig.channelSecret);
            var lineMessagingClient = new LineMessagingClient(_lineBotConfig.accessToken);

            var lineBotApp = new LineBotApp(lineMessagingClient, db);
            await lineBotApp.RunAsync(events);
        }
        catch (Exception ex)
        {
            _logger.LogError(JsonConvert.SerializeObject(ex));
        }
        return Ok();
    }
}
調整 LineBotApp 建構式。
private readonly LineMessagingClient _messagingClient;
private readonly CoreDbContext _db;

public LineBotApp(LineMessagingClient lineMessagingClient,CoreDbContext db)
{
    _messagingClient = lineMessagingClient;
    _db = db;
}
終於好了,有點繁瑣 ~~~
可以開始寫測試程式了,簡單寫就好,邏輯如下。
當使用者輸入 訂閱 https: //xxxxx 時,就將資料寫入 ITHome。
黨使用者輸入 查詢 時,將剛剛儲存的資料回傳給使用者。
LineBotApp.cs 程式如下
public class LineBotApp : WebhookApplication
{
    private readonly LineMessagingClient _messagingClient;
    private readonly CoreDbContext _db;

    public LineBotApp(LineMessagingClient lineMessagingClient, CoreDbContext db)
    {
        _messagingClient = lineMessagingClient;
        _db = db;
    }

    protected override async Task OnMessageAsync(MessageEvent ev)
    {
        var result = null as List<ISendMessage>;

        switch (ev.Message)
        {
            //文字訊息
            case TextEventMessage textMessage:
                {
                    //頻道Id
                    var channelId = ev.Source.Id;
                    //使用者Id
                    var userId = ev.Source.UserId;

                    //當使用者輸入訂閱時
                    {
                        var regex = new Regex(@"(?=^訂閱[\s]*)?(https:[\S]+)", RegexOptions.IgnoreCase);
                        var match = regex.Match(textMessage.Text);
                        if (match.Success)
                        {
                            //新增一筆資料
                            var iTHome = new ITHome
                            {
                                Url = $"{match.Value}",
                                Name = "測試",
                                Account = "abc"
                            };
                            _db.ITHomes.Add(iTHome);
                            await _db.SaveChangesAsync();

                            //回傳訊息
                            result = new List<ISendMessage>
                            {
                                new TextMessage("新增成功!!")
                            };
                            break;
                        }
                    }

                    //當使用者輸入查詢時
                    {
                        var regex = new Regex(@"^查詢[\s]*$", RegexOptions.IgnoreCase);
                        if (regex.IsMatch(textMessage.Text))
                        {
                            //取得第一筆資料
                            var iTHome = await _db.ITHomes.FirstOrDefaultAsync();

                            //回傳訊息
                            result = new List<ISendMessage>
                            {
                                new TextMessage(JsonConvert.SerializeObject(iTHome))
                            };
                            break;
                        }
                    }
                }
                break;
        }

        if (result != null)
            await _messagingClient.ReplyMessageAsync(ev.ReplyToken, result);
    }
}
程式中沒有看到任何的 SQL 語法,新增、修改、刪除、查詢,都可以用 LINQ 完成。
接著將程式部屬,測試看看結果如何。
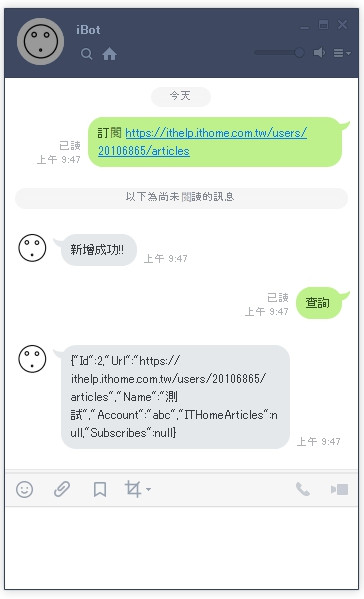
資料庫出現了新增的資料。

這篇簡單的介紹了 EF 的用法,不過這些都是我個人的習慣,僅供參考。
接下來和大家分享一些心得,我一直以來都不喜歡 ORM 和資料庫綁太死,這也是我跑去用 Dapper 的原因,不過新版的 EF Core 給我的感覺是越來越輕量,比起遠古的版本真的進步很多。
我開頭提到的誤解是,我以前認為 EF 一定要使用指令管理版本 「Migrations」,不過正式環境更新資料庫,一般不會讓 EF 直接連過去下指令,會自己寫 SQL 語法,因此 Migrations 對我來說是一個困擾。
還有關聯的問題,有些舊資料庫,是不設 SQL 關聯的,只有邏輯上的關聯,如果用 Migrations 管理,EF 一定會將 「導覽屬性」 設為關聯,這樣就破壞了原資料庫的結構,動舊資料庫的結構是件很可怕的事。
可以看到文中我完全沒有提到 Migrations,資料表之間的關聯也只是邏輯上的,EF 還是可以正常運作,所以我才說我誤解了 EF,不過不知道是不是最近才改成這樣,歡迎有經驗的大大分享。
下一篇會介紹,製作 Line Bot 最不可少的 「爬蟲」,我會將爬蟲程式會部屬在 Webjob 上,並透過 Logic App 定時呼叫,抓取 it 幫的文章瀏覽數。
今天就到這裡,感謝大家觀看。 (́◕◞౪◟◕‵)*
