這個題目是從六角的F2E精神時光屋裡面的[第六關 - 旅館預約服務]來的
裡面有各種大神前輩們做的UI及實作出來的頁面
就算颱風來也要coding
後面幾週就來用幾個題目實作出作品出來吧
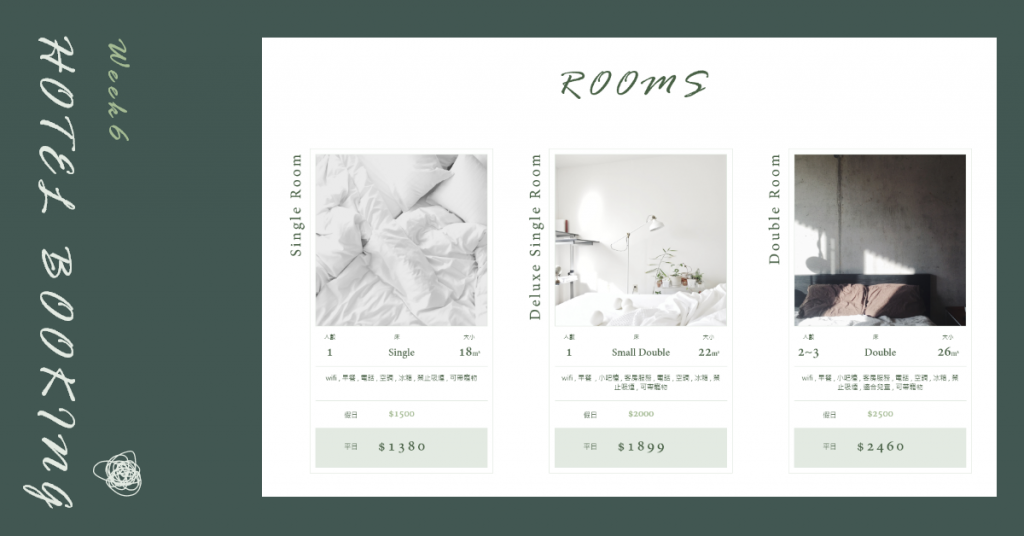
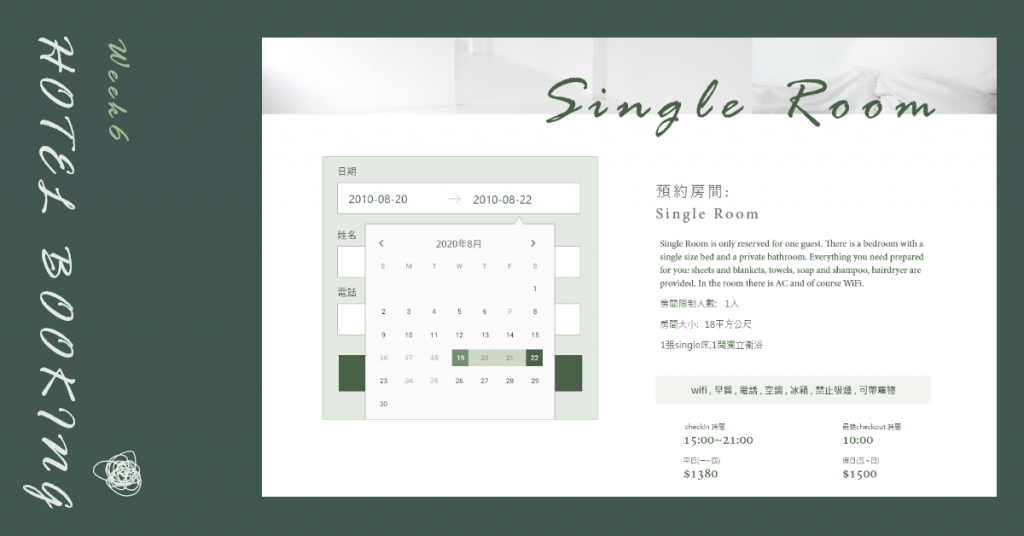
這裡選了一個Miss_Y大神做的美美的UI
希望我有辦法把它實作出來(不然就糗了)
事不宜遲, 既然挑好題目就馬上開始做吧~
首先, 建置專案的部分使用Vue Cli小秘書幫我們做吧~
忘記怎麼做的可以看一下前面這篇讓Vue Cli小秘書跟你一起做
於是乎我們做就建置完成了 (偷懶)
上一次介紹小秘書給大家時, 沒有提到專案架構的部分
這邊來介紹一下
首先先來放上專案架構圖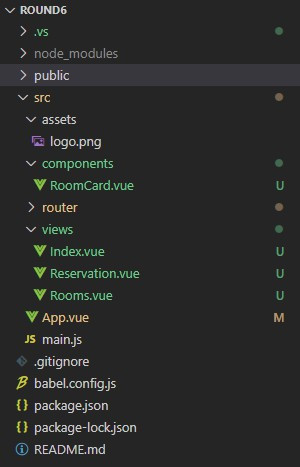
讓我上一些筆記
結束xD
上面圖中我們有看到在components及views資料夾中都有一些vue檔
這邊來介紹一下vue檔是什麼
vue檔是一個元件檔, 裡面會放1個元件, 注意喔~是1個元件~不能放2個喔~
它就像把做好的Vue.component整個放進去一樣
並且可以用單獨的css去美化
它的結構分為三個區塊
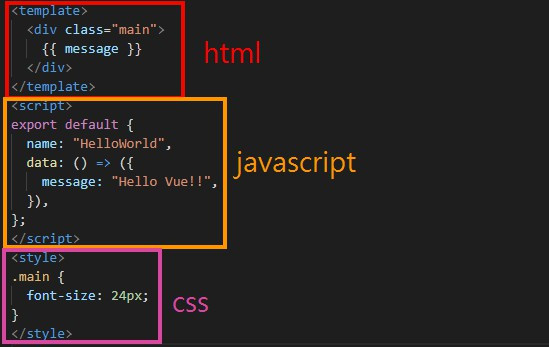
其中比較不同的是script的部分, 需要加上export default來設定元件的配置
其他用法都與Vue.component相同
最後做一個頁面分析這週就結束
我們可以看到這UI大致分為三頁
可以看到我們會需要做出這些元件
於是乎, 就先在views及components資料夾中建立這些檔案吧~
接著我們先建立好頁面router, 頁面分兩頁, 建立在views資料夾內
兩頁檔案中都先只放一個div, 內容是自己的名子
//Index.vue
<template>
  <div>Index</div>
</template>
//Reservation.vue
<template>
  <div>Reservation</div>
</template>
接著開啟router資料夾裡面的index.js, 把這兩頁的routes設定加上吧~
忘記vue-router的人可以參考一下前面這篇Vue Router分頁好蚌蚌
//router/index.js
import Vue from 'vue'
import VueRouter from 'vue-router'
import Index from '../views/Index.vue' //引用Index元件
import Reservation from '../views/Reservation.vue' //引用Reservation元件

Vue.use(VueRouter)

//加入routes設定
const routes = [
  {
    path: '/',
    name: 'Index',
    component: Index
  },
  {
    path: '/reservation',
    name: 'Reservation',
    component: Reservation
  },
  {
    path: '*',
    redirect: '/',
  },
]

const router = new VueRouter({
  mode: 'history',
  base: process.env.BASE_URL,
  routes
})

export default router
最後在App.vue上記得加上router-view節點
可以另外加上兩個router-link來測試看看有沒有成功~
//App.vue
<template>
  <div id="app">
    <router-link to="/">Index</router-link>
    <router-link to="/reservation">Reservation</router-link>
    <router-view />
  </div>
</template>
<script>
export default {
  name: "App",
  data: () => ({}),
};
</script>
有成功切換頁面就可以休息了 哈哈
今天就先做到頁面router建立完成囉~
下週繼續~~
 餅乾
餅乾
