技術文章
技術問答
My Project
iT 徵才
聊天室
2026 鐵人賽
登入/註冊
文章
問答
Tag
邦友
鐵人賽
搜尋
第 12 屆 iThome 鐵人賽
DAY
10
0
DevOps
淺談 Istio
系列 第
10
篇
實作 istio helm3 部署(中)
12th鐵人賽
Eddie
團隊
神龍特攻隊-為了燒肉不小心成為一條龍
2020-09-18 12:20:28
1053 瀏覽
分享至
前言:
安裝與設定 istio-init istio gateway
Istio 部署
因為Istio會獨立在叢集中的一個namespace 所以需先建立namespace 以下安裝Istio-init
kubectl create namespace istio-sysyem
helm install -n istio-system istio-init ./istio-init (安裝istio-init)
kubectl -n istio-system wait --for=condition=complete job --all
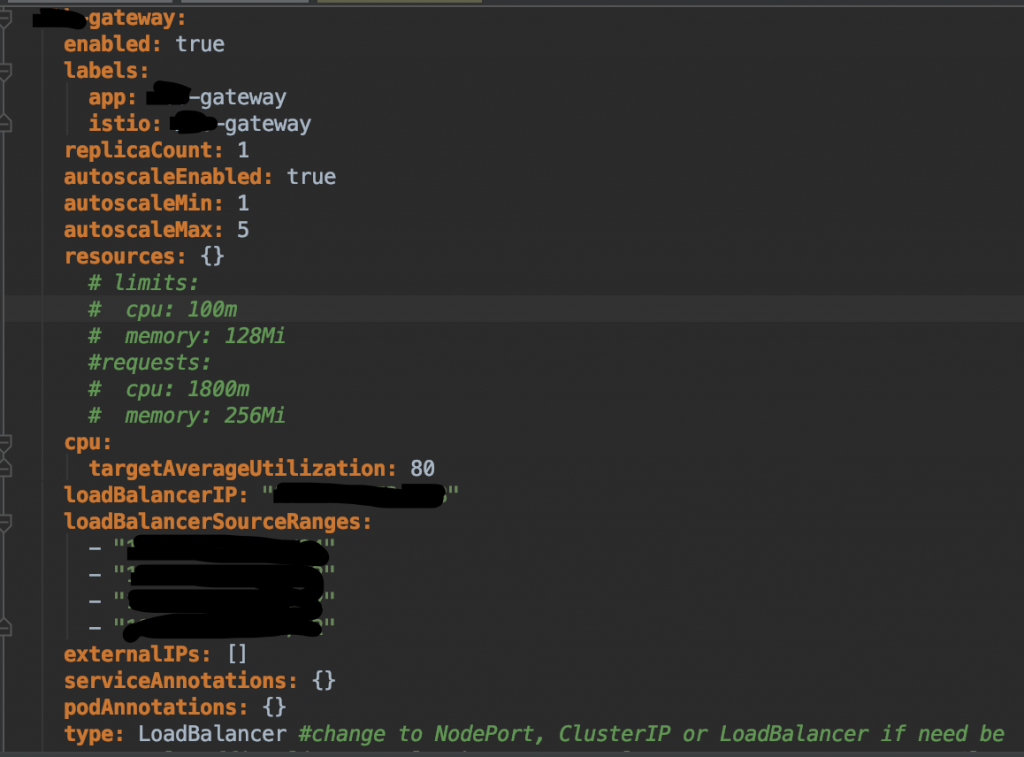
建立Istio 這邊安裝在1.4.2版本可在value.yaml檔中設定監控,gateway,IP 泛指所有相關網路IP Port部份都可以在這邊設置,甚至可以建立多組gateway,可參考下圖
labels部分需要設定與後面kind gateway相同名稱
loadBalancerIP 可以"指定"設置你所想要的固定IP
因為是LoadBalancer Service安全性考量,loadBalancerSourceRanges 部分也需要設置可以連線的IP range在GCP上會系統產生對應防火牆確保安全性
HPA 部分可在autoscaleMin autoscaleMax參數設定
最後就是設定port對應服務與憑證,port這部分基本上不太需要去手動更動除非有特別需要使用到的port號,還有一部份就是憑證在後面幾天會在細說~
建立Istio monitor 也可以在value.yaml 開啟設定,預設會是關閉若需要也記得打開(另外自己有遇到一個問題若想要收集Istio access log 像是nginx access log東西,也在value.yaml accessLogFile這個key 補上這字串accessLogFile: "/dev/stdout" pod 便會收集log但相對的硬碟使用量也會升高~)
留言
追蹤
檢舉
上一篇
實作 istio helm3 部署(上)
下一篇
實作 istio helm3 部署(下)
系列文
淺談 Istio
共
30
篇
目錄
RSS系列文
訂閱系列文
12
人訂閱
26
GCP K8S Istio建置(三)
27
Istio 1.7
28
Istio轉變
29
使用Istio理由
30
心得 淺談Istio
完整目錄
熱門推薦
{{ item.subject }}
{{ item.channelVendor }}
|
{{ item.webinarstarted }}
|
{{ formatDate(item.duration) }}
直播中
立即報名
尚未有邦友留言
立即登入留言
看影片追技術
看更多
{{ item.subject }}
{{ item.channelVendor }}
|
{{ formatDate(item.duration) }}
直播中
熱門tag
15th鐵人賽
16th鐵人賽
13th鐵人賽
14th鐵人賽
17th鐵人賽
12th鐵人賽
11th鐵人賽
鐵人賽
2019鐵人賽
javascript
2018鐵人賽
python
2017鐵人賽
windows
php
c#
linux
windows server
css
react
熱門問題
WSUS伺服器近期客戶端更新都會出現0x80244010
vs code不能執行npm找了很多方法
outlook2024 郵件圖檔無法顯示的情況
哪款防毒+EDR+雲端中控台比較好用?
熱門回答
vs code不能執行npm找了很多方法
WSUS伺服器近期客戶端更新都會出現0x80244010
outlook2024 郵件圖檔無法顯示的情況
熱門文章
[Tedium Is Stability-02] 與 AI 一起開發,看見冰山:一個「功能」,其實是一組沒說出口的隱形契約
【AI Agent 架構】從 0 開始學 AI Agent ,含 22 章完整教學
清洗 14 年台灣實價登錄資料,我踩到的坑
網站設計師每天聚集的 Stack Overflow 平台,最近在 2026 中旬更換了全新品牌 Logo 形象,但社群反應兩極
龜先生奧援開發到底花生省魔術:#1 開工吧?
IT邦幫忙
×
標記使用者
輸入對方的帳號或暱稱
Loading
找不到結果。
標記
{{ result.label }}
{{ result.account }}