前陣子朋友跟我說了一個需求,思考了一下想說花的時間不多順手就做了
自動將Gmail信件的附檔分類並儲存至Google Drive指定的資料夾
朋友說以往都是每個信件手動下載再逐一上傳,他稱之為歸檔的動作
這是主要也是唯一的頁面,首先要進行登入,就如同一般使用Google登入會詢問權限相關的描述,反正就同意下一步就對了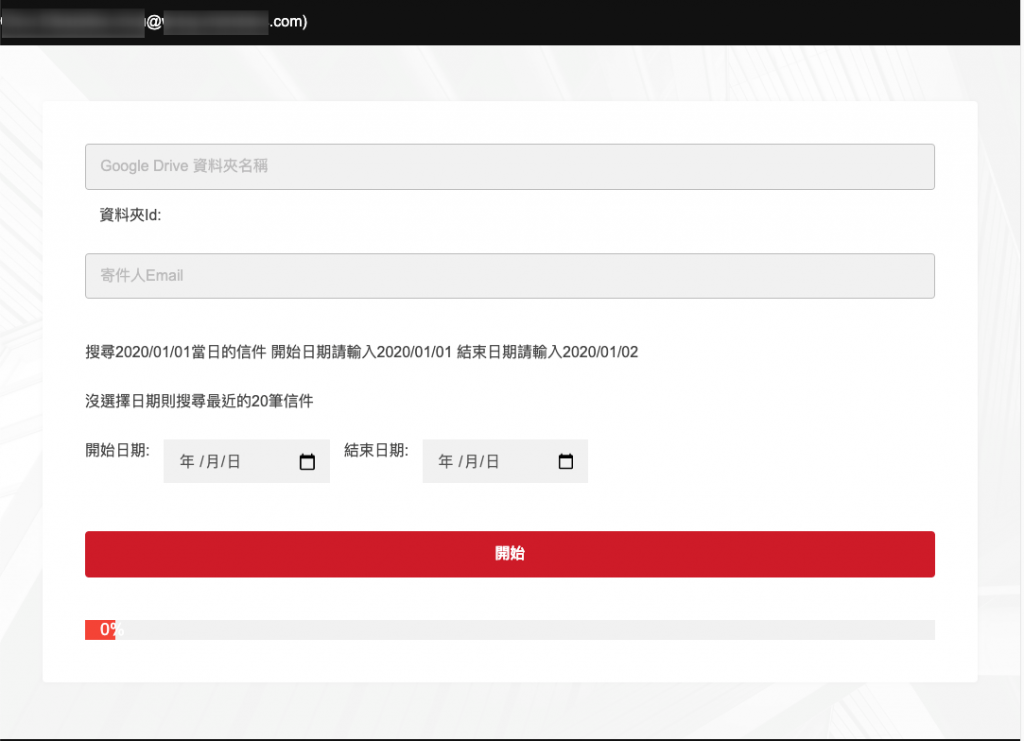
接下來建置一個資料夾,準備歸檔用,我就建了一個Test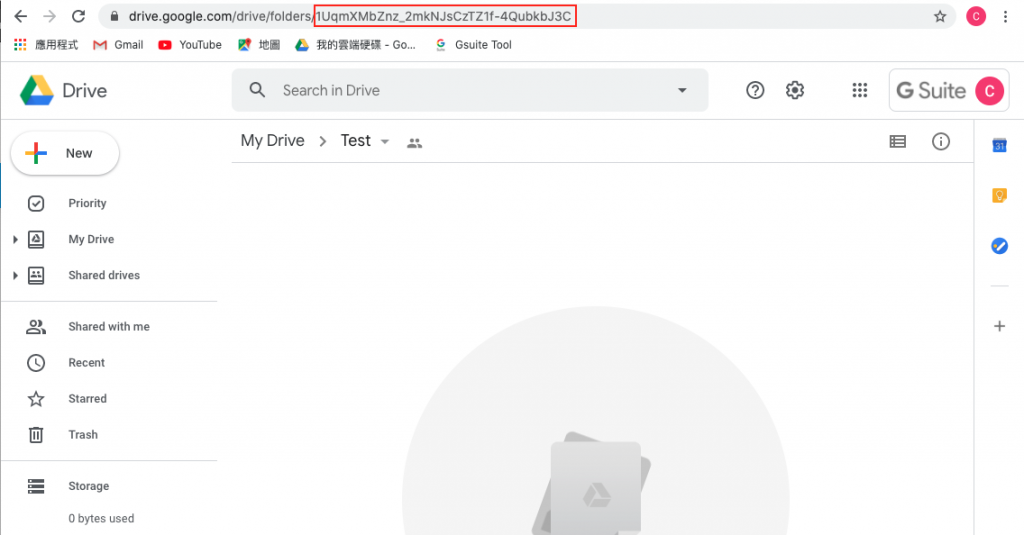
然後必須將資料夾權限分享給Service account,這個Service account後續技術部份會再說明,如果沒分享的話帳號沒有權限操作Google Drive是沒辦法正常運作的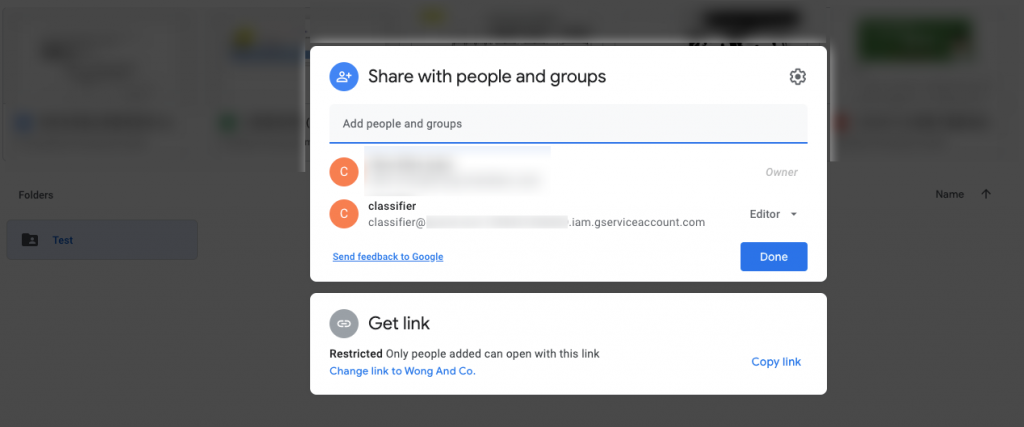
最後再回到主畫面,找到資料夾,確認自動對應上的ID是否正確,然後就開始歸檔啦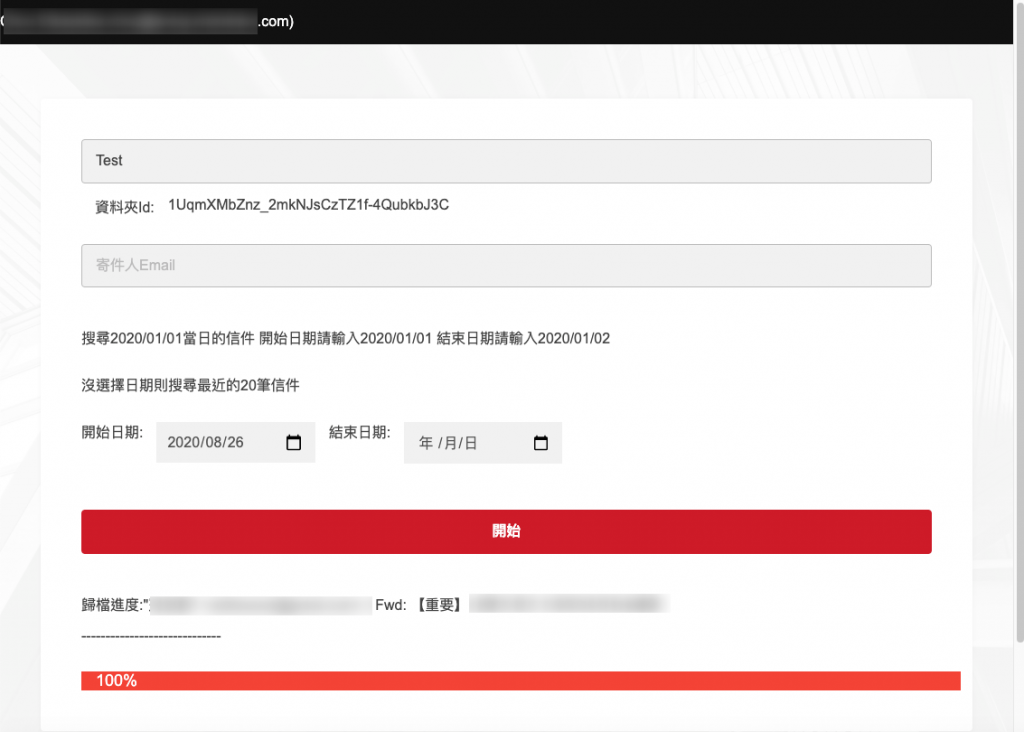
前端Html, css, javascript
後端Nodejs
前端Google Login,透過帳號oauth呼叫Gmail API取得信件列表
-> 透過信件列表的ID逐一取得每個信件的詳細資料(附加檔案為Base64格式)
-> 將附加檔案透過內部API傳送至Nodejs後端
-> 後端將檔案暫存至Server
-> 呼叫Drive上傳檔案API
-> 刪除暫存在Server的檔案
相關的權限、帳號需要申請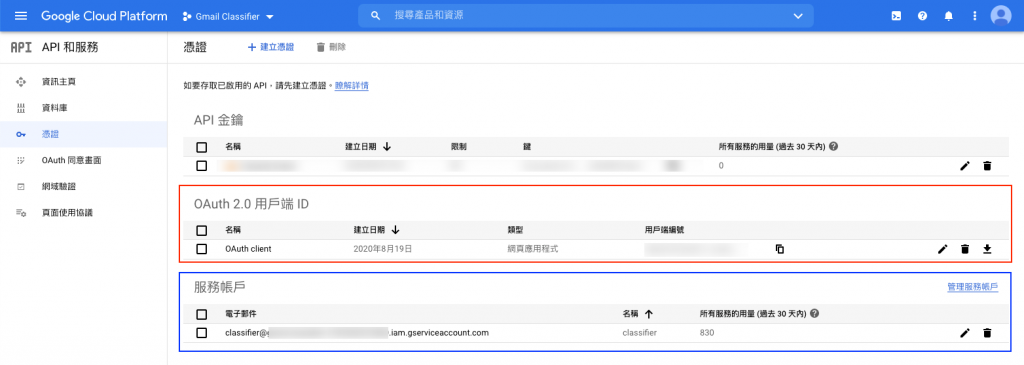
紅色框的OAuth是給前端Google登入 access gmail使用的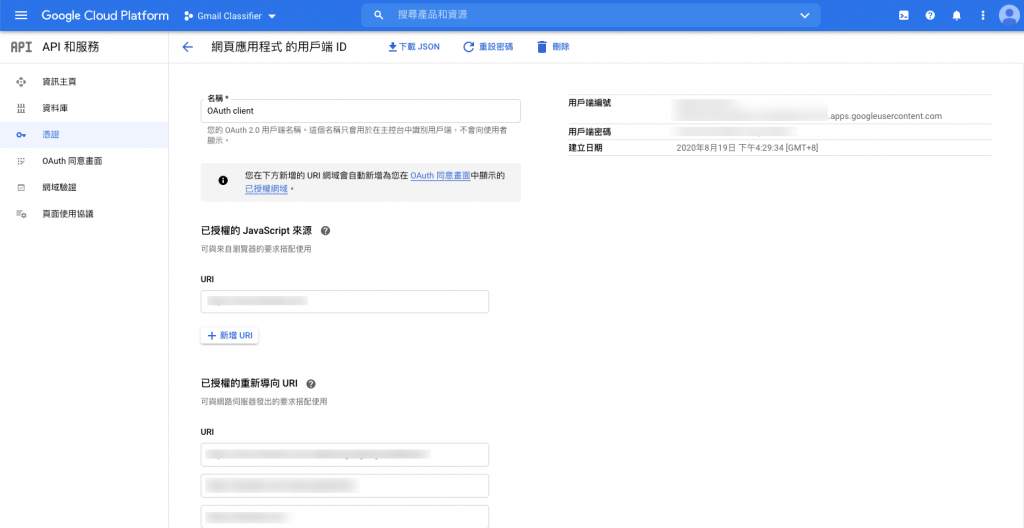
藍色框則Service account則是Drive需要的
這邊需要自行新增金鑰,這個金鑰會是Nodejs後端需要用到的身份驗證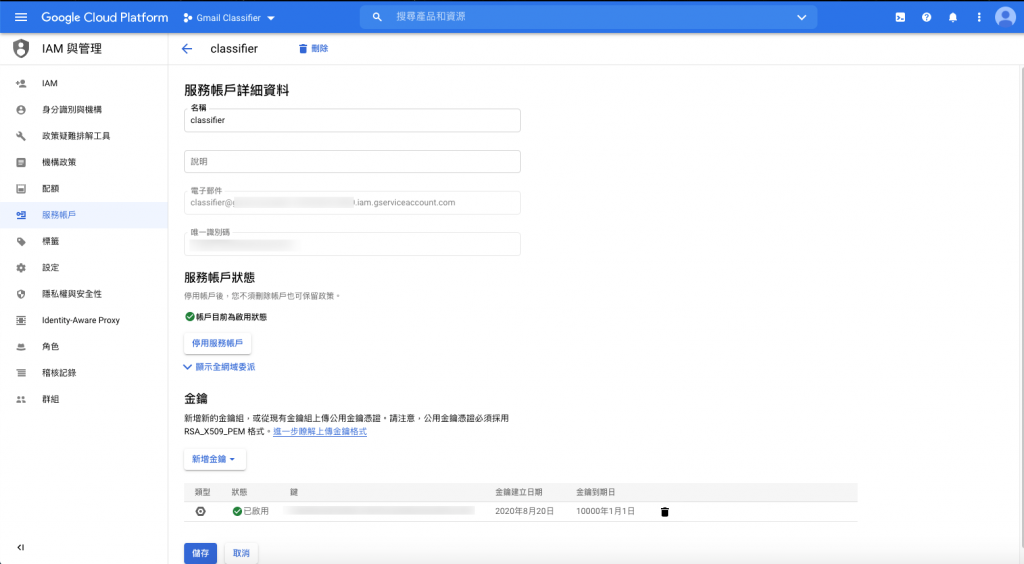
這邊就是基本的初始化設定
"google-signin-client_id" = 前置作業紅框的 OAuth用戶端編號
<meta name="google-signin-client_id" content="YOUR_CLIENT_ID.apps.googleusercontent.com">
<script src="https://apis.google.com/js/client.js?onload=loadAPIs" async defer></script>
<script src="https://apis.google.com/js/platform.js?onload=renderButton" async defer></script>

function loadAPIs() {
    gapi.client.load('gmail', 'v1');
}

function renderButton() {
    var gmailScope = 'https://www.googleapis.com/auth/gmail.readonly';
    gapi.signin2.render('signin', {
        'scope': ['profile', gmailScope].join(' '),
        'onsuccess': onSigninSuccess,
        'onfailure': onSigninFailure
    });
}
讀取Gmail信件,大致上是使用SDK呼叫,比較麻煩的是query部分的語法,雖然官網上都有各自的教學,但是在多條件合併使用的時候還是要注意一下,印象中連has:attachment擺前或後都有影響到搜尋結果(導致錯誤),可能我英文不太好所以沒有非常清晰的了解,各位看官可以親自去體驗一下
gapi.load('client:auth2', () => {
    gapi.client.load('gmail', 'v1', () => {
        var query = ''
        //after:2020-08-01 before:2020-08-10
        if($('#startDate').val() != '') {
            query = 'after:' + $('#startDate').val()
        }
        if($('#endDate').val() != '') {
            query += ' before:' + $('#endDate').val()
        }

        query += ' has:attachment'
        if($('#email').val() != '') {
            query += ' from:' + $('#email').val()
        }
        else {
            query += ' from:-' + profile.bu
        }

        // q=in:sent after:2014/01/01 before:2014/02/01
        var userId = profile.getId()
        var request = gapi.client.gmail.users.messages.list({
            userId: userId,
            q: query,
            maxResults: 20
        });

        request.execute(function(resp) {
            var messages = resp.messages;
            if(messages && messages.length > 0) {
                requestFullEmailMessage(userId, messages, 0, function() {
                })
            }
        });
    });
})
用遞迴的方式逐一讀取每一封Email的內容
function requestFullEmailMessage(userId, messages, index, callback) {
    var message = messages[index]
    var fullMessageRequest = gapi.client.gmail.users.messages.get({
        userId: userId,
        id: message.id
    });
    fullMessageRequest.execute(function(fullMessage) {
        var from = getFromEmail(fullMessage.payload.headers)
        var subject = getSubject(fullMessage.payload.headers)

        if(fullMessage.payload.parts && fullMessage.payload.parts.length > 0) {
            startCheckAndCreateFolder(fullMessage.id, fullMessage.payload.parts, 0, from, subject, function() {
                if(index + 1 < parseInt(messages.length)) {
                    requestFullEmailMessage(userId, messages, index + 1, callback)
                } else {
                    callback()
                }
            })
        }
    });
}
同樣是使用遞迴的方式,呼叫SDK的方法attachments.get另外取得附件資料
取得附件Base64資料後,呼叫本地的checkAndCreateFolder建置歸檔的資料夾
確認目的地存在後在呼叫saveAndUploadFile將Base64附件資料上傳至後端
function startCheckAndCreateFolder(messageId, payloadParts, index, folderName, subject, callback){
    var part = payloadParts[index]
    if(part.body.attachmentId && part.filename) {
        var attachmentId = part.body.attachmentId;
        var request = gapi.client.gmail.users.messages.attachments.get({
            'id': attachmentId,
            'messageId': messageId,
            'userId': 'me'
        });
        request.execute(function (attachment) {
            $.ajax({
                type: 'POST',
                url: '/api/gsuite/checkAndCreateFolder',
                data: {
                    "parentId": "Google Drive資料夾ID",
                    "folderName": folderName
                },
                success: function(result) {
                    if(result.status == true) {
                        var requestFileData = {
                            mime: part.mimeType,
                            filename: part.filename,
                            folderId: result.data.id,
                            data: attachment.data
                        }
                        $.ajax({
                            type: 'POST',
                            url: '/api/gsuite/saveAndUploadFile',
                            contentType: "application/json; charset=utf-8",
                            dataType: "json",
                            data: JSON.stringify(requestFileData),
                            success: function(uploadResult) {
                                if(index + 1 < payloadParts.length) {
                                    startCheckAndCreateFolder(messageId, payloadParts, index + 1, folderName, subject, callback)
                                } else {
                                    callback()
                                }
                            },
                            error:function(XMLHttpRequest, textStatus){
                                startCheckAndCreateFolder(messageId, payloadParts, index + 1, folderName, subject, callback)
                            }
                        });
                    } else {
                        callback()
                    }
                },
                error:function(XMLHttpRequest, textStatus){
                    startCheckAndCreateFolder(messageId, payloadParts, index + 1, folderName, subject, callback)
                }
            });
        });
    } else if(index + 1 < payloadParts.length){
        startCheckAndCreateFolder(messageId, payloadParts, index + 1, folderName, subject, callback)
    } else {
        callback()
    }
}
接下來來到後端的部分
首先第一個API是checkAndCreateFolder,功能是建置當下檔案要存放的資料夾
那這邊客戶的需求是只要按執行當下月份分類就可以,所以基本上只需要執行一次
這邊使用到的gsuiteHelper drive.files是googleapis sdk可以直接到npm這邊查看
https://www.npmjs.com/package/googleapis
其他參數我就不細講,這邊完全是根據客戶的需求去調整設定,如果方法執行沒有達到預想的效果,可以到文檔查詢一下有哪些設定值可以修改,調整一下或許就沒問題了
https://developers.google.com/drive/api/v3/enable-shareddrives
exports.checkAndCreateFolder = function(req, res) {
  var parentId = req.body.parentId
  var folderName = new Date().toISOString().substring(0, 7)
  folderName = folderName.split("-").join("");
  gsuiteHelper.listByParentId(parentId, function(err, folders) {
    var targetFolder = null
    folders.forEach(folder => {
      if(folder.name == folderName) {
        targetFolder = folder
      }
    });

    if(targetFolder == null) {
      gsuiteHelper.createFolder(parentId, folderName, function(err, folder) {
        //response
      })
    } else {
      // response
    }
  })
}

//gsuiteHelper
exports.listByParentId = function(parentId, callback) {
  drive.files.list({
      q: "trashed=false and '" + parentId + "' in parents",
      includeItemsFromAllDrives: true,
      supportsAllDrives: true
    }, (err, driveRes) => {
      if (err) {
          callback(err, null)
      }
      else {
          const files = driveRes.data.files;
          callback(null, files)
      }
  });
}

//gsuiteHelper
exports.createFolder = function(parentId, folderName, callback) {
  var fileMetadata = {
    'name': folderName,
    'mimeType': 'application/vnd.google-apps.folder',
    'parents': [parentId]
  };
  drive.files.create({
    resource: fileMetadata,
    fields: 'id',
    supportsAllDrives: true,
    supportsTeamDrives: true
  }, function (err, file) {
    if (err) {
      callback(err, null)
    } else {
      callback(null, file)
    }
  });
}
到了最後一步saveAndUploadFile API
這邊是用fs套件做本地的檔案讀寫操作
首先要確認資料夾是否可以讀寫(通常我都會先手動chmod),再將Base64資料轉為檔案存在Server指定的資料夾
存下後在呼叫drive.files.create API上傳檔案到Drive,確認完成後再刪除Server暫存檔,避免佔空間
exports.saveAndUploadFile = function(req, res) {
  var tmpFolder = './privateFile/uploads'
  var tmpFile = './privateFile/uploads/' + req.body.filename;
  fs.access(tmpFolder, fs.constants.F_OK | fs.constants.W_OK, (err) => {
    if (err) {
      //response err
    } else {
      fs.writeFile(tmpFile, req.body.data, { encoding: 'base64' }, function(err) {
        if(err) {
          //response err
        } else {
          gsuiteHelper.createFile({
            'name': req.body.filename,
            'parents': [req.body.folderId]
          }, {
            mimeType: req.body.mime,
            body: fs.createReadStream(tmpFile)
          }, function(err, result) {
            if(err) {
              //response err
            } else {
              if(result.status == 200) {
                fs.unlink(tmpFile, function() {
                  resultHelper.responseSuccess(res, result.data);
                });
              } else {
                //response err
              }
            }
          })
        }
      });
    }
  });
}

//gsuiteHelper
exports.createFile = function(fileMetadata, media, callback) {
  drive.files.create({
    resource: fileMetadata,
    media: media,
    fields: 'id',
    supportsAllDrives: true,
    supportsTeamDrives: true
  }, function (err, file) {
    if (err) {
      callback(err, null)
    } else {
      callback(null, file)
    }
  });
}
整個功能到這邊是算完成了,上面這些是局部的程式,有些地方我手動刪除了,不過重點都有在
其實這次開發滿多地方寫的滿髒的,有些方法也用得不好,例如遞迴、或重複檢查資料夾是否存在,都可以再進行優化。
不過使用的人很少,量很小,也沒收錢,做事也是要考量一下成本,就算啦
有任何開發外包工作,或者產品開發都歡迎找我討論
產品部分可以視情況接受事後分潤的方式共同創業
Email: softicecan@gmail.com
 MarcusLiu

 iThome鐵人賽