這個 Topic 很大
所以會分做幾個階段來說
因為我主要都在使用 Redux-saga
這部份的解說較多
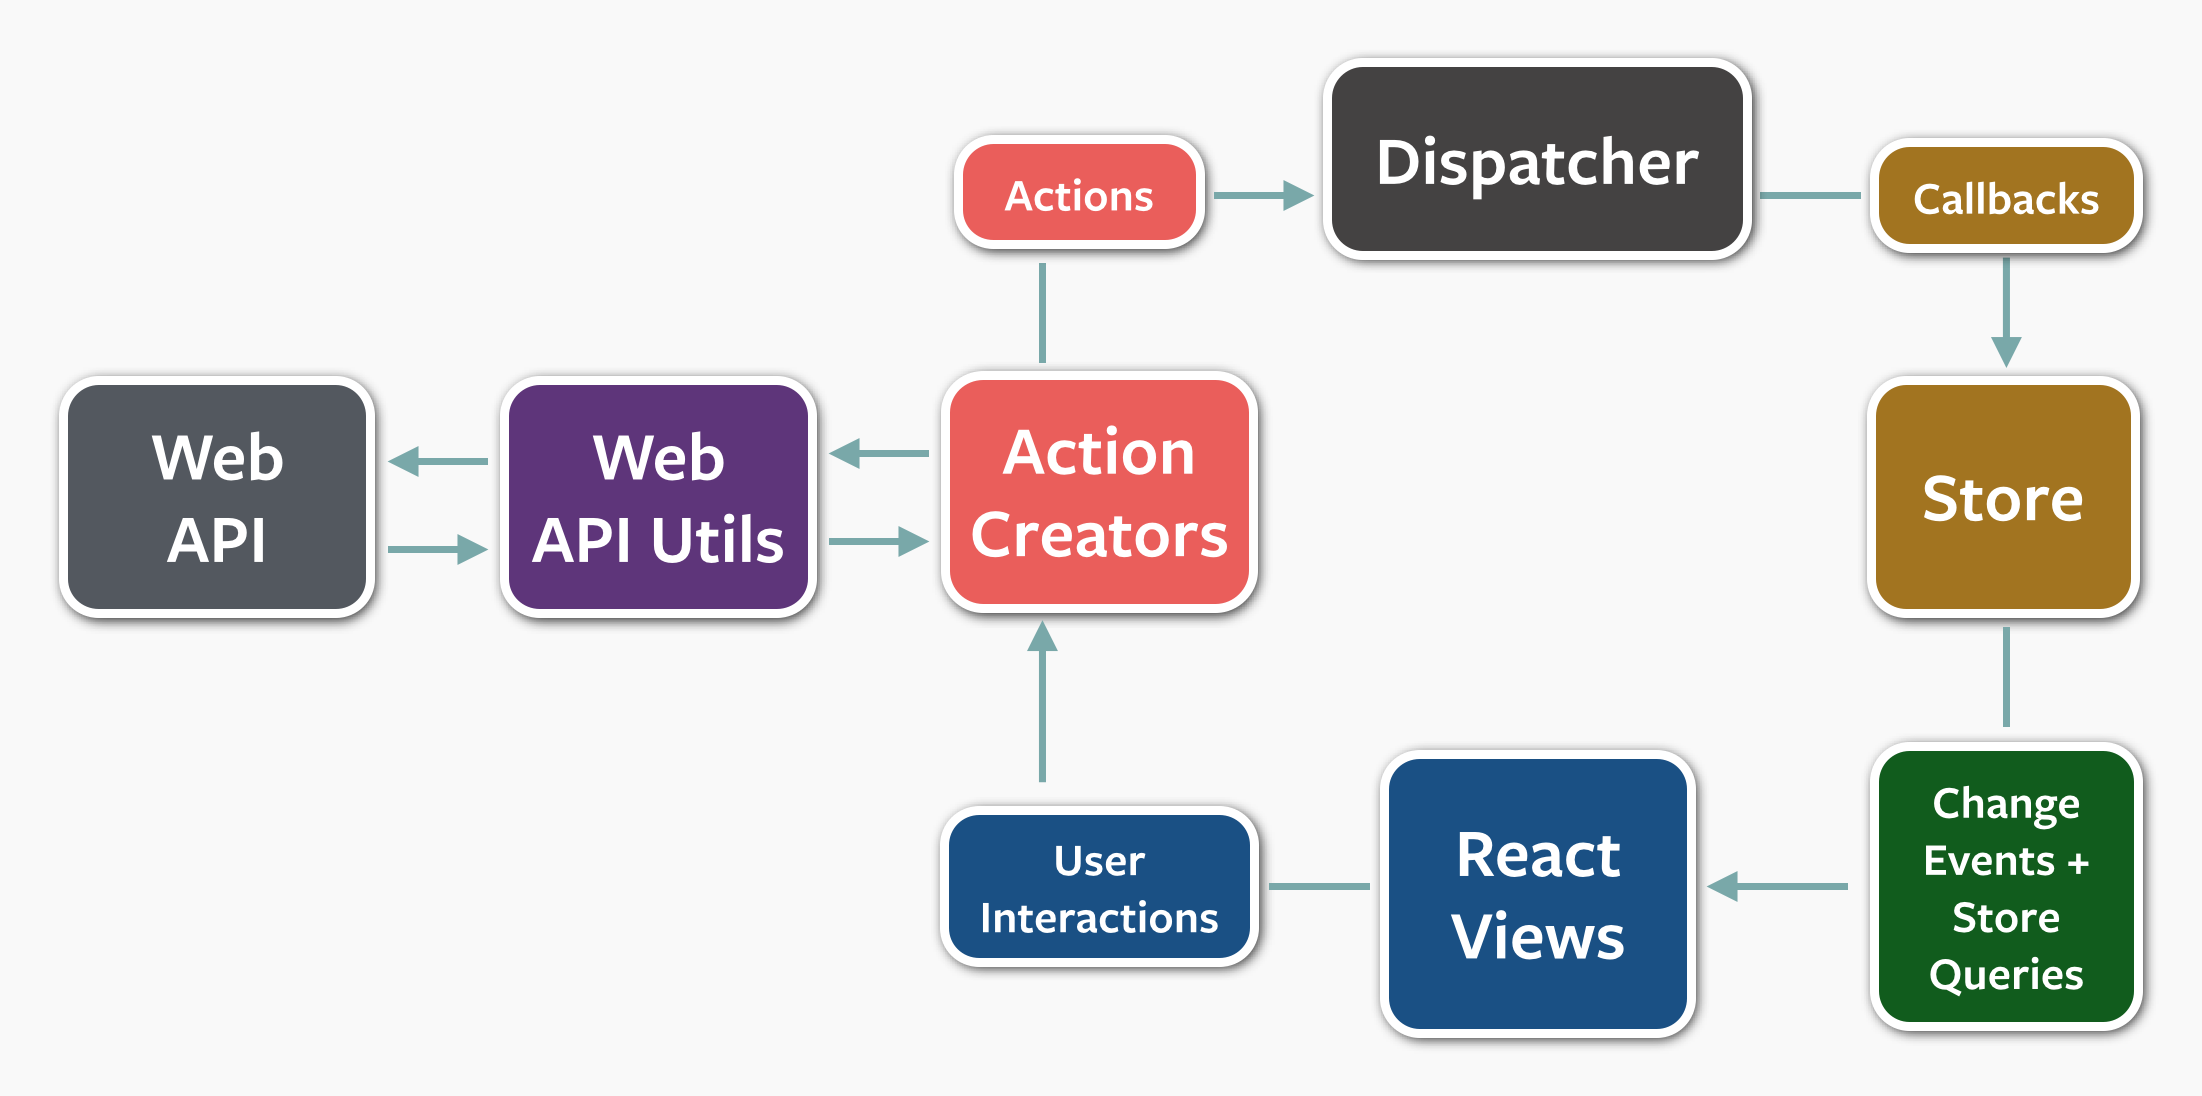
Flux 的實作之一
有一個共同的 Store 儲存資料
透過 Middleware 來控制工作流
發起 Action 來通過工作流之後
透過 Reducer 來修改 Store 內的資料
再藉由 Store 的資料來顯示 Screen
搭配的 Package 有很多種不同的配合與實現
主要都是在處理 Async Actions
兩個骨架範例
基本上每一個 Async Action 都是單一的 Promise
但是不代表只能夠有一個 Promise
也可以多個 Promise 但是需要使用 Promise.all 做群組
有清楚的成功與失敗
所以建立一個非同步的 Action 應該會有三個 action types
不要跳脫一個完整的週期
在一個 Action 內 在發送另外一個 非同步 Action
$ yarn add redux
import {createStore} from 'redux';
import React, {useState, useEffect} from 'react';
import {Navigation} from 'react-native-navigation';
import { View, Text, Button, StyleSheet, Icon } from 'react-native';

const counter = (state = 0, action) => {
  switch (action.type) {
    case 'INCREMENT':
      return state + 1;
    case 'DECREMENT':
      return state - 1;
    default:
      return state;
  }
};


const store = createStore(counter);

const LoginScreen = () => {
  const [value, setValue] = useState(null);
  useEffect(() => {
    setTimeout(() => {
      store.dispatch({ type: 'INCREMENT' })
      // 1
      store.dispatch({ type: 'INCREMENT' })
      // 2
      store.dispatch({ type: 'DECREMENT' })
      // 1
    }, 2000)
    const unsubscribe = store.subscribe(() => {
      const v = store.getState();
      console.log('LoginScreen -> v', v)
      setValue(v);
    })
    return () => unsubscribe();
  }, [])
  return (
    <View style={styles.root}>
      <Text>{String(value)}</Text>
      <Button
        title='Login'
        color='#710ce3'
        onPress={() => Navigation.setRoot(mainRoot)}
        />
    </View>
  );
};
counter 是 Reducer
Reducer 都是一個函式
會修改 Store 裡面的某一個部分的值
再把修改結果回傳
但是這樣最基本的 Redux 只能同步的修改 Store 的資料
{ type: 'INCREMENT' } 是 Action Object
但是上述的流程只能處理同步的 Action
非同步的需要多做一點點事情
這時候需要 Middleware 的幫助
Middleware 概念就是一個一個的生產線
每一個 Function 都是處理某些細節
再利用這個 Middleware 排定順序
const compose = (...fns) => (...payload) => {
  if(fns.length === 0) return payload;
  if(fns.length === 1) return fns[0](...payload);
   return funcs.reduce((a, b) => (...payload) => a(b(...payload)))
}
compose 與 pipe 是 Middleware 的其中兩種應用
目前 dispatch 只能做同步 Action
但是並不符合我們的需求
export default (...middlewares) => (reducer, initialState) => {
  const store = createStore(reducer, initialState);
  const next = store.dispatch;

  const middlePayload = {
    getState: store.getState,
    dispatch: (action, ...args) => dispatch(action, ...args)
  };

  const chain = middlewares.map(middleware => middleware(middlewareAPI));
  const dispatch = compose(...chain)(store.dispatch);
  return {
    ...store,
    dispatch
  }
};
可以一步一步慢慢了解 Redux 如何形成 Middleware 的過程
最後可以看到這個範例
接下來了解如何實做 Redux 中的 Middleware 之後
再來看看加入 Thunk , Saga 概念的 Data flow