有些時候我們需要傳參數到路由中,以動態的方式匹配對的資料及畫面:userId表示為一個自定義的參數,我們可以透過 this.$route.params.userId 來取得參數的值。
{
  path: 'user/:userId',
  name: 'User',
  component: () => import('@/views/User.vue')
}
今天如果我們希望參數是可以非必填的,就可以使用?來代表optional params
{
  path: '/offers/:member?',
  ...
}
vue-router 分為兩種模式:hash(預設)、historyhash mode
ex:http://website.com/#user/id
Vue Router 的默認模式,使用 URL 的 hash 來模擬一個完整的URL,hash 雖然出現在 URL 中,但不會被包含在 HTTP 請求中,對後端完全沒有影響,於是當URL 改變時頁面不會重新加載。
history mode
ex:http://website.com/user/id
history模式少掉了#比較像完整的URL網址,是不是也比較簡單好看,而且這模式利用history.pushState 來完成URL跳轉而無須重新載入頁面,唯一要特別注意到當您的URL匹配不到任何靜態資源時,需配置重新導向到同一個頁面,如index.html。後端配置例子可以看這邊
const router = new VueRouter({
  mode: 'history',
  routes,
  ...
})
我們來回顧這張圖,巢狀路由是指路由有多階層,所以我們用多層的路由視圖 router-view,且配置好子路由childern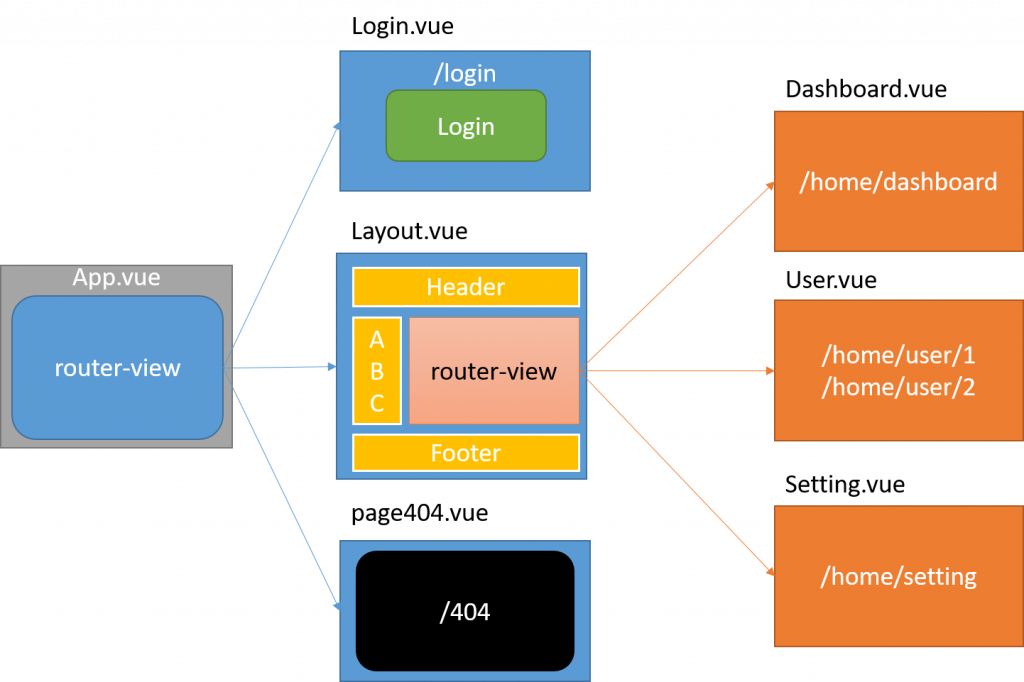
如圖,我們在app.vue有配置 router-view,然後在Layout.vue再配置一個 router-view 及其子路由Dashboard.vue、User.vue、Setting.vue
{
    path: '/home',
    component: Layout,
    meta: { requireAuth: true },
    childern: [
      {
        path: 'dashboard',
        name: 'Dashboard',
        component: () => import('@/views/Dashboard.vue')
      },
      {
        path: 'user/:userId',
        name: 'User',
        component: () => import('@/views/User.vue')
      },
      {
        path: 'setting',
        name: 'Setting',
        component: () => import('@/views/Setting.vue')
      }
    ]
  }
需注意到,以/開頭的巢狀路由會被當作根目錄符號來運用,children 底下的 path 不加/讓其自動匹配父層路由。
// 不需要再配置路徑'/dashboard','dashboard'即可
childern: [
      {
        path: '/dashboard', // X
        name: 'Dashboard',
        component: () => import('@/views/Dashboard.vue')
      }
    ]
redirect:
在昨天,我有教大家捕獲所有路由或匹配不到時,則重定向到 404page,今天在加碼教大家一個使用命名(name)來重定向
const router = new VueRouter({
  routes: [
    { path: '/bar', redirect: { name: 'foo' }}
  ]
})
alias:
重定向的意思是,當用戶訪問/a時,URL將會被替換成/b,然後匹配路由為/b。
c 的別名是 d,意味著,當用戶訪問/d時,URL會保持為/d,但是路由匹配則為/c,就像用戶訪問/c一樣,路徑不變,代表一個路由有多個匹配路徑的別名。
const router = new VueRouter({
  routes: [
    { path: '/a', redirect: '/b' },
    { path: '/c', component: C, alias: '/d' }
  ]
})
vue-router提供的路由守衛主要用來通過跳轉或取消的方式守衛導航。有多種方式植入路由導航過程中:全局守衛,獨享守衛,元件內守衛。
首先我們來做個簡易的驗證,還記得我們的元訊息meta: { requireAuth: true }有設定驗證,這樣該路由(包含子路由)在路由改變時就會需要檢查。
router.beforeEach((to, from, next) => {
  if (to.matched.some(record => record.meta.requiresAuth)) {
    const token = VueCookies.get('token')
    const isLogin = this.checkLogin(token) // 這裡寫驗證機制(自己客製化)
    if (isLogin) {
      next() // 往下執行
    } else {
      //如果使用者token無效則跳轉到login頁面
      if (to.path !== '/login') {
        next('/login')
      } else {
        next() // 往下執行
      }
    }
  } else {
    next() // 往下執行
  }
})
剛剛我們用的beforeEach即是全局前置守衛,其中三個參數to、 from、 next:
1.to:即將要進入的目標路由物件。
2.from:當前導航即將要離開的路由物件。
3.next:呼叫該方法後,才能進入下一個鉤子函式:
必須注意,確保所有的邏輯狀態都要調用 next()一次,否則鉤子就不會被解析(resolved)。
後置守衛和前置守衛不同的是afterEach不接收第三個參數 next(),也意味著不會改變導航本身。
router.afterEach((to, from)=>{
    console.log(to)
    console.log(from)
})
你可以在路由配置上直接定義beforeEnter守衛,這些守衛與全局前置守衛的方法參數一樣。
const router = new VueRouter({
  routes: [
    {
      path: '/admin',
      component: Admin,
      beforeEnter: (to, from, next) => {
        // ...
      }
    }
  ]
})
我們可以在component裡面直接定義導航守衛,元件的導航守衛有三種:
beforeRouteEnter:beforeRouteEnter (to, from, next) {
next(vm => {
console.log(vm)
})
}
beforeRouteUpdate:beforeRouteLeave:beforeRouteLeave來暫止用戶在還未保存修改前突然離開。beforeRouteLeave (to, from, next) {
const answer = window.confirm('您是否離開此頁?您尚有改變未儲存!')
if (answer) {
next()
} else {
next(false)
}
}
完整路由程式碼:
import Vue from 'vue'
import VueRouter from 'vue-router'
import VueCookies from 'vue-cookies'
import Login from '@/views/Login'
import Layout from '@/views/Layout'

Vue.use(VueRouter)

const routes = [
  {
    path: '/login',
    name: 'Login',
    component: Login
  },
  {
    path: '/',
    name: 'redirect',
    redirect: '/home/dashboard'
  },
  {
    path: '/home',
    component: Layout,
    meta: { requireAuth: true },
    childern: [
      {
        path: 'dashboard',
        name: 'Dashboard',
        component: () => import('@/views/Dashboard.vue')
      },
      {
        path: 'user/:userId',
        name: 'User',
        component: () => import('@/views/User.vue')
      },
      {
        path: 'setting',
        name: 'Setting',
        component: () => import('@/views/Setting.vue')
      }
    ]
  },
  {
    path: '/404',
    name: '404',
    component: () => import('@/components/Page404'),
    hidden: true
  },
  {
    path: '*',
    redirect: '/404',
    hidden: true
  }
]

const router = new VueRouter({
  mode: 'history',
  base: process.env.BASE_URL,
  routes
})

router.beforeEach((to, from, next) => {
  if (to.matched.some(record => record.meta.requiresAuth)) {
    const token = VueCookies.get('token')
    const isLogin = this.checkLogin(token) // 這裡寫驗證機制(自己客製化)
    if (isLogin) {
      next() // 往下執行
    } else {
      //如果使用者token無效則跳轉到login頁面
      if (to.path !== '/login') {
        next('/login')
      } else {
        next() // 往下執行
      }
    }
  } else {
    next() // 往下執行
  }
})

export default router
參考文件:Vue Router
有任何問題歡迎下方留言,如果喜歡我的文章別忘了按讚、訂閱追蹤加分享唷!!
---我是分隔線-----------------------------------------------------------
PollyPO技術-前端設計轉前端工程師-JS踩坑雜記 30 天
喬依司-實作經典 JavaScript 30
五百億-Vue CLI + Firebase 雲端資料庫 30天打造簡易部落格及後臺管理
eien_zheng-前端小嘍嘍的Golang學習旅程_The journey of learning Golang

