本篇同步發文在個人Blog: 一袋.NET要扛幾樓?打造容器化的ASP.NET Core網站!系列文章 - (10) 建立商品列表的頁面 - 3
在WebMvc專案新增ViewModels資料夾,這些模型專門在頁面作呈現
CatalogIndexViewModel帶著商品類型列表、商品列表,還有一個分頁模型
using Microsoft.AspNetCore.Mvc.Rendering;
using System.Collections.Generic;
using WebMvc.Models;

namespace WebMvc.ViewModels
{
    public class CatalogIndexViewModel
    {
        public IEnumerable<CatalogItem> CatalogItems { get; set; }
        public IEnumerable<SelectListItem> Types { get; set; }
        public int? TypesFilterApplied { get; set; }
        public PaginationInfo PaginationInfo { get; set; }
    }
}
PaginationInfo帶著列表的分頁資訊,包含總數量、每頁的數量、第N頁、總頁數、前一頁/下一頁按鈕的CSS
namespace WebMvc.ViewModels
{
    public class PaginationInfo
    {
        public int TotalItems { get; set; }
        public int ItemsPerPage { get; set; }
        public int ActualPage { get; set; }
        public int TotalPages { get; set; }
        public string Previous { get; set; }
        public string Next { get; set; }
    }
}
在appSettings.json新增CatalogUrl, 因為目前還在VS開發,所以是用launchSettings.json的IIS Express設定檔:
"CatalogUrl": "http://localhost:13914"
網頁風格採用NES.css,於是Layout是主要的外觀修改,另外也搭配bootstrap 3做排版
<!DOCTYPE html>
<html lang="en">
<head>
    <meta charset="utf-8" />
    <meta name="viewport" content="width=device-width, initial-scale=1.0" />
    <title>@ViewData["Title"] - WebMvc</title>
    <link rel="stylesheet" href="~/css/site.css" />
    <link rel="stylesheet" href="https://maxcdn.bootstrapcdn.com/bootstrap/3.3.7/css/bootstrap.min.css" />
    <link href="https://stackpath.bootstrapcdn.com/font-awesome/4.7.0/css/font-awesome.min.css" rel="stylesheet" />
    <link href="https://fonts.googleapis.com/css?family=Press+Start+2P"
          rel="stylesheet" />
    <link href="https://unpkg.com/nes.css@2.3.0/css/nes.min.css"
          rel="stylesheet" />
</head>
<body>
    <nav class="navbar navbar-default" role="navigation">
        <div class="container-fluid">
            <!-- Brand and toggle get grouped for better mobile display -->
            <div class="navbar-header">
                <button type="button"
                        class="navbar-toggle"
                        data-toggle="collapse"
                        data-target="#bs-example-navbar-collapse-1">
                    <span class="sr-only">Toggle navigation</span>
                    <span class="icon-bar"></span>
                    <span class="icon-bar"></span>
                    <span class="icon-bar"></span>
                </button>
                <a class="navbar-brand" href="#"><strong>RPG</strong> Shop</a>
            </div>

            <!-- Collect the nav links, forms, and other content for toggling -->
            <div class="collapse navbar-collapse" id="bs-example-navbar-collapse-1">
                <ul class="nav navbar-nav navbar-right">
                    <li><a href="#">Login</a></li>
                    <li><a href="#">Signup</a></li>
                </ul>
            </div>
            <!-- /.navbar-collapse -->
        </div>
        <!-- /.container-fluid -->
    </nav>
    <div class="container">
        <main role="main" class="pb-3">
            @RenderBody()
        </main>
    </div>


    <script src="~/lib/jquery/dist/jquery.min.js"></script>
    @RenderSection("Scripts", required: false)
</body>
</html>
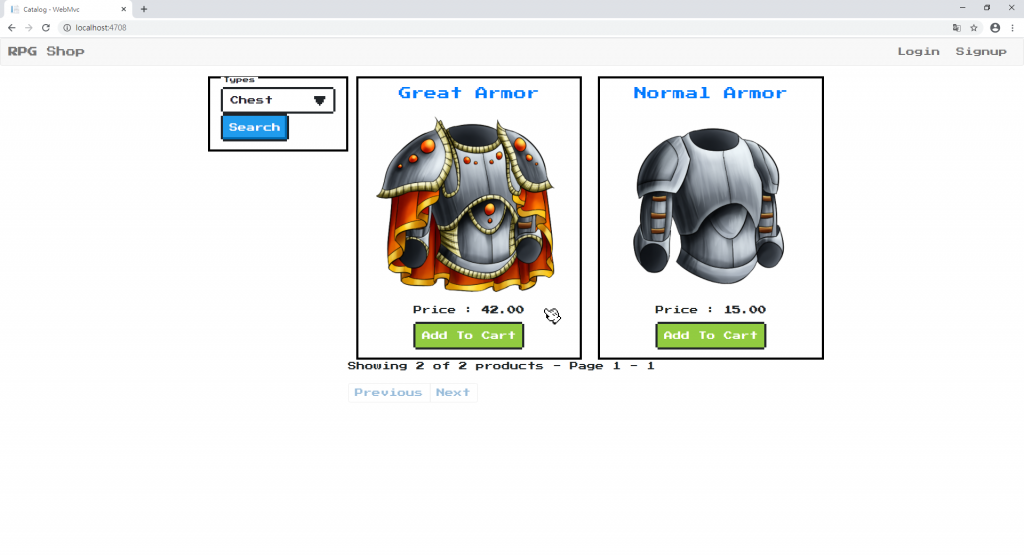
此頁面是商品的首頁
@{
    ViewData["Title"] = "Catalog";
    @model WebMvc.ViewModels.CatalogIndexViewModel
}

<form asp-action="Index" asp-controller="Catalog" method="post">
    <div class="row">
        <div class="col-md-3">
            <section class="nes-container with-title">
                <h3 class="title">Types</h3>
                <div id="lists" class="item">
                    <div class="nes-select">
                        <select asp-for="@Model.TypesFilterApplied" asp-items="@Model.Types"></select>
                    </div>
                    <button type="submit" class="nes-btn is-primary">Search</button>
                </div>
            </section>
        </div>
        <!-- /.col -->
        <div class="col-md-9">
            <div class="row">
                @if (Model.CatalogItems.Count() > 0)
                {
                    <div class="row">
                        @foreach (var catalogItem in Model.CatalogItems)
                        {
                            <partial name="_product" model="catalogItem" />
                        }
                    </div>
                    <partial name="_pagination" model="Model.PaginationInfo" />
                }
                else
                {
                    <div class="row">
                        No any product.
                    </div>
                }
            </div>
            <!-- /.row -->
        </div>
        <!-- /.col -->
    </div>
    <!-- /.row -->
</form>
每個商品的詳細內容是同樣的排版,所以用Partial的方式呈現
@model WebMvc.Models.CatalogItem
<form asp-controller="Cart" asp-action="AddToCart">
    <div class="col-md-6 text-center col-sm-6 col-xs-6">
        <section class="nes-container with-title">
            <h3><a href="#">@Model.Name</a></h3>
            <img src="@Model.PictureUrl" style="width: 100%" alt="" />
            <div class="caption"></div>
            <p>Price : <strong>@Model.Price.ToString("N2")</strong></p>
            <p>
                <input type="submit" href="#" class="nes-btn is-success" value="Add To Cart" />
            </p>
        </section>
    </div>
    <input type="hidden" asp-for="@Model.Description" name="description" />
    <input type="hidden" asp-for="@Model.Id" name="id" />
    <input type="hidden" asp-for="@Model.Name" name="name" />
    <input type="hidden" asp-for="@Model.PictureUrl" name="pictureUrl" />
    <input type="hidden" asp-for="@Model.Price" name="price" />
</form>
分頁的功能另外寫成一個Partial頁面
@model WebMvc.ViewModels.PaginationInfo

<div class="row">
    <span>
        Showing @Model.ItemsPerPage of @Model.TotalItems products - Page @(Model.ActualPage + 1) - @Model.TotalPages
    </span>
</div>
<div class="row">
    <ul class="pagination alg-right-pad">
        <li>
            <a class="@Model.Previous"
               id="Previous"
               asp-controller="Catalog"
               asp-action="Index"
               asp-route-page="@(Model.ActualPage - 1)"
               asp-route-typesFilterApplied="@(ViewBag.TypesFilterApplied)"
               aria-label="Previous">
                Previous
            </a>
        </li>
        <li>
            <a class="@Model.Next"
               id="Next"
               asp-controller="Catalog"
               asp-action="Index"
               asp-route-page="@(Model.ActualPage + 1)"
               asp-route-typesFilterApplied="@(ViewBag.TypesFilterApplied)"
               aria-label="Next">
                Next
            </a>
        </li>
    </ul>
</div>
在Contollers新增CatalogController,商品的資料都是從Controller為起點,並透過Service取資料,再由ViewModel組成回傳cshtml的CatalogIndexViewModel模型。
using Microsoft.AspNetCore.Mvc;
using System;
using System.Threading.Tasks;
using WebMvc.Services;
using WebMvc.ViewModels;

namespace WebMvc.Controllers
{
    public class CatalogController : Controller
    {
        private const int itemsPage = 6;

        private ICatalogService _catalogService;
        public CatalogController(ICatalogService catalogService)
        {
            _catalogService = catalogService;
        }

        public async Task<IActionResult> Index(int? typesFilterApplied, int? page)
        {
            var catalog = await _catalogService.GetCatalogItems(page ?? 0, itemsPage, typesFilterApplied);
            var vm = new CatalogIndexViewModel()
            {
                CatalogItems = catalog.Data,
                Types = await _catalogService.GetTypes(),
                TypesFilterApplied = typesFilterApplied ?? 0,
                PaginationInfo = new PaginationInfo()
                {
                    ActualPage = page ?? 0,
                    ItemsPerPage = Math.Min(catalog.Data.Count, itemsPage),
                    TotalItems = catalog.Count,
                    TotalPages = (int)Math.Ceiling((decimal)catalog.Count / itemsPage)
                }
            };

            vm.PaginationInfo.Next = (vm.PaginationInfo.ActualPage == vm.PaginationInfo.TotalPages - 1) ? "is-disabled" : "";
            vm.PaginationInfo.Previous = (vm.PaginationInfo.ActualPage == 0) ? "is-disabled" : "";
            ViewBag.TypesFilterApplied = typesFilterApplied;

            return View(vm);
        }
    }
}
增加一條css,用在讓按鈕變成disable
.is-disabled {
    opacity: .5;
    pointer-events: none;
}
最終商品列表的頁面