今天我們來處理資料的驗證,
使用者傳過來的資料,
我們必須要經過驗證,
確保資料是沒有問題的,
我們將原來的/resources/views/user/sign-up.blade.php改成下面這樣
<!-- 指定繼承 layout.master 母模板 -->
@extends('layout.master')

<!-- 傳送資料到母模板,並指定變數為title -->
@section('title', $title)

<!-- 傳送資料到母模板,並指定變數為content -->
@section('content')
<form id="form1" method="post" action="">
<!-- 自動產生 csrf_token 隱藏欄位-->
{!! csrf_field() !!}
<div class="login_form">
    <div class="login_title">註冊</div>
    <div class="login_label">暱稱</div>
    <div class="login_textbox">
        <input name="name" class="form_textbox" type="text" placeholder="請輸入暱稱"/>
    </div>
    <div class="login_label">帳號(必須為E-mail)</div>
    <div class="login_textbox">
        <input name="account" class="form_textbox" type="text" placeholder="請輸入帳號"/>
    </div>
    <div class="login_label">密碼</div>
    <div class="login_textbox">
        <input name="password" class="form_textbox" type="password" placeholder="請輸入密碼"/>
    </div>
    <div class="login_label">密碼確認</div>
    <div class="login_textbox">
        <input name="password_confirm" class="form_textbox" type="password" placeholder="請確認密碼"/>
    </div>
    <div class="btn_group">
        <button type="submit" class="btn btn-primary btn_login">註冊</button>
    </div>
</div>
</form>
@endsection
我們需要做以下驗證:
根據這些條件我們寫了以下規則
//驗證規則
$rules = [
    //暱稱
    'name' => [
        'required',
        'max:50',
    ],
    //帳號(E-mail)
    'account' => [
        'required',
        'max:50',
        'email',
    ],
    //密碼
    'password' => [
        'required',
        'min:5',
    ],
    //密碼驗證
    'password_confirm' => [
        'required',
        'same:password',
        'min:5'
    ],
];
驗證規則大約有以下這些,
這些只是我整理的有用到的內容,
也許還有一些很少用到的沒整理到
| 規則 | 驗證資料說明 |
|---|---|
| required | 必填 |
| emal | E-mail格式 |
| in:A,B | 資料限制範圍為A & B |
| integer | 整數 |
| alpha | 英文字母 a-z |
| alpha_num | 英文字母 a-z 及數字 0-9 |
| min:value | 最小值,當為integer整數欄位則表示為數值最小值,當為字串則為字串長度最小值 |
| max:value | 最大值,當為integer整數欄位則表示為數值最大值,當為字串則為字串長度最大值 |
| array | 陣列資料 |
| numeric | 數值資料 |
| string | 字串資料 |
| before:date | 在指定日期之前 |
| after:date | 在指定日期之後 |
| between:min, max | 在指定日期之間 |
| date | 是否為正確的日期格式 |
| date_format:format | 指定日期格式 |
| ip | IP位址 |
| url | 網址 |
我們將signUpProcess函式修改如下
//處理註冊資料
public function signUpProcess()
{
    //接收輸入資料
    $input = request()->all();

    //驗證規則
    $rules = [
        //暱稱
        'name' => [
            'required',
            'max:50',
        ],
        //帳號(E-mail)
        'account' => [
            'required',
            'max:50',
            'email',
        ],
        //密碼
        'password' => [
            'required',
            'min:5',
        ],
        //密碼驗證
        'password_confirm' => [
            'required',
            'same:password',
            'min:5'
        ],
    ];

    //驗證資料
    $validator = Validator::make($input, $rules);

    if($validator->fails())
    {
        //資料驗證錯誤
        return redirect('/user/auth/sign-up')->withErrors($validator);
    }

    exit;
}
必須要引用Validator
use Validator;
在這裡我們要用一個模板來顯示錯誤訊息,
不用每一頁都要重寫,
新建 resources/views/layout/ValidatorError.blade.php 檔案如下
@if($errors AND count($errors))
    <ul style='color:red;'>
        @foreach($errors->all() as $err)
            <li> {{ $err }} </li>
        @endforeach
    </ul>
@endif
然後在 resources/views/user/sign-up.blade.php 加上錯誤訊息模板元件
<!-- 錯誤訊息模板元件 -->
@include('layout.ValidatorError')
完整內容如下
<!-- 指定繼承 layout.master 母模板 -->
@extends('layout.master')

<!-- 傳送資料到母模板,並指定變數為title -->
@section('title', $title)

<!-- 傳送資料到母模板,並指定變數為content -->
@section('content')
<form id="form1" method="post" action="">
<!-- 自動產生 csrf_token 隱藏欄位-->
{!! csrf_field() !!}
<div class="login_form">
    <div class="login_title">註冊</div>
    <div class="login_label">暱稱</div>
    <div class="login_textbox">
        <input name="name" class="form_textbox" type="text" placeholder="請輸入暱稱"/>
    </div>
    <div class="login_label">帳號(必須為E-mail)</div>
    <div class="login_textbox">
        <input name="account" class="form_textbox" type="text" placeholder="請輸入帳號"/>
    </div>
    <div class="login_label">密碼</div>
    <div class="login_textbox">
        <input name="password" class="form_textbox" type="password" placeholder="請輸入密碼"/>
    </div>
    <div class="login_label">密碼確認</div>
    <div class="login_textbox">
        <input name="password_confirm" class="form_textbox" type="password" placeholder="請確認密碼"/>
    </div>
    <div class="login_error">
        <!-- 錯誤訊息模板元件 -->
        @include('layout.ValidatorError')
    </div>
    <div class="btn_group">
        <button type="submit" class="btn btn-primary btn_login">註冊</button>
    </div>
</div>
</form>
@endsection
附上scss檔案
$mainTitleHeight: 56px;
$loginFormWidth: 360px;

$mainColor: #0097A7;
$textColor: #FFF;
//背景顏色
$BackWhiteColor: #FFFFFF;
$BackWhiteColor2: #FAFAFA;
$lightgrayColor: #A7A7A7;

$mainFont: 24px;
$mainFont2: 16px;
$toolBarFont: 16px;
$loginTitleFont: 32px;
$formMainFont: 20px;
$formTextBoxTextFont: 16px;
$formTextBoxBorderFont: 40px;

$mainLeftMargin: 24px;


//上面Bar的樣式
.toolbar_section{
    height: $mainTitleHeight;
    background: $mainColor;

    .toolbar_title{
        line-height: $mainTitleHeight;
        font-size: $mainFont;
        margin-left: $mainLeftMargin;
        color: $textColor;
    }

    .toolbar_title2{
        line-height: $mainTitleHeight;
        font-size: $mainFont2;
        margin-left: $mainLeftMargin;
        color: $textColor;
    }

    .toolbar_right{
        float: right;
        height: $mainTitleHeight;
        margin-right: 24px;
        font-size: $toolBarFont;
    }

    .toolbar_text{
        margin-left: 12px;
        color: $textColor;
        line-height: $mainTitleHeight;
    }
}

//註冊登入表單
.login_form{
    width: $loginFormWidth;
    margin: auto;

    .login_title{
        margin-top: 15px;
        margin-bottom: 30px;
        font-size: $loginTitleFont;
        font-weight: 600;
        text-align: center;
    }

    .login_label{
        font-size: $formMainFont;
        font-weight: 600;
        margin-bottom: 12px;
    }

    .login_textbox{
        font-size: $formTextBoxTextFont;
        line-height: $formTextBoxBorderFont;
        margin-bottom: 20px;
        .form_textbox{
            padding-left: 12px;
            width: 100%;
        }
    }

    .login_error {
        font-size: $formTextBoxTextFont;
    }

    .btn_group{
        text-align: right;
        .btn_login{
            font-size: $formMainFont;
            height: 40px;
            width: 120px;
            color: $textColor;
            box-shadow: none;
            border-radius: 3px;
            border-width: 0;
            background: $mainColor;
        }
    }
}


.background_white {
    min-height: calc(100vh - #{$mainTitleHeight});
    background: $BackWhiteColor;
}

.background_white2 {
    min-height: calc(100vh - #{$mainTitleHeight});
    background: $BackWhiteColor2;
}


/****************改變Bootstrap樣式****************/


.container {
    width: 100vw;
    padding: 0;
    background: $BackWhiteColor2;
}

//排版
.form.col-sm-1 {
    padding: 0;
}

//選單
.nav-pills>li{

    &>a{
        border-radius: 0;
        color: $lightgrayColor;
        font-size: $formTextBoxTextFont;

        &:hover{
            background: #E9E9E9;
        }
    }

    &.active{
        border-right: solid 4px $mainColor;

        &>a, {
            color: $mainColor;
            background: transparent;

            &:hover{
                color: $mainColor;
                background: #E9E9E9;
            }
        }
    }
}
當我們輸入錯誤或沒有輸入的時候,
就會提示我們哪些欄位有錯誤.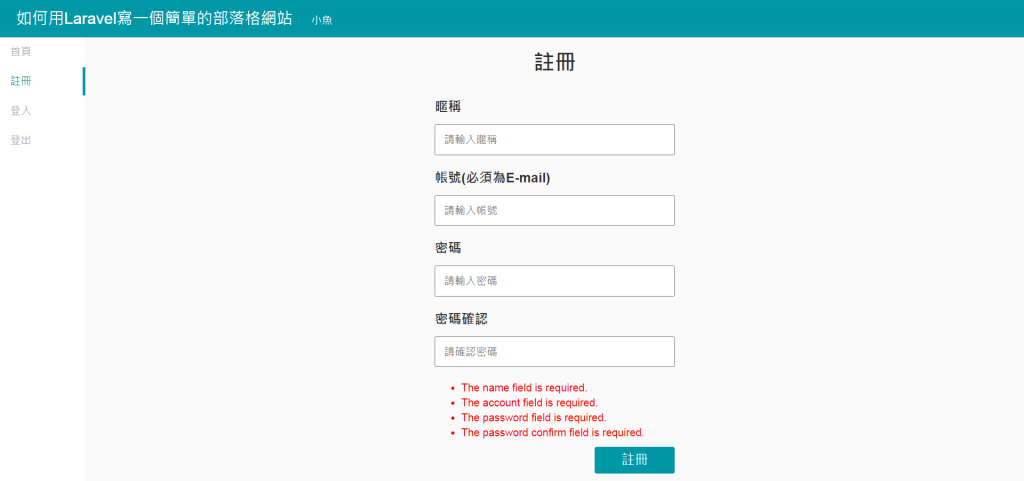


 iThome鐵人賽